Setting Yourself Up for Success
Dear Bubbles:
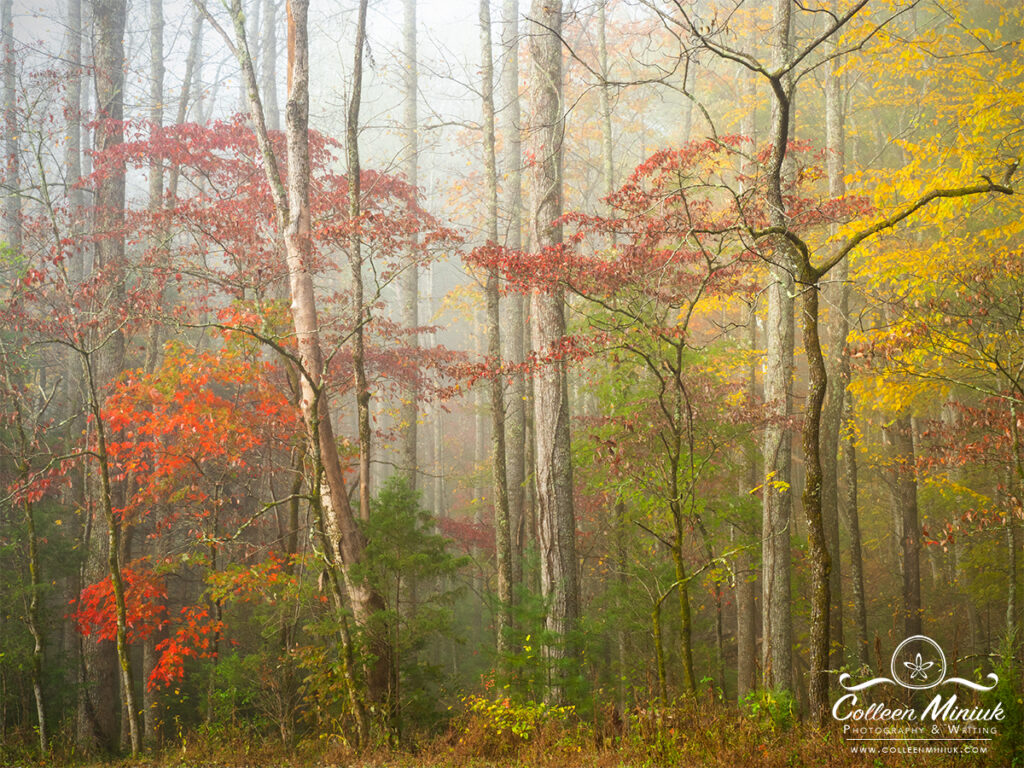
That looks like an oil painting!! Are you free to divulge the camera settings you employed, please?
~Tom
Dear Tom:
You bet! I made the image with my Olympus OMD EM1 Mark II camera, 14-150mm lens set at 31mm, ISO 200, f/13, 1/5th second, and with a polarizer.
But wait! There’s more!
I could stop there, but I’ve never been known to say so little about anything in my life…
The settings question is one I often get. It’s one I used to ask of other photographers when I started learning more about how a camera records an exposure. With so many numbers and choices, how does someone pick the “right” shutter speed, aperture, and ISO combination? I thought by knowing “the” formula used by other photographers, I could mimic their beautiful results. I thought wrong…
I’ll be honest, a little piece of my soul dies now when someone asks me “What were your settings?” and then walks away from the conversation after I babble off a bunch of drivel. It’s not because it’s the wrong question. It’s just an incomplete one.
When I share my images publicly, I do not provide technical information. It’s an intentional choice. I’m not trying to be difficult. I’m not trying to be secretive. It’s just not the full story. Knowing my settings for my photograph without any explanation of WHY those choices were made is meaningless at best, misleading at worst.
(At the risk of being called a hypocrite, yes, I listed camera settings for all photos in my guidebooks without providing additional background. That too was a conscious decision to preempt the barrage of questions I’d inevitably receive in email once the books were published had I not. And my editor tells me I only have so much room in a book caption to explain things…)
The last thing I want to do is mislead anyone into believing my settings are the right answer for them and their situations. They were the right answer for me at the time, but effectively choosing these settings requires more than simply matching my numbers to yours on your camera. Making a decision involves a complex mix of variables including, but not limited to, how your camera sees light (all brands and models meter slightly differently), the quantity and quality of natural light, the weather conditions, what you wish to depict in terms of motion and depth of field, and what you wish express through the photograph. The likelihood of you–or even me–experiencing the exact same set of variables to require the exact same settings is about as slim as scientists finding the edge of the Universe. Besides, there is more than one right answer…
Understanding how these variables impact your setting choices and how changing ISO, shutter speed, and aperture affects your image are more worthy pursuits. You can’t get that information from numbers alone. You can, though, if you also ask “Why?” As Miyamoto Musashi, a famous Japanese swordsman, said, “A man cannot understand the art he is studying if he only looks at the end result without taking the time to delve deeply into the reasoning of the study.”
So why did I choose those settings for the photo above? I’m so glad you asked!
For ISO, I “set it and forget it” at 200 as a general practice (my camera’s native ISO setting) and don’t even think about changing it unless I can’t get the aperture/shutter speed combo I want. Or I have wind, low light, or other conditions that dictate something faster (or slower). I try to keep my ISO as slow as possible given the conditions to avoid the noise seen at faster ISO speeds, but I’m more interested in delivering my message even if it means introducing a little noise into the frame. In this sense, every single ISO setting could have been a right answer.
There was no wind, so I wasn’t concerned with depicting (or avoiding) motion. As such, I couldn’t have cared less about my shutter speed. I started instead by deliberately choosing the aperture to gain enough depth of field such that my entire frame from foreground to background appeared to be in sharp focus in the resulting image.
To help me do this, I used an app called “DOF Calc” on my iPhone. I typed in my camera, my focal length of my lens (31mm), and an arbitrary f-stop of f/8. The app spit out the hyperfocal distance at 27.33 feet. If I focused at 27.33 feet, everything from about half that number–13.67 feet–to infinity would appear to be in sharp focus in my photograph. You might be a better judge than I, but I have absolutely no idea what 27.33 feet looks like. I knew the front of the trees were approximately 15-16 feet from me. Maybe farther? Maybe closer?? No idea…
If my distance estimates were off and I used f/8, I could easily muck up the sharpness. So I checked the hyperfocal distance for f/13 in the app–a swag based on experience. The hyperfocal was 19.88 feet. Close enough for me. F/13 it is! (If I set the aperture to f/13 and focused at 19.88 feet, or let’s say about 20 feet away from my camera, everything from half that, or 10-ish feet, to infinity would be in focus–giving me plenty of range in the foreground to work with in case my measurements were off.)
To be fair, F/16 through f/22 could have also yielded enough depth of field, but I try to stay as close to f/8 as possible since it’s the setting that provides maximum sharpness (usually two stops smaller than your widest aperture due to physics and how the camera manufacturers build lenses) and to avoid diffraction, or softness, at smaller apertures.
At ISO 200 set to f/13, my meter then spit out 1/5th second for shutter speed for the low light and fog. Had wind been a factor, I would have increased my ISO to 400, maybe 800, to speed up the shutter speed and keep the leaves still in my frame. Without any wind, though, had my meter spit out 10 seconds or 1/2000th of a sec, so long as my histogram looked correct (exposed to the right without blowing out my highlights for RAW captures), all would have been correct answers for my circumstances.
I added a Singh-Ray polarizer to remove the reflected glare off the leaves. I was standing at about a 90-degree angle to the sun (which is the angle at which the filter is most effective), so the polarizer enhanced the apparent color saturation in the leaves. It turned dulled colors into richer ones in the final image.
The oil painting effect? That was all Mother Nature and the glorious pastel light she delivered in this scene. I did not do any special effects in Photoshop processing, only some slight adjusting for my histogram (specifically setting the black point), darkening the ground to increase its visual weight, and adding a subtle vignette to darken the edges of the frame, which serves to hold the viewers eye in the picture. (For future reference, vignettes solve all world problems!)
So there you have it. If you ask a photographer about his or her settings on an image, set yourself up for success. Please, please, please, also ask “And WHY did you choose them?” Yes, you’ll get a mouthful as you did here, but you’ll be on your way to understanding the reason behind the end result. You’ll gain a clearer understanding of the variables he/she faced. You’ll continue to develop your own muscle memory so you can respond more effectively in your future situations. You’ll make more consistent exposures and better images, and no one’s soul has to die…everyone wins!
Be well, be wild!
~Bubbles
Have a question about photography, art, and/or the creative life? Need some advice? Send your question to Dear Bubbles at colleen@colleenminiuk.com to be possibly featured in a future column post. (If you’d prefer a different display name than your real first name, please include your preferred nickname in your note.)

Learning More, but Getting Worse?

One Comment
Cheryl
That image has been etched into my brain as I collect pixels of the last remaining fall color in Atlanta! Sublime light….thanks for sharing.