Get Closer
Dear Bubbles:
I’ve heard you talk about extension tubes. What are they? And how do you use them?
~Do I Really Need More Gear
Dear Do I Really Need More Gear:
I subscribe to the belief that less is more when it comes to gear. Why lug around a bunch of stuff you might only use once or twice a year? Save your back, knees, hips, and shoulders from extra weight! But extension tubes are one piece of equipment that are worth having on hand and I’d advise investing in, especially if you enjoy photographing close-ups and macros scenes.
An extension tube is a simple, lightweight, and affordable accessory that can get you closer to expressing your vision by enabling you to get closer to smaller compositions. They weigh less than a small slice of pie and usually cost less than $50 USD.
Extension tubes are hollow spacers that attach in between your lens and your camera body. By increasing the distance between your lens and your camera’s sensor, the tubes serve to reduce the lens’ minimum focusing distance. This allows photographers to get even closer to their subjects and magnify smaller details than they could with a standard lens.
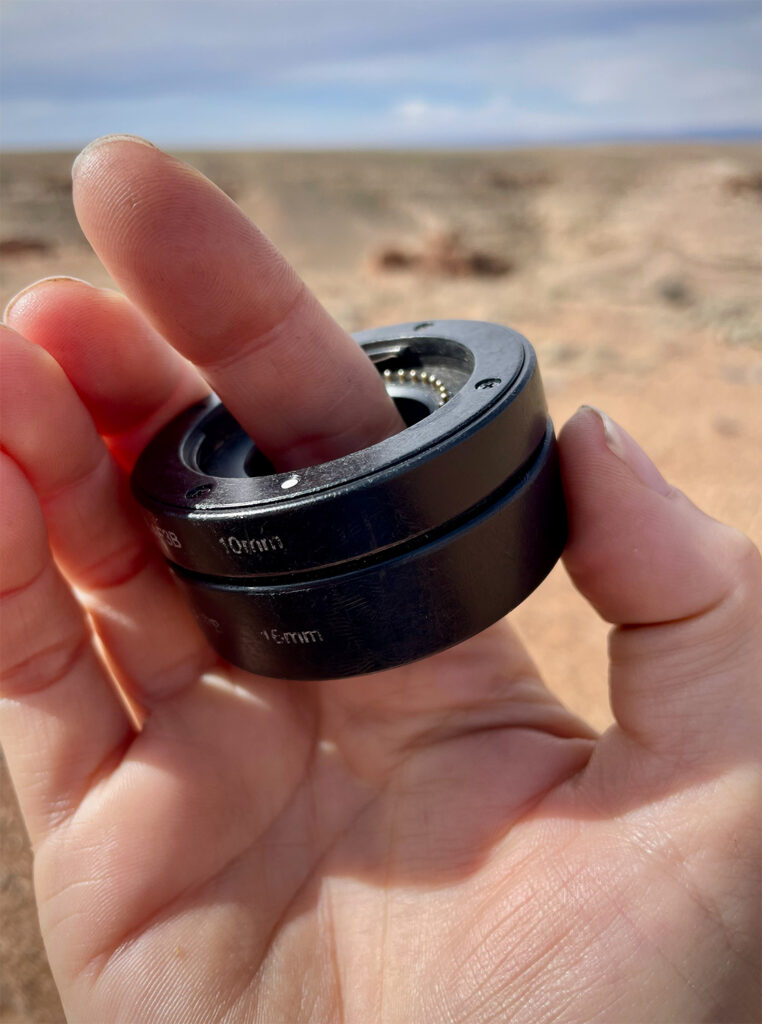
Extension tubes come in different lengths like 10mm, 11mm, 13mm, 16mm, and 18mm depending on your camera brand/mount. This length determines how much additional magnification you’ll gain. Shorter tubes allow you to get a little closer and results in a little magnification boost. Longer tubes allow you to get a lot closer and results in a greater magnification increase—think filling your frame with nose hairs of a bee!
Despite some thinking it’s sacrilegious, you can stack multiple extension tubes to get even closer and render even greater magnification. I promise you won’t spontaneously combust when you do. At least I haven’t yet…and I stack my tubes All.The.Time. Whoo! Living on the edge!
Extension tubes are normally associated with macro photography, thus most have heard you can use them with macro lenses. But you can use tubes with most any lens so long as the mounts and electronics are compatible. I use mine with not just my 60mm macro lens, but also my 7-14mm, 14-150mm, and 300mm lenses. To determine whether your tubes will function with your various lenses, check your instruction manuals and/or equipment specifications.
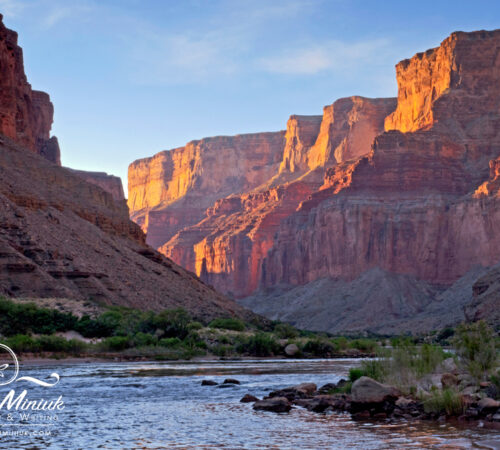
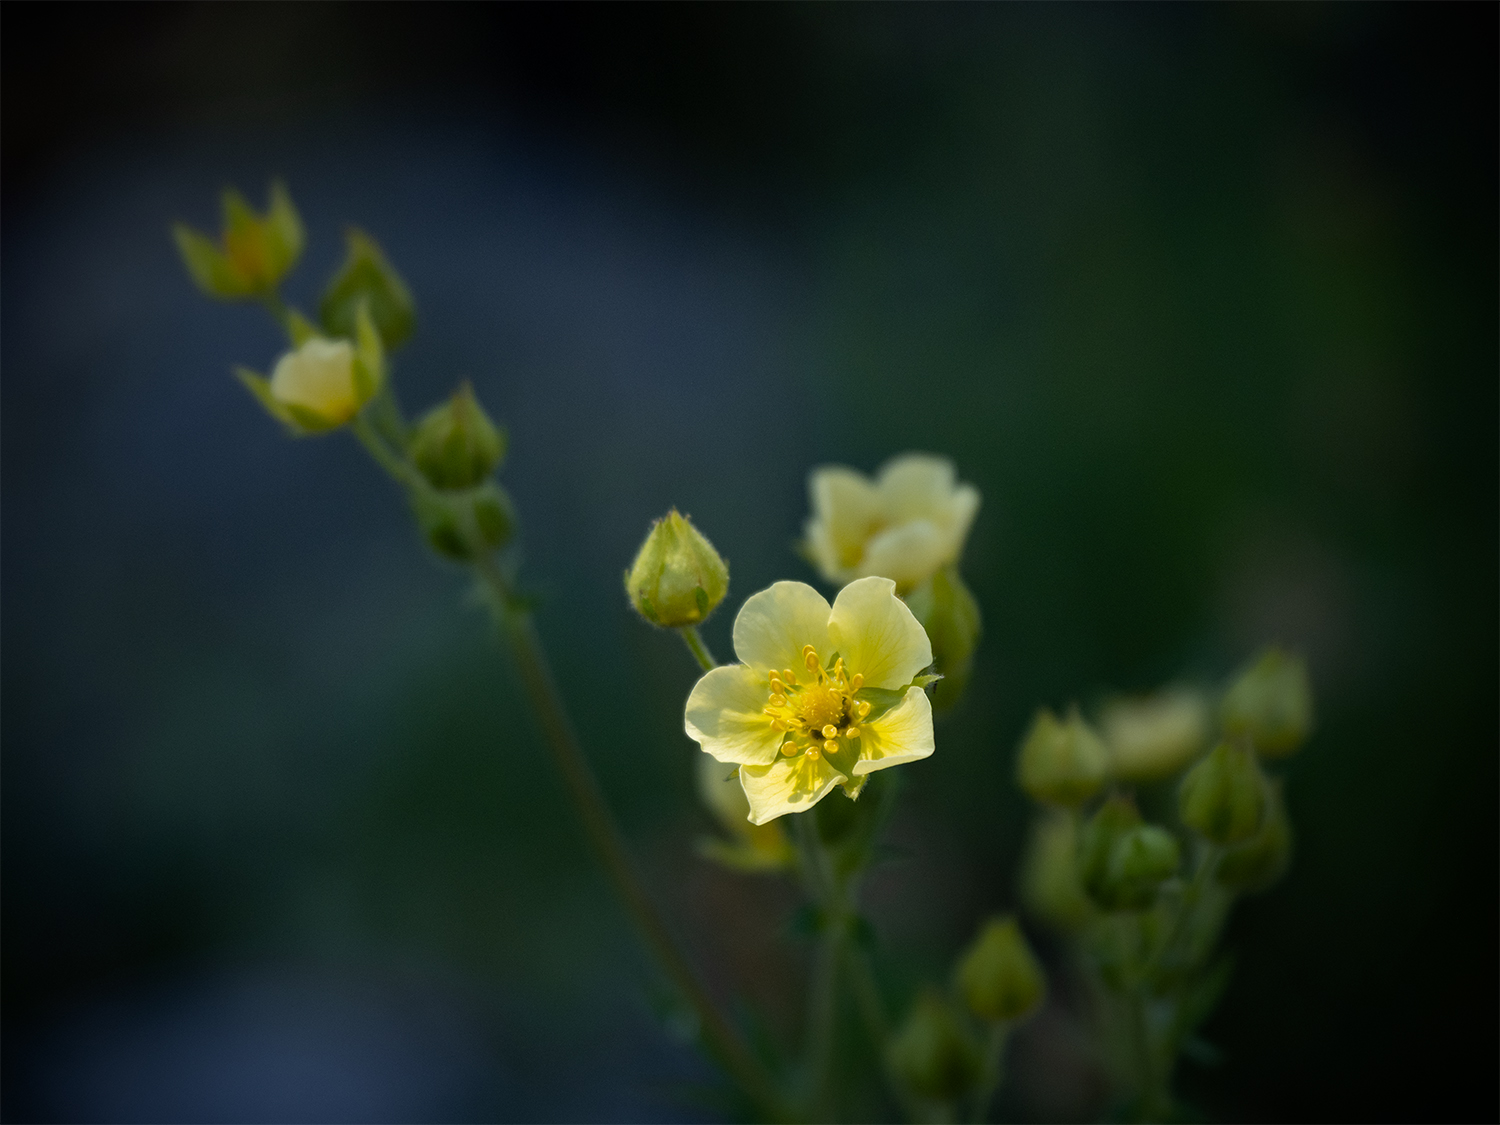
When weight or space is a concern (like on my Grand Canyon rafting photo trip where we’re limited to 25 lbs. of gear), I’ll sometimes leave my macro lens home and only bring extension tubes and my 14-150mm. Which is exactly what I did to make the photo of that purdy little cinquefoil at the top of this post. I paired my 150mm with a 10mm extension tubeand—left the heavier macro lens in the parking lot—so I could keep up with my super bada$$ friends while hiking up a mountain in the Lake Tahoe area.
Pro tip: If you haven’t done much macro photography and aren’t sure if you’re going to like it, before you invest thousands of dollars in a macro like, pick up an extension tube and try it with your normal lenses first!
Different focal lengths behave differently with extension tubes. Wide-angle lenses require you to get extremely close, while telephoto lenses allow greater working distance and seem easier to manage. As you increase magnification, your working distance—that is, the space between your lens and subject—shrinks. In some cases, you may be just inches (or less) away, which can make focusing tricky and photographing skittish subjects (like bees, butterflies, etc.) sorta ambitious. Case in point: when I use a 12mm extension tube with my 7mm lens, the lens’ glass has to be physically touching my subject in order for the subject to be in focus. Fun times!
Also, the longer the tube, the shallower the depth of field. Longer lengths and stacked tubes will make it more challenging to keep things in focus, even with smaller apertures. Techniques like focus stacking can help not only expand the depth of field range but also help you pinpoint which part of the frame you wish to remain sharp.
At high magnifications, even the tiniest of movements is exaggerated. I find it nearly impossible to keep my composition in focus while handholding with extension tubes, so consider using a tripod. A focusing rail used with your tripod can make finding focus even easier and more precise. If you do choose to handhold, use a faster shutter speed and enable image stabilization/vibration reduction to improve your chances of keeping things sharp.
If maintaining access to autofocus and exposure metering are important to you, look for extension tubes that maintain electronic communication between your camera and lens. More basic (and less expensive) tubes lack these electrical contacts which means you’ll be required to use manual focus and manual exposure. That’s not necessarily a bad thing…since autofocus can work way too hard and long searching for a focus point at such close focusing distances, I use manual focus anyhow. And I’m a control freak when it comes to photography, so I already adjust my exposure in Manual mode.
As you monitor your exposure, keep in mind that extension tubes reduce the amount of light reaching your sensor. At higher magnifications, your effective aperture becomes smaller than your actual aperture (what your camera displays), which contributes to light loss. The longer the tube, the greater the light loss. Shorter tubes will result in about a 1/3- to 1-stop of light reduction, depending on the lens and magnification ratio. Longer tubes could reduce light by 1 to 2 stops.
(For my math friends out there, the exposure factor formula to calculate the loss of light is equal to (1 + tube length/lens focal length)2. For my non-math friends out there, just know you lose light super fast as magnification increases.)
Some cameras offer exposure simulation functions that will account for this loss of light; some cameras won’t. Either way, keep an eye on your histogram knowing you may need to add light with a slower shutter speed, wider aperture, or higher ISO (or a combo of these settings) to compensate for the loss of light, especially with longer or stacked tubes. For especially dark or shadowed scenes, attaching a ring light to your camera will brighten the scene up a bit. It’ll also create front light so be careful you don’t overpower all the shadows, and thus shape and dimension, in your composition.
Alternatives to extension tubes exist: close-up diopter (also called close-up filters), reverser rings, and bellows. A close-up diopter is basically a magnifying filter that attaches to the front of your lens. You can get closer to your subject matter, like you can with extension tubes. However, close-up diopters contain glass. Cheap ones can degrade image quality and introduce softness to your image. Extension tubes do not contain any glass, so they preserve the optical quality of the lens and do not degrade image quality—and also do not shatter when you drop them (ask me how I know!).
Also, reverser rings are also hollow and attach to your lens like extension tubes. But they enable you to literally reverse your lens. With this ring, you mount your lens backward on your camera. Like tubes, reverser rings (and reversed lenses) enable extreme close-ups but at a fixed magnification. I prefer a set of extension tubes to give me more flexibility in choosing my focusing distance and magnification.
Finally, bellows are an adjustable, accordion-style contraption that fits between your camera and lens, as an extension tube would. It too moves the lens farther from the sensor to allow closer focusing and greater magnification. However, bellows can be continuously extended or compressed, unlike extension tubes which are fixed lengths, giving you precise control over magnification and focusing distance. That said, bellows are bulkier, heavier, less packable, and typically require a tripod. For extreme close-ups and studio work, they might be worth investigating.
No matter what you choose, the goal is the same: to be able to express your vision with smaller details in the world around you. Extension tubes can help!
So how do you use extension tubes? If you’ve never used an extension tube before, start with the shortest length. I prefer to attach the tube to my lens first, then the lens-plus-tube to my camera, but it’s not wrong to attach the tube to your camera first, then attach your lens to the tube. Six one, half dozen the other.
Start with a non-moving subject (then graduate to moving subjects once you’re more comfortable with your set-up). Test how close you can get to your subject while still finding a focus point. Get closer…get closer. The biggest mistake I’ve seen when people first try extension tubes is that they are not close enough. If you can’t seem to get anything in focus, you very likely need to get closer.
Once you find focus, determine if the composition within your frame matches your vision. If you feel like you need to get even closer to fill your frame, then you know you need greater magnification and a longer extension tube. In this case, either swap your tube out for a longer one or stack multiple tubes. With practice, you’ll get a better feel for which length to use—there isn’t a harder and fast rule on when to use a 12mm vs. 36mm, for example.
Set your tripod up, if you plan to use one. Switch to manual focus if your autofocus spends too much time hunting around for contrast. Adjust your aperture to accomplish the depth of field you wish (using your depth of field preview button and/or your focus peaking function to confirm). Once you make an image, check your histogram to ensure you have an appropriate distribution of light (and data) across the tonal range. Adjust your exposure as needed. Then do a little happy dance because look at you go with extension tubes!
Then keep creating! By getting closer to your subjects with extension tubes, hopefully you get closer to your vision with close-up photography. So go forth and create!
Be well, be brave, be wild!
~Bubbles
Have a question about photography, art, and/or the creative life? Looking for advice or inspiration? Send your question to Dear Bubbles at colleen@colleenminiuk.com to be possibly featured in a future column post. (If you’d prefer a different display name than your real first name, please include your preferred nickname in your note.
Thanks to the generous support of many, the Dear Bubbles monthly column will remain free for all to read. If you’d help contribute while gaining access to the Making the Photo video series, the forthcoming “Bubble Wraps” image reviews, and other special perks for as little as $2/month, please consider becoming a Dear Bubbles Patreon supporter. Your generosity at any level keeps this site ad-free and focused on learning which is hug-worthy and greatly appreciated!