Stacking it Up
Dear Bubbles,
Do you focus stack your landscape photographs?
~Ed
Dear Ed:
As a standard practice for my broad landscape scenes, no, I don’t. That said, there are scenarios when knowing how to focus stack saves the day.
To ensure everyone is on the same page, let’s review what focus stacking is and why photographers might want to use it. Focus stacking is a technique where a photographer makes multiple exposures of the same scene while moving the focus point to different parts of the frame from exposure to exposure. This focus point movement can occur through the manual actions of a photographer, by turning the focusing barrel on the lens or by adjusting the autofocus point to different distances within the scene. This movement can also be automated on certain cameras by adjusting focus stacking (or multiple exposure) settings in a menu or custom function.
The number of frames one makes to ensure the entire scene is in focus can range from two to several hundreds. However many exposures one makes, those images are then blended into a single image. This blending can occur automatically by the camera, automatically by processing software or apps, or manually by the photographer while using processing software.
Regardless of how it’s accomplished, the purpose of focus stacking is to extend the focus range for a final image. In other words, a photographer can achieve a greater depth of field, and thus what appears to be sharpness, through blending multiple exposures versus recording a single exposure. It’s a helpful technique when a photographer sets up a composition of a scene that exceeds the camera’s depth-of-field capabilities. When shooting broad landscapes with wide-angle lenses, that just doesn’t happen very often for me.
Depth of field is how much the image from foreground to background appears to be in sharp focus. With landscape photographs, photographers usually want everything in the frame to appear in focus. To achieve this, we pay attention to the hyperfocal distance. The hyperfocal distance is the distance at which you must focus such that half of that distance to infinity appears sharp within your frame. The hyperfocal distance is a calculation involving your camera (i.e. the circle of confusion for your sensor), the focal length of your lens, and your aperture setting. Since absolutely no one wants to do math while standing in front of a field of wildflowers or at the edge of a canyon at sunrise, there are apps out there that will do the calculations for you. Hooray!
(For a refresher on depth of field, including an explanation of the depth-of-field app I use called DOF Calc, please read “Another Dose of Depth of Field” on Dear Bubbles: https://dearbubbles.com/2020/04/another-dose-of-depth-of-field/.)
Knowing the hyperfocal distance will give a photographer guidance on two key decisions:
- What aperture to use
- Where to position your focus point
Due to physics and how camera lenses are manufactured, the sharpest aperture for a lens typically occurs about two stops over the lens’ widest aperture. Generally speaking, this occurs for many, but not all, lenses around f/8. So that’s the aperture I typically start with when I’m setting up a composition. It’s not always where I end.
The hyperfocal for my widest-angle lens, a 7mm lens (which is a 14mm equivalent in full-frame speak), when I use f/8 equals about 17 inches. (I rounded up for the sake of easier mathing in this example. It’s actually 16.63 inches.) This means if I focus at 17 inches with an f/8 aperture, everything from 8.5 inches to infinity within my scene will look sharp in my frame.
The question to ask at this point is: does everything within my composition fit within that range? If you have a flower or rock or other visual element positioned at least 8.5 inches away from your camera (AND you set your focus point to at least 17 inches), everything within your frame will appear sharp. Shoot it! Do a happy dance! Eat some pie!
However, if your flower or rock or other visual element that appears closer than 8.5 inches, then Houston, we have a problem. That flower or rock or other visual element will not be in focus with my 7mm lens set to f/8 if I focus at 17 inches.
Time to problem solve! Because photographers are problem solvers!
Moving my focus point closer will shorten my depth of field and reduce the amount of sharpness within the frame. Focusing on elements closer to the lens does not solve the problem. It makes it worse…when it comes to depth of field, if you want more of the frame in focus, you must focus farther away from your camera—never closer!
(It’s physics and math. If you enter a distance shorter than the hyperfocal distance in the Distance field of the DOF Calc app, you’ll see the limited depth of field range. In addition to being a narrow range, the depth of field, and thus sharpness, won’t reach infinity.)
Instead, I have three viable options, listed in the order I employ them:
- Change to a smaller aperture (bigger number) without changing my position, composition, or lens.
- Back up my camera physically such that the flower or rock or closest visual element is at least 8.5 inches away from my camera while still using f/8 and my 7mm lens. This typically entails minor adjustments to my composition to ensure the proper balance of visual elements—minor enough where the integrity of my desired visual message remains intact.
- Focus stack at least two or three images on f/8 with my 7mm lens, where I focus on the foreground, midground, and background as arbitrary, but quicker, measures than doing precise calculations. I would do so without moving my position or adjusting my composition.
In theory, a fourth option exists (and if it were practical, I would apply it fourth in this list). A photographer can also change the focal length of their lens to modify the depth of field and hyperfocal. Wider-angle lenses produce a broader depth of field for a given aperture. Longer, more telephoto lenses produce a shallower depth of field for a given aperture. However, I do not own a wider-angle lens than a 7mm.
If I did, it’s important to note a wider-angle lens changes the perspective relative to the composition. It might record more of the scene than you may want. It often impacts the integrity of my desired visual message to more than a minor degree. If I were to choose a different lens, and thus make a broader composition than I desired, I could crop the frame in processing software. The reason this changing my lens is my last resort is once I set up my composition, I really, really, really don’t want to mess with it either in the field or in processing software. I’m picky like that. (Hey, we all have issues. I’m not picky about pie, so I feel like it all balances out.)
Of course, I don’t photograph every landscape with only a 7mm focal length. I let my vision dictate my lens choice (and not vice versa). No matter the focal length I choose, I’d consult my DOF Calc app to determine the hyperfocal distance and determine the appropriate aperture and focus point for my scene. Then go into problem-solving mode if I identify issues.
So if my visualized composition requires a 7mm focal length, I want to keep that 7mm focal length. If I realize f/8 does not give me the range I need, I start with my first option above: changing to a smaller aperture. If I dial my aperture to f/22, which is my smallest aperture setting possible, the hyperfocal changes to 6 inches (again rounded. It’s actually 6.05 inches). So long as I focus as about 6 inches, everything from 3 inches to infinity will appear in sharp focus. Does everything within my composition—the flowers, rock, and closest visual element—fit within that range? There are very, very few scenarios where my scene does not fall within this range.
I might back up my camera a slight bit (option 2 above), but only because I’m not skilled enough to eyeball the difference between 6 and 6.05 inches, and I want to cover my bacon. I’m definitely not going to focus stack multiple frames (option 3). I don’t need to.
Or do I?
I can hear The Almighty Library of Wisdom—the internet—screaming now: “But, but Bubbles! You’re gonna get diffraction when you use f/22!” That is true. But, I can tell you that having a little diffraction in my photographs has never made me spontaneously combust or eaten my pie or burst my bubbles. So calm down internet.
Here are my earlier thoughts about diffraction and shooting at f/22: https://dearbubbles.com/2020/08/choose-wisely/. As I suggest at the end of that column, “…I have never heard anyone say, ‘Wow, Bubbles, what a nice photograph! You know, it could have been so much better had you not had diffraction.’”
I feel like there are bigger issues to worry about in life and in photography than diffraction, but those who do worry about diffraction can use focus stacking to address it. But let’s say I don’t want to use a small aperture because of diffraction. Let’s use the example above and say I have a flower positioned 4 inches away from my camera in my foreground. It’s the closest visual element to my camera. I’m using my 7mm lens still and return to the f/8 setting. So the hyperfocal distance, as a reminder, is 16 inches (so everything from 8 inches to infinity will appear in sharp focus if I focus at 16 inches). We’ve determined the flower positioned 4 inches away from the camera will not be in focus given this range. So we’d focus stack multiple images.
To ensure everything in the frame is in focus, I would need to focus stack at least three images:
- Focus at 4 inches: gives me a depth of field range from 3.22 inches to 5.27 inches
- Focus at 6 inches: gives me a depth of field range from 4.41 inches to 9.39 inches
- Focus at 16 inches: gives me a depth of field from 8.21 inches to infinity.
I’ve used my DOF Calc app to determine these precise measurements and to ensure some overlap between each exposure. The overlap between the distances in each frame ensures everything remains in focus and that there are no unsightly out-of-focus areas from exposure to exposure when you blend them together.
Will this blended image made at f/8 appear sharper than a single image photographed at f/22? Yes. Will the single image at f/22 look sharp when viewed on its own? Yes. Will your blended image at f/8 ever appear right next to you single image photographed at f/22? No. How many times do we display the same composition at different aperture settings together? Never. Unless we’re doing this analysis. Which I would absolutely encourage you do so that you can see the difference in sharpness for yourself and decide for yourself how you wish to incorporate focus stacking into your photographic process. (To get you started, there’s a set of photo comparisons for reference in my “Choose Wisely” column.)
Now, all that said, I frequently use focus stacking for more intimate and close-up scenes of the land. Do those fit under the definition of “landscape photography?” According to Wikipedia, they do: “Landscape photography…shows the spaces within the world, sometimes vast and unending, but other times microscopic.” Look, I’m a writer. Semantics matter!
Intimate and close-up photographs typically require longer lenses. As mentioned above, longer focal length lenses have shallower depth of field. Shallower depth of field means you might not be able to get the whole scene in focus in a single frame. It’s not your fault. It’s because of physics and math limitations. Boooo!
The hyperfocal distance for my 150mm lens (which is a 300 equivalent in full frame speak) at f/8 is 637 feet. That means if I focus at 637, everything from half of that—317.5 inches—to infinity will be in focus. If I switch to f/22, the hyperfocal changes to 231 feet. I’m not a math major, but I can tell ya that my poor flower, rock, or other visual element sitting 4 inches away from my lens will not even be close to being in focus even with f/22. It’s not possible—due to physics and math—to get everything from 4 inches to infinity in focus in a single frame using this 150mm lens.
(And I ain’t gonna back up 633 feet to make it happen…)
This is when focus stacking saves the day! And it’s very likely that if you want to get the entire distance from 4 inches to infinity in focus with a telephoto lens, you’d need hundreds of frames to do it. More realistically, you’re likely to have a scenario where the visual elements are a bit closer together off in the distance, and you’d need far less frames. You might need two or three frames or ten or thirty or three hundred. My Olympus OMD EM1 Mark II suggests it can focus stack up to 999 images. I’ve not yet used that capability. I’ve never been in a situation to need 999 images…yet…
One could mathematically calculate the exact number of frames you’d need to cover a set distance (as I did above in the wide-angle, f/8 flower scenario). But I’d rather poke my eye out with a fork. And we all know that I’d rather use that fork to eat pie. So that math ain’t happening, now or ever.
Instead, when using a telephoto or macro lens, I’ll eyeball the focus stacking from frame to frame using my focus peaking capabilities in my camera. I’ll start by manually focusing on the closest foreground element (with f/8) and see how much of the rest of the frame is in focus. I’ll make a swag at how many frames I need from there.
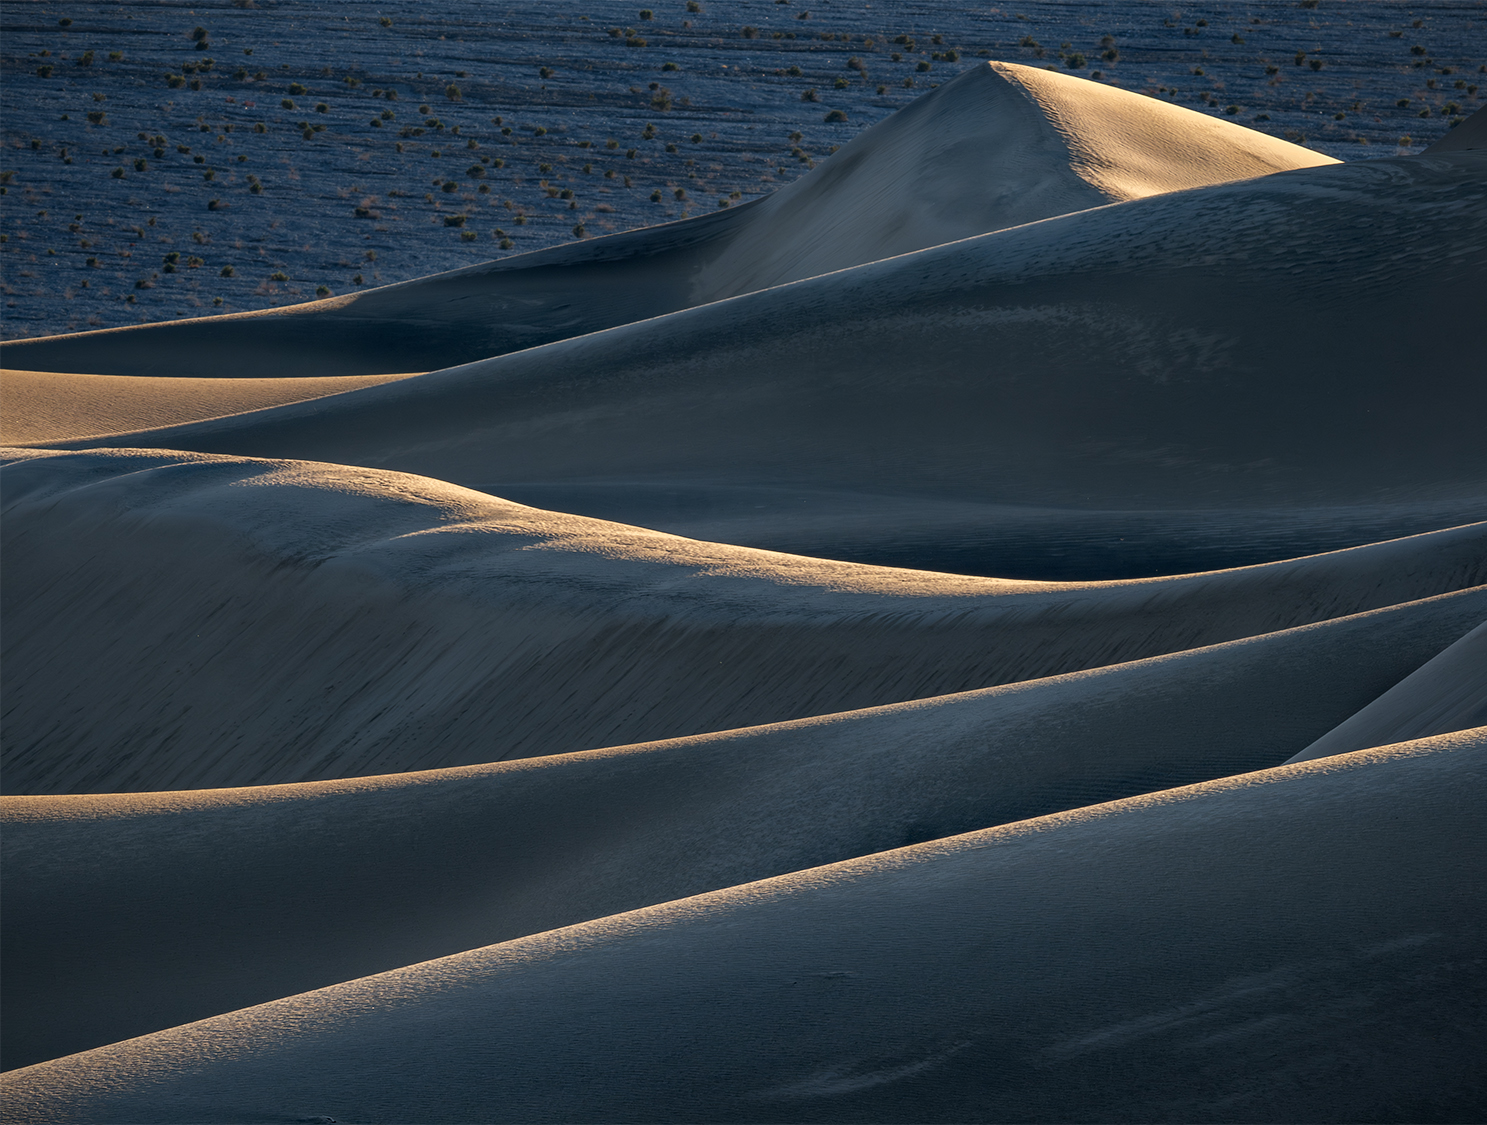
As an example, in the photograph of the sand dunes at the top of this post, I used my 300mm lens (a 600mm equivalent) set to f/13 and blended six exposures. (For those who just can’t get enough of hyperfocal, the hyperfocal distance for that combination is 1566.45 feet).
I initially manually focused on the first ridgeline and paid attention to my focus peaking. I guessed I would need four exposures to cover the whole scene, but to be safe (and also because of the number of layers), I went with six. Then, as I made exposures, I moved the focus point from the first illuminated ridgeline to the second to the third to the fourth to the fifth to the background. In processing, I selected all six exposures then used the Load into Photoshop Layers function. Once layered up in Photoshop, I selected Edit/Auto-Align Layers to align the visual elements (I photographed this from a tripod so the alignment was nil–merely a double-check in the process). Then I used Edit/Auto Blend Layers and Stack Images to blend them. I then resumed my normal processing for exposure, contrast, color corrections, etc. as a single frame image. You see the final results at the top of the screen.
Now, for my close-up/macro scenes, I sometimes focus stack but not so that the entire frame is in focus but rather to tightly control where the focus/sharpness occurs within the frame. In most close-up scenarios, I’m using a selective, or shallow, depth of field to create separate layers in shapes, colors, and tones. I want the foreground or the background to look blurred on purpose so that my dominant visual element (i.e., the figure in a figure-ground relationship) stands out from everything else (i.e., the ground in the figure-ground relationship). This creates a sense of depth. Sometimes one can create a flat image if everything is in focus and there is no separation of layers.
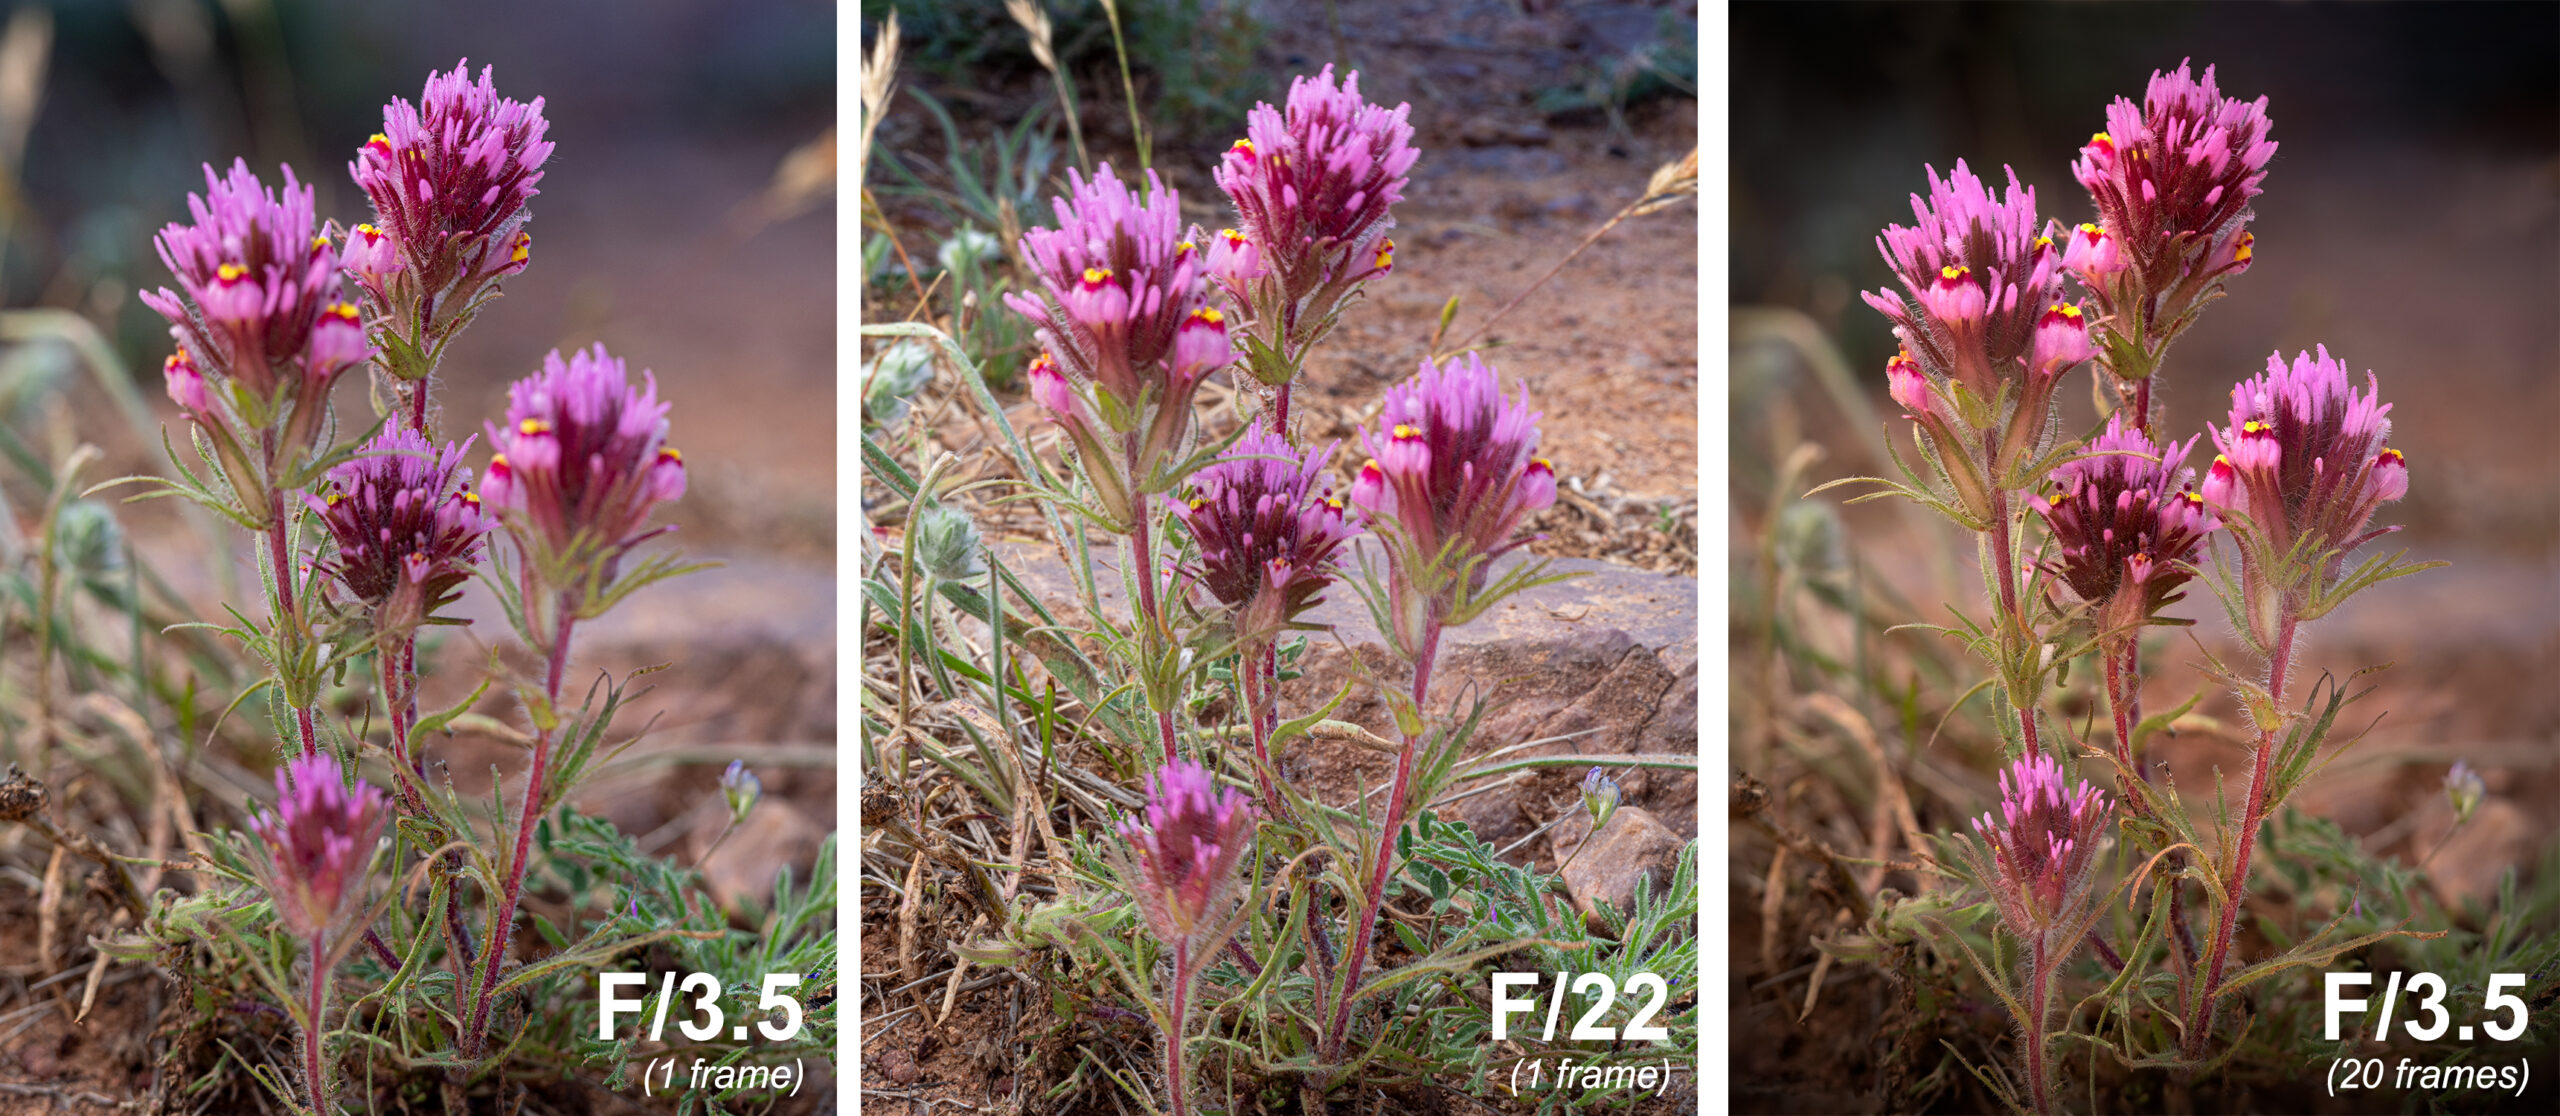
But when using a macro lens, sometimes the depth of field is so shallow that all the parts of my primary visual element do not appear in focus. A focus stack can help me isolate, very precisely, how much of a particular visual element remains in focus. For example, for this family of owl clover below, an f/2.8 blurred the background just fine, but not all of the blooms were in focus. Fine. I switched to f/22 and made the whole scene a mess. Not only were all the flowers not in focus but also the background was a train wreck.
I chose to use focus stacking to help me–but not so that the entire frame ended up in sharp focus. Oh no! I used focus stacking so that just my pretty little family of owl clover blooms appeared sharp while everything else around it stayed blurry. For the final image, I ended up blending 20 images at f/3.2 to keep the background blurred, yet keep the 3 inches of blooms in sharp focus. Here is a comparison between the different approaches:
It should be clear by now that I’ll deliberately apply a technique like focus stacking because it solves a problem for me. I will not mindlessly apply a technique just because I know how to do it.
If you have not yet tried focus stacking in either broad, intimate, or macro landscapes scenes (or any other scenes for that matter), I would absolutely practice it until it becomes second nature, whether you actually need to do it or not. It’s good to expand your knowledge and your photographic tool box so that you give yourself options to successfully express your desired visual messages. In photography (and in life), it’ll bring comfort and confidence if you know how to solve a problem before you encounter it.
Be well, be brave, be wild,
~Bubbles
If you liked this post and others like it, please consider supporting Dear Bubbles either through a monthly contribution through Patreon or a one-time donation through Buy Me a Coffee. Learn more about both at https://dearbubbles.com/support.
Have a question about photography, art, and/or the creative life? Need some advice? Looking for inspiration? Send your question to Dear Bubbles at colleen@colleenminiuk.com to be possibly featured in a future column post. (If you’d prefer a different display name than your real first name, please include your preferred nickname in your note.

Resolving Resolutions


One Comment
Toni Francis
Love the depth of explanation.
Thank you ❤️