Restoring Balance
Dear Bubbles:
Can you settle this once and for all: does setting the white balance affect a RAW image?
~Jeff
Dear Jeff:
It’s complicated. No and yes, which is why we’re easily confused…
Let’s start with what RAW is. It’s exactly what it sounds like: a raw, unprocessed file. (Although people tend to capitalize RAW, it is not an acronym like it’s counterpart JPEG–which stands for Joint Photographic Expert Group.) A raw image file (also called a raw image format) is not an image. It’s just a file with a bunch of data in it. It doesn’t transform into an image until we convert it through Lightroom, Adobe Camera Raw, or other software (at which point we save it in an image format like TIFF, PSD, or JPEG). To get technical with semantics, a raw image is a misnomer. It does not exist. To avoid further confusion, I’m going to refer to a raw image file simply as a “raw file” for the remainder of this discussion even though it shortens the true name.
In order to make that conversion, the camera needs to explain how it recorded and encoded the data so the processing software knows how to translate it and decode it into a photograph. While each camera manufacturer has developed their own structure to do this, most raw files contain similar information, including, but not limited to:
- The file header, which includes an identifying name/number.
- The data the sensor collected during the exposure (the amount of light you let in through your aperture, shutter speed, and ISO speed settings).
- Camera sensor metadata which records how the sensor collected that data, including how the data translated wavelengths of light into color through the color filter array over the sensor.
- Image metadata which captures the date/time the file was created, the camera settings (including your white balance setting), lens information, and more. Some of this information is typically structured into EXIF, which stands for Exchangeable Image File Format. (You may have noticed EXIF data in your camera and processing software for each file.)
- A compressed JPEG image to use as a preview in your camera’s playback mode and in your processing software’s interface.
Once you snap the shutter, the raw file sits on your memory card unprocessed. The contents of this file don’t mix until you’re ready to create an image. As it relates to your question specifically, the data the sensor collected during the exposure does not see, consider, or utilize the camera or image metadata (i.e. the white balance setting) until:
- The camera hastily processes that smaller compressed JPEG image (the last bullet point above) so that it can show you a example of what the image might look like later. This is what you see on your camera’s LCD screen and/or the viewfinder immediately after you photograph it and when you switch into playback mode. You do not see the raw file itself which is not viewable. (To process and display the large raw file would require a tremendous amount of power which would eat up even more battery than our LCDs and electronic viewfinders already do.) This is key! And partly why we get confused…If you change your white balance setting while shooting in raw, you will see a color shift in the JPEG image on your camera’s LCD screen and viewfinder. You’ll even see a shift in your RGB histogram. That’s because the histogram represents the light distribution in the JPEG rendition, not the raw file. For example, let’s say you switched from Sunny to Cloudy while photographing in raw format. In playback mode, you’d see the color tint on your camera’s screen go from a whitish blue to orangey. The red channel in your histogram would shift to the right. None of this affects the data the sensor collects during the exposure at this point, however. It does not affect the raw data captured. The only thing that affects the raw data captured is exposure settings (aperture, shutter speed, and ISO speed). Thus, when your red, green or blue channel on your histogram is blown out (overexposed), the solution to resolve it is to underexpose via your exposure settings–not to change the white balance, which has no effect on the data your sensor captured…until…
- You process this set of instructions in processing software. In our image cataloging systems in software like Adobe Bridge and Lightroom, we see image thumbnails as JPEG previews on the screen until you bring the raw file into Adobe Camera Raw or the Lightroom Develop module (both raw file converters). There, the software interprets and mixes the contents of the raw file. From there, you can create an image. Again, specific to your question, it’s at this point where the data the sensor collected and the image metadata now “talk” with each other. It’s where white balance gets applied to the exposure data. How do we know? Well, in the White Balance field in the raw converters, have you ever noticed a setting called “As Shot” in the drop down menu? That’s the value of the white balance setting you used when you snapped the shutter…while shooting in raw format.
Maybe it’d help to think of it as a metaphor: let’s say you wanted to bake a cake (“create an image”). You’d collect the raw ingredients like flour, sugar, baking soda, and whatnot and set everything out on your counter (we’ll call this “data the sensor collected”). You may have grabbed chocolate chips to add in for additional flavoring (“white balance setting”). You have a recipe, a set of instructions, out too (“metadata”). It may even have a picture of what the cake might look like at the top (“JPEG preview”). Don’t forget, you need an oven to create the cake (“the processing software”). Here’s the thing, you don’t whisk the flour with the other ingredients per the instructions until you’re ready to actually make a cake. Alright, maybe it’s not a perfect analogy, but I had cake on my mind, and the idea of cake is too good not to share.
So if we consider the structure of the raw file and how we use the information within it to create an image, the answer to your question is: No, adjusting the white balance does not affect the data the sensor collects during the exposure in our camera. Adding a bag of chocolate chips to the counter in your collection of cake ingredients doesn’t affect the flour or other ingredients. But yes, the white balance setting tags along with the raw file and eventually affects how your processing software interprets the data into something more useful. The chocolate chips and flour eventually get mixed together in a batter (the raw converter), which eventually gets put into the oven to create a cake.
At this point, some might be wondering what I put in my tea this morning. Others might be wondering what white balance is anyhow. White balance affects the color, not the quantity or quality, of light. (It flavors the light like chocolate chips flavor a basic cake mix.) Measured in degrees Kelvin (K), it is how the camera measures the existing colors in your composition and adjusts to render this color neutrally in your photograph. Your camera is trying to help you make sure your scene doesn’t look too blue or too orange, too green or too magenta. After all, too many chocolate chips can drown out the taste of the cake.
Some common measures of the color of light throughout the day include:
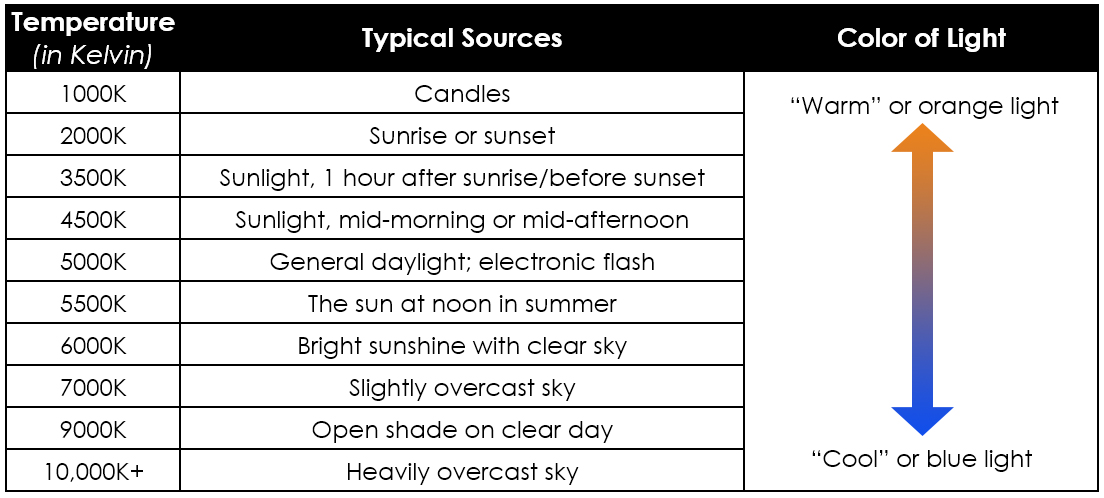
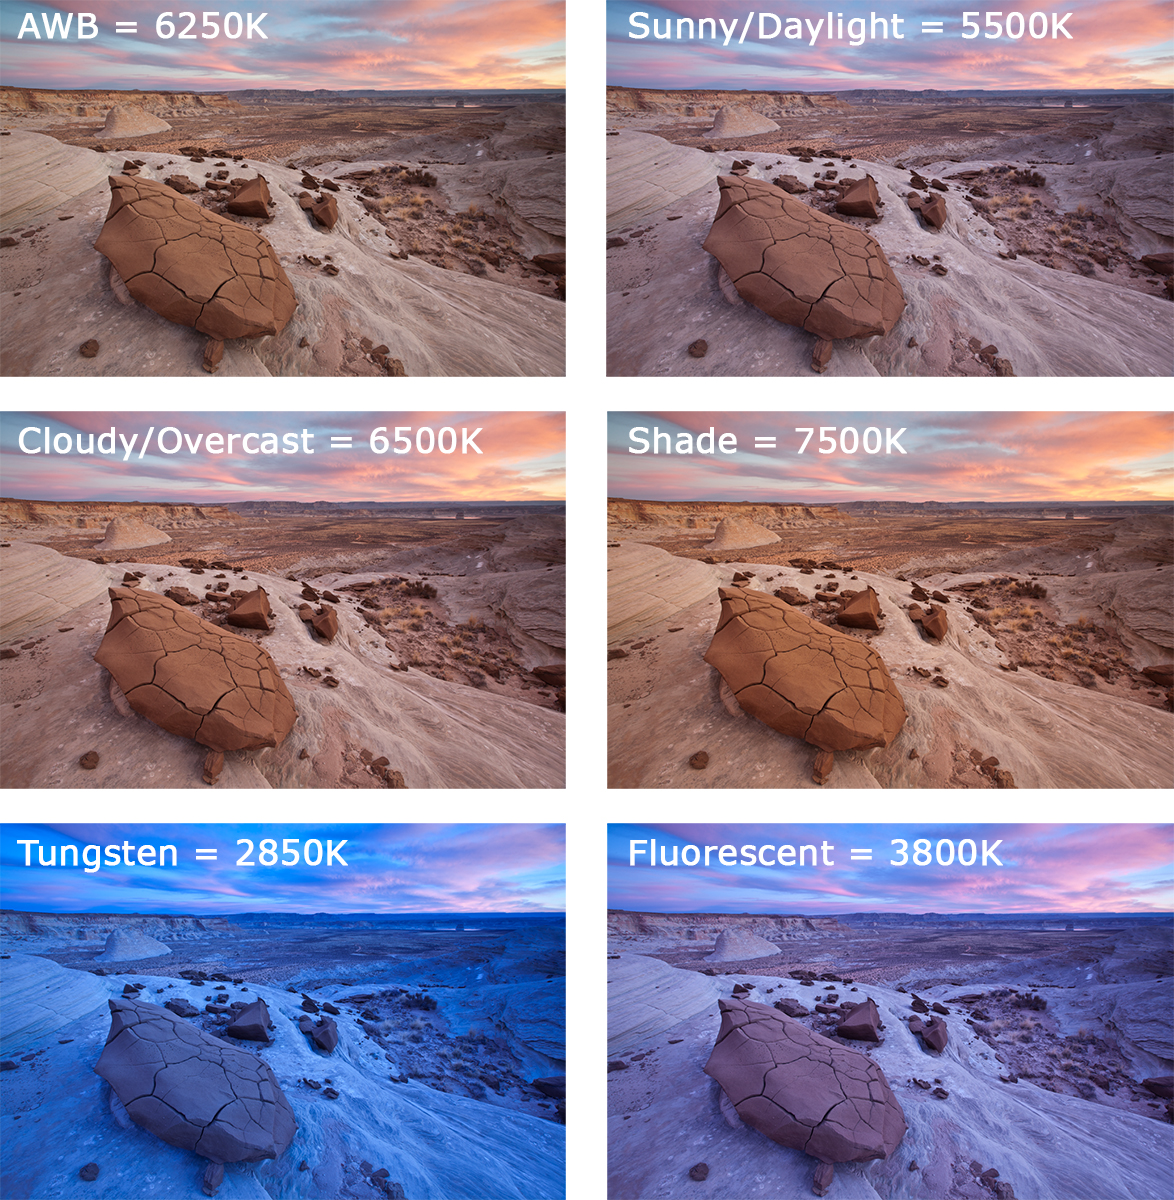
White balance enables photographers to have a conversation with their camera. We can tell the camera what lighting conditions exist so that the camera knows how to respond to them. We do this through the white balance setting presets which include Auto, Sunny (or Daylight), Cloudy (or Overcast), Shade, Tungsten, Fluorescent, Flash, and other custom settings. When you set your camera to Sunny, you’re telling the camera it’s Sunny outside. The camera adjusts the color accordingly.
To give you an example of how these affect a single frame:
If you are photographing in JPEG format, you’ll want to pay attention to this setting while you are photographing. Unlike raw format, the camera mixes and processes the exposure data with the image metadata in the camera. (It makes a little cupcake for you in the microwave…) JPEG is a lossy format which means image quality degrades as you adjust things in processing software. Because processing a JPEG negatively impacts the image, many avoid processing altogether. As such, JPEG shooters need to pay more attention to what’s going on at the time of capture. (Raw is a lossless format which means it does not lose data as you process it.)
When using Auto White Balance (AWB) the camera will interpret the light and make the necessary adjustments to render what it thinks is the proper color in your photograph. You have no say over the value it decides. You’ve basically decided to give your camera the silent treatment–that it can figure out the lighting conditions on its own without your input. We’ve already established I’m a control freak when it comes to cameras in earlier posts, so this is not the choice I would make when it comes to setting my white balance if I were to shoot in JPEG format. Besides, no one, not even your camera, likes the silent treatment. I mean, can’t we all just get along and eat cake together? Talk to your camera. Make friends with it, OK? OK.
For more control over how your camera sees the color of light, you can adjust the white balance on the camera to reflect the color of light for a scene as best you can. If it’s sunny out, you’d select Sunny. Cloudy? Cloudy. Shooting indoors with tungsten lights? Tungsten. Match the setting to the conditions.
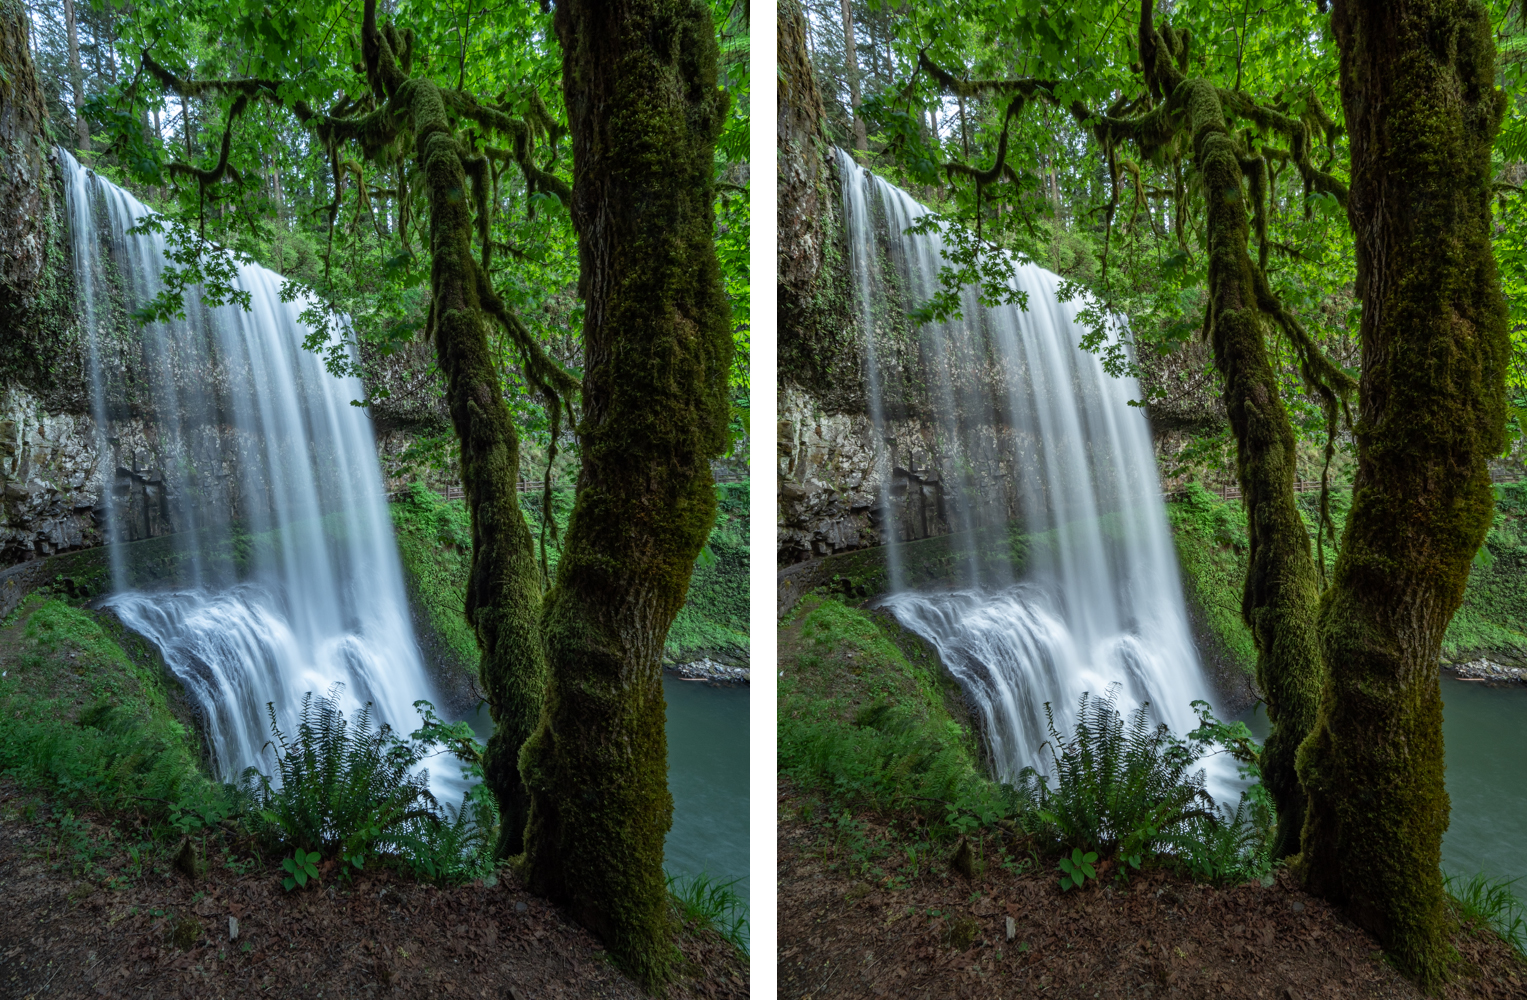
You can also trick the camera into seeing a color temperature that doesn’t exist in nature in order to get specific results. For example, if you’d like additional warmth in your photograph, change the white balance to Cloudy or Shade when it’s sunny outside. The camera doesn’t have eyes. It doesn’t know any different. In doing so, you’re telling the camera, “Yo! Camera! It’s REALLY blue out here right now. Help me out buddy!” The camera responds, “Hey awesome photographer! You got it! Here’s a dump of orange to balance that blue out. You’re welcome!” Then, boom! Just like that you and your camera are friends making it happen out there together. Have some cake to celebrate!
If you are photographing in raw format, however, the question arises, “Do we really need to bother with the white balance setting?” Many raw shooters ignore this setting. There are too many other things–namely aperture, shutter speed, and ISO speed settings–that are more important to consider. However, there are two good reasons, you may wish to care about it:
- It enables you to visualize the coloration of your final image more accurately in the field at the time you snapped the shutter.
- It establishes a baseline for the “As Shot” value in processing software so you start from the same place every time when processing.
I shoot in raw format and keep my white balance setting set to Sunny all the time, no matter the conditions, for reason #2. For my Olympus camera, my “As Shot” value in Adobe Camera Raw is always 5250K. Sure, the JPEG rendition on my camera in the field sometimes looks funky, but I’m capable of overlooking, ignoring even, the color of my image while visualizing my final image.
This may be, in part, because I struggle in general with seeing white balance both in the field and on the computer. (While tests confirm I’m not colorblind or afflicted with any other color-related issues, I have substantial anecdotal evidence that suggests I see blues and greens differently than most.) I adjust my colors in Adobe Camera Raw by:
- Cranking the Saturation slider to +100. This allows me to see at an extreme level how much blue, orange, green, and magenta appears in the image. It becomes very obvious when the colors look nuclear.
- Adjusting the Temperature and Tint until the colors look normal-ish.
- Resetting the Saturation slider to 0, then carrying on with processing the file and image.
There are other ways to adjust the white balance in Photoshop (e.g. the mid-tone eyedropper in Levels or Curves), but when I use them, I always feel like I’m playing a game of Go Fish. And I never like the outcome. It’s a crap shoot for me at best, but I know plenty of photographers who swear by this method. Using the Saturation slider trick in Adobe Camera Raw works for me every time. I’ve said it before: I don’t care how you get there, just that you do. Find a process that works best for you, and go with it.
Now with white balance and raw all settled, we should have cake to celebrate!
I don’t know why it hadn’t occurred to me before, but all this talk about raw makes me wonder now: if you shoot in raw, does that mean you’re a raw-grapher and not a photo-grapher? And why is it pronounced pho-tog-rapher and not photo-grapher? Am I allowed to ask Dear Bubbles questions?!?
Be well, be wild,
~Bubbles
Have a question about photography, art, and/or the creative life? Need some advice? Send your question to Dear Bubbles at colleen@colleenminiuk.com to be possibly featured in a future column post. (If you’d prefer a different display name than your real first name, please include your preferred nickname in your note.

The Impossibility of Creativity