Micro Difference Between Macro and Close-Up

Dear Bubbles:
Is there really a difference between macro and close-up photography?
~Libba
Dear Libba:
Macro and close-up are often used interchangeably in the photography world. They both mean recording subjects at close distances with a camera. What separates them is a matter of scale, though, and the difference between the two is small. (Pun intended.)
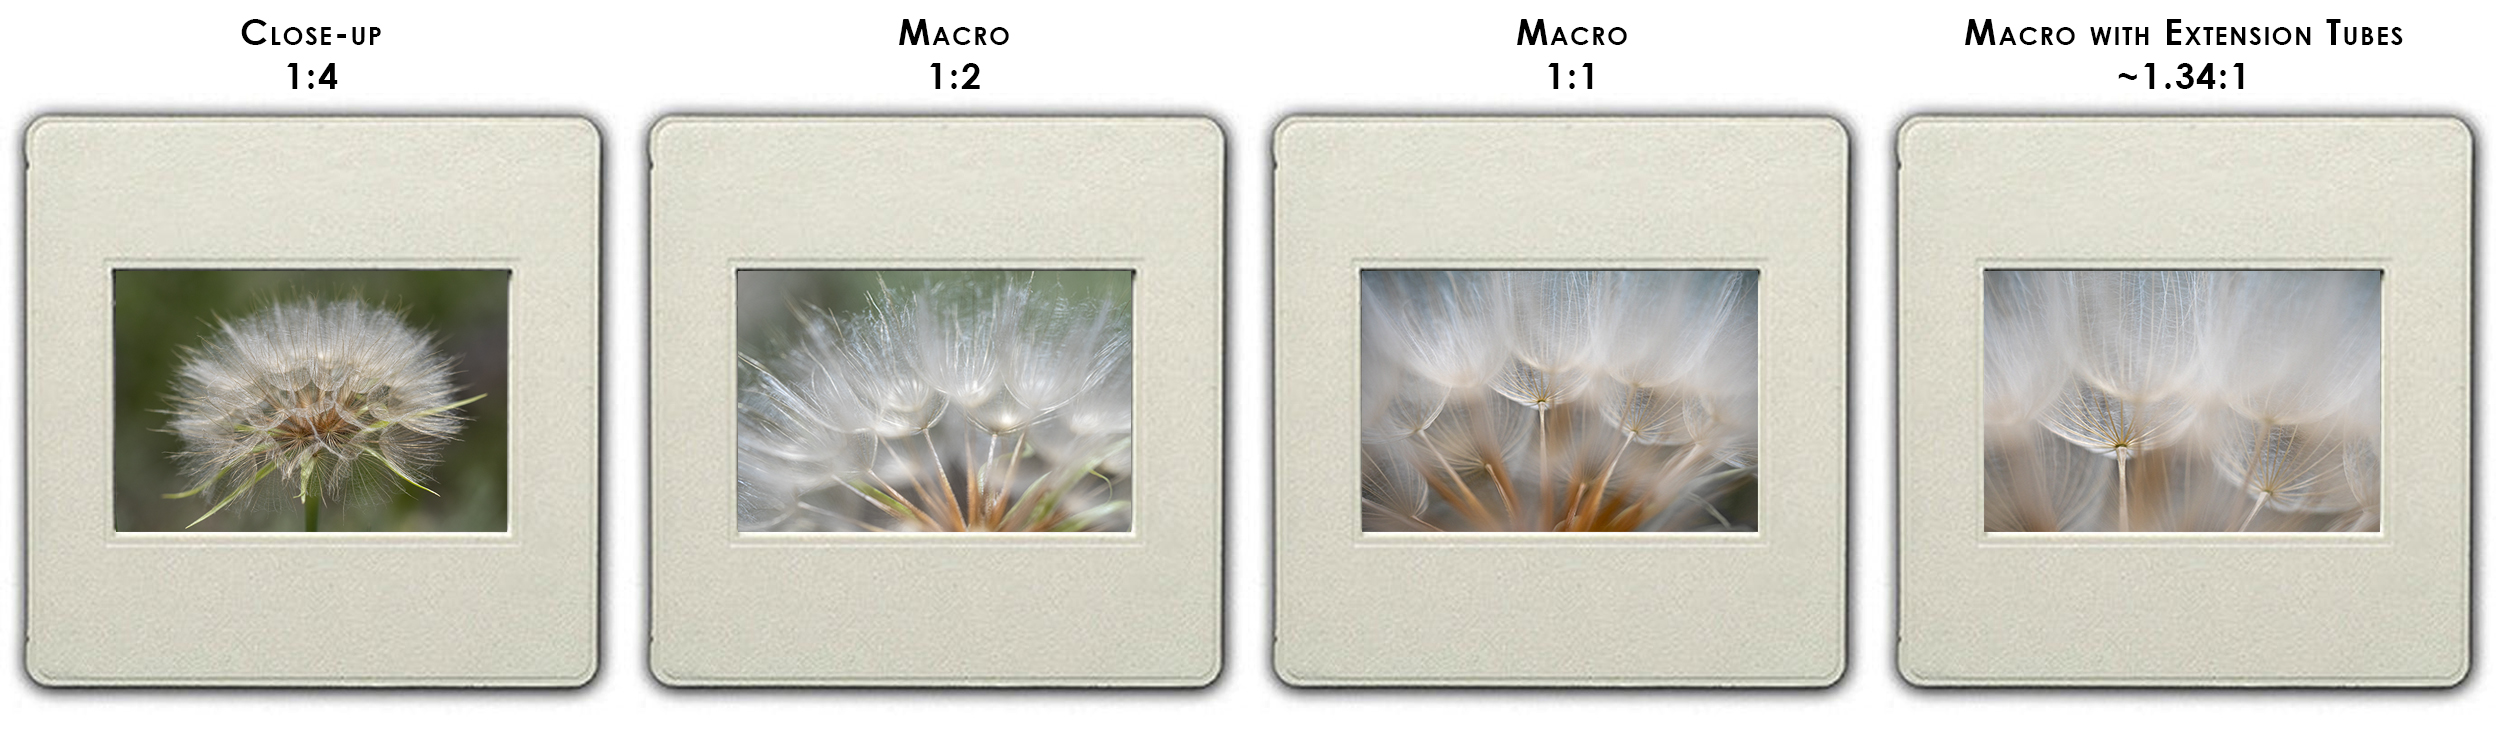
The Oxford Dictionary defines “macro photography” as “photography producing photographs of small items larger than life size.” However, the definition the photography industry uses doesn’t necessarily jive with this one. Macro photography is generally understood in the photography industry as the ability to render a small subject at life size, half life size, or larger than life size on a sensor (or film plane)—and while still being able to keep the subject in sharp focus. Let’s break that down even further…
Our ability to record a subject on our sensor (or film plane) at life size requires a photographer to use specialized equipment—a macro lens, extension tubes, and/or close-up filters—in order to achieve a 1:1 magnification ratio. The 1:1 ratio indicates a photographer can get close enough to the subject so that the subject records at actual size on the sensor and still appears in focus.
For example, let’s say you would like to photograph a flower that measures about 1.5 inches (or 38mm) in diameter. The size of full-frame sensor on a camera is about 36mm x 17mm. If we use a lens or other gear with a 1:1 magnification ratio to photograph this flower, we have the ability to capture almost the full width of the flower (36mm of 38mm) in a horizontal orientation on the 36mm sensor. Hence, 1:1. You don’t have to get that close to the flower with a macro lens or other accessories, though. You can make photographs that yield the subject at half size, quarter size, etc. That 1:1, or full size, is the maximum, not the minimum size.
The definition of macro the photography industry uses also includes a 1:2 magnification ratio, or half life size. If we that same flower with a full-frame sensor, the flower would appear to be, at a maximum, half its actual size. The 38mm flower would only cover about 19mm of the 36mm width of the horizontal frame.
The definition changes from “macro” to “close-up” as soon as we move to a 1:4 magnification ratio. If you’ve followed the math thus far, you know that if we photograph that 38mm flower with a lens or gear possessing a 1:4 magnification ratio, it means the flower will appear at 1/4th its actual size on the sensor. In a horizontal frame, the flower would appear to cover about 9.5mm in the 36mm frame.
(For the record, the Oxford Dictionary defines “close-up photography” as “a photograph, movie, or video taken at close range and showing the subject on a large scale.” Like the macro definition, it’s still too vague compared to how we define it in the photography industry…)
Most camera manufacturers use the “macro” terminology consistently, but Nikon had to be different. They call their macro lenses “micro.” They aren’t trying to be difficult. Their term comes from their original use of their equipment in producing microforms—remember browsing through microfiche (also a fun word to say) at the library years ago? That.
In fact, the word “macro” actually comes from “macrograph” which originated in the 1890s when trying to distinguish it from a “micrograph” (which originated earlier in the 1850s). A macrograph is a photograph of an object at the same size or larger than the object. A micrograph is a photograph made with a microscope.
Now, if you own a Canon system, they produced a lens with a 5:1 magnification ratio, which, you guessed it, magnifies the subject up to five times actual size. You can record nose hairs on bees with that puppy! (That is, if you can get it focused before the bee flies away…no small task.) This level of magnification ratio is considered “photomicroscopy.” Which is a super fun word to say. Say it with me: “Photo-mi-CROS-co-py!”
If you don’t own a macro—or micro—lens, accessories like an extension tube can help you get closer to your subject than you otherwise could with your lens. An extension tube is a hollow ring that fits in between your camera and your lens. This moves the lens farther away from the sensor (or film plane), which serves to alter your minimum focusing distance and increase your magnification capabilities. You can calculate the magnification increase for your extension tube by dividing your lens’ focal length by the extension tube thickness (usually represented in mm on the side of the tube). So a 12mm extension tube on a 24mm lens equals a 0.5x magnification (12mm/24mm=0.5, or 1:2) increase over whatever your lens’ current magnification ratio is. Similarly, a 24mm extension tube on a 105mm lens equals 0.23x or about 1:4. The thicker the extension tube, the greater the magnification ratio.
I’ve stacked my 10mm extension tube on top of my 16mm (for a total of 26mm) and added to my 28-300mm lens. At the widest focal lengths, I have to be physically touching the subject with the front of my lens before it’ll appear in focus. I haven’t figured out a practical application for this yet, but I’m sure working on it!
Close-up filters can help achieve a similar affect. These are close-up lenses even though they are more similar to filters and not lenses…(but what’s in a name?!) They attached to the front of your lens and are measured in diopters like +1, +2, +3, and +4. To determine the magnification equivalent for each strength, we simply multiple the focal length of the lens (converted first into meters) by the diopter strength. For example, if we use a +2 on a 300 mm lens, the magnification of the lens will increase 0.6x (300mm = .3m, .3 X 2 = 0.6), or a little more than 1:2, thanks to the diopter. In the same vein, if we applied a +4 to a 105mm lens, we get .42x magnification (105mm = .105 m x 4 = 0.42) which means an increase of not quite 1:2 but close. Given this, not surprisingly, the higher the number diopter, the greater the magnification.
Besides giving us reasons to say silly words and do math, does any of this matter? Not really. I don’t spend any time pondering the difference between macro or close-up while evaluating a scene and choosing my equipment to execute my vision. I just make a photograph of whatever inspires me without labeling it.
I suppose, though, some contests and competitions may call for one or the other (or both or not distinguish). When in doubt, consult the powers that be to make sure their definition lines up with yours.
Be well, be wild,
~Bubbles
Have a question about photography, art, and/or the creative life? Need some advice? Looking for inspiration? Send your question to Dear Bubbles at [email protected] to be possibly featured in a future column post. (If you’d prefer a different display name than your real first name, please include your preferred nickname in your note.)

Becoming an AIR