Widen Your Horizons
Dear Bubbles:
I recently bought a wide-angle lens for landscape photography. How do I use it?
~From multiple participants in a recent workshop
Dear multiple participants in a recent workshop:
I remember the exact moment I realized I didn’t just want an ultra-wide-angle lens, I needed one. It was the evening of November 11, 2009. I was standing on basalt rocks below the Bass Harbor Head Lighthouse in Acadia National Park, Maine. I had set up a solid composition with my 24mm wide-angle lens. I positioned the swirling waves spinning in the foreground, the glowing granite cliffs and lighthouse on the right, and the clouded, but colorful, sky in the background.
I liked the arrangement. I didn’t love it. I gritted my teeth. I.Needed.More.Space.To.Fit.More.In.
But I didn’t have a wider lens to expand my composition. Stepping backwards to make more space would have dumped me in the Atlantic Ocean. I didn’t have a lot of options, so I made do with my 24mm lens. It worked out well enough (says the recovering perfectionist): a photo from that evening now lives on the cover of my Photographing Acadia National Park guidebook.
When I returned home, I immediately ordered the 16-35mm lens—and immediately fell in love with the ultra-wide perspective. I realized this broader view matched how I see the world. Which meant I finally had the perfect tool to help me express that vision. Whew! My compositions could finally breathe!
I’ve changed camera systems since then, but I’m still addicted to my 7-14mm (which is a 14mm-28 equivalent in full-frame speak). Even though wide views felt instinctive to me, learning how to make images I was proud of with it took some practice. Wide-angle lenses open up a wide range of opportunities for you and your photography, but it comes with some challenges.
Let’s start from the beginning…
Wide-angle lenses are lenses with short focal lengths. Generally, anything shorter than a 35mm focal length on a full-frame camera is considered a wide-angle. Anything wider than 24mm is considered “ultra wide.” An 8mm fisheye and a 9mm non-fisheye lens are currently the widest-angle lenses on the market today.
These short focal lengths offer big perspectives. The horizontal angle of view ranges from about 55 degrees for a 35mm lens to a whopping 180 degrees for an 8mm fisheye lens. In comparison, a 300mm telephoto lens provides about a 5-degree angle of view.
Because of their extremely broad perspective, photographers tend to associate using wide-angle lenses with photographing things like big sprawling landscape scenes and big starry night skies. (They are especially effective in creating sunbursts, the radiating star-like effect when using small apertures like f/16 and f/22, in expansive landscapes.) These lenses can be useful in a variety of other situations as well, though, like adding environmental context to smaller subjects or working within tight, constrained quarters. No matter what you’re pointing at, there’s no question, you can fit a lot into a single frame with a wide-angle lens.
But just because you can fit a lot into a composition doesn’t mean you should. Including “everything” from big scenes with big open spaces with these big perspective lenses will make your photographs feel cluttered and chaotic. You’ll come home with photos that look more “meh” than majestic.
Remember K.I.S.S.—Keep It Simple Silly—from elementary school? Keep your wide-angle compositions as simple as possible. As you visualize your composition, ask yourself “To what am I responding to and why?” Fill your frame with just the elements you identify in your answer (specifically the first words that come to mind). For bigger scenes, you’re likely going to have a lot more elements that you’re excited about: the rocks, the sky, the trees, the mountains, the whole view, oh my! That’s OK. So long as the visual elements work together in a comprehensive, cohesive manner.
To make sure your visual elements play together nicely, pay attention to how you’re moving the viewer around the frame using lines, layers, and light (i.e., color and tonal contrasts). Are your lines moving the viewer into and around most of the frame? Which colors grab attention first, second, and third? Which bright tones stand out from the dark tones? Use cadence, rhythm, and flow to create movement into and around your image.
It’s equally important to know what parts of your composition are not drawing attention. We may not necessarily want to eliminate those. Instead, leverage this open, or “negative,” space to give the viewer’s eyes places to rest and to convey balance. (When we talk about composition in terms of figure-ground relationships, the figure is considered the positive space. The ground is the negative space. We aim to separate figure from ground through lines, layers, and light—with all lenses, not just wide-angle ones.) How are the layers of foreground, midground, and background working together? How are the visual elements connected to each other? How does the proximity between the layers and shapes create meaning and depth?
Check the edges of your frame for any distractions—out of focus branches, bright tones (“light leaks”), or odd crops. Before pressing the shutter, scan every part of your frame and ask yourself, “Does this detail add to my message? Or distract from it?” If it’s not helping, get rid of it or minimize it from view. Finding success with a wide-angle lens isn’t about fitting more into the frame. It’s about fitting in only what matters in helping you express the scene.
Now, the other aspect of composition we must pay extra special attention to with wide-angle lenses is how we convey depth. This is the crux of using wide-angle lenses.
Wide-angle lenses possess perspective distortion. This means these lenses exaggerate the size of visual elements. They make close objects look a lot bigger than they are. They also make far objects look a lot smaller than they are. This exaggeration in size isn’t a flaw. It’s a function of the lens.
Photographers can make the perspective distortion work in our favor if we keep in mind the “relative size illusion.” This optical illusion, which has been used by two-dimensional artists for centuries to create a sense of depth when none exists, suggests that our brains interpret the size of an object by comparing it to its surroundings. What we think we see and what we actually see isn’t always the same. Some popular relative size illusions that demonstrate how our brain tricks us include the Ebbinghaus illusion and the Ponzo illusion.
Studies of human perceptions in Gestalt psychology show that larger elements feel closer to us on the visual plane in two-dimensional art. Smaller elements feel farther away on the visual plane. This is exactly the separation we need to create the illusion of depth in a two-dimensional photograph.
The perspective distortion of a wide-angle lens will help exaggerate this even more so. Especially when you position your camera paired with a wide-angle lens close to your foreground elements. When we raise our tripods and tilt down, it’s called “forced perspective.” By getting close to the nearest visual elements, the perspective distortion forces these foreground elements look even bigger than they are in real life. Consequently, you’ll make distant elements appear smaller than they are in the physical world. Remembers, what is physically larger is not always the same as what is visually larger on the visual plane. You’re creating an illusion–tricking people’s brains into perceiving depth in a two-dimensional photograph.
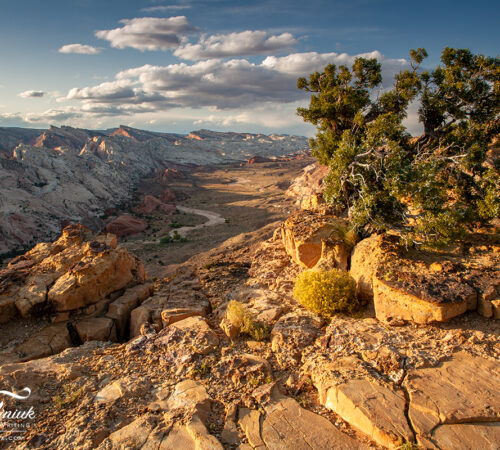
Case in point: The rock in the foreground in the photo at the top of this post is physically smaller than the trees and cliffs in the background. Significantly so, in fact. But by setting up my tripod close to the rock (about 12 inches away) and tilting down, my wide-angle lens makes the foreground seem a lot bigger than the background. I’ve pulled it closer to the viewer on the visual plane. At the same time, I’ve pushed the trees and cliffs backward on the visual plane because they are smaller.
(If you’d like another example and you’re a Patreon supporter of Dear Bubbles, be sure to log in and check out my June 2025 “Making the Photo” video where I talk through how forced perspective worked in the Badlands National Park, SD.)
While wide-angle lenses are sometimes used in photojournalism to establish the scene for a story and/or action, this is one of the reasons why wide-angle lenses aren’t used to photograph people at close range (i.e., portraits). The perspective distortion inherent to wide-angle lenses makes people’s noses appear abnormally large while making their ears look really tiny. Which makes people look like turtles. That’s not flattering. Unless you really are a turtle…
With rocks and sticks and other natural elements, we aren’t too worried about turning them into turtles. So get close to your foreground elements. Then get even closer still (assuming the landscape permits it safely).
The key to photographing with wide-angle lenses is getting close enough to ensure the different visual elements have different sizes to separate them on the visual plane. If the different elements appear to be the same size in a photograph or other two-dimensional art—which is what happens if you stand too far away from your scene with a wide-angle lens—we can’t distinguish dimension on the visual plane. So the resulting image looks flat. That’s not flattering either! For anyone! Not even for turtles!
What typically prevents photographers from getting close to their foreground is the challenge of getting everything in focus. Depth of field and hyperfocal distance and coming home with images that are out of focus are scary! Although wide-angle lenses offer the broadest depth of field of all the focal lengths, managing depth of field, specifically the hyperfocal distance, becomes critical to keeping everything in the frame (“from front to back,” meaning from foreground to background) in apparent sharp focus. For more discussion specific to depth of field, visit my column on “Another Dose of Depth of Field” at https://dearbubbles.com/2020/04/another-dose-of-depth-of-field/ . Face the fear! Amazing in-focus images with close foreground with your wide-angle lens await you! You got this!
The perspective distortion of a wide-angle lens can lead us to a greater sense of depth and expansive we feel in our landscapes. But it can also get us into a couple of undesirable issues. The distortion can make a straight horizon appeared curved. It can also make objects along the edges of your frame look tilted. This is called “edge stretch.” It’s when trees near the sides of your frame look like they’re leaning from too much wine. (I mean, wind.)
You can see a bit of edge stretch in the photo at the top of this post. It’s in the cliffs on the sides of the frame, especially near the top where the cliffs seem to fall away—or stretch—from the rest of the scene. For this composition, it’s not terrifically obnoxious so I just left it be.
Converging lines are almost impossible to avoid with an ultra-wide-angle lens, so more often than not, I don’t worry about them too much. (Because wine, I mean, wind, happens.) Curved horizons do bother me. Yes, the Earth is round, but we expect them to be straight in our photographs (which, on second thought, maybe we should ignore this expectation…)
Both of these distortion issues are almost impossible to avoid in the field. But you can address both in processing software via Filter/Lens Correction, Edit/Transform/Perspective, or my personal favorite Edit/Free Transform which enables Warp.
Besides vignette, Warp is perhaps one of my favorite editing functions. It allows you to move pixels around without affecting the integrity of your composition. This means, unlike cropping, you can keep your original composition mainly intact as you warp your pixels.
Warp is currently only available in Adobe Photoshop. To try it:
- Open an image in Photoshop.
- Duplicate the background layer (since the background layer opens in a locked state).
- Go to the Edit menu at the top of the screen and select Free Transform. Select Warp. (Alternatively, the shortcut is Control-T on a PC or Command-T on a Mac).
- Select the Warp icon. You’ll see a grid overlay on top of your image.
- To straighten the horizon, keep the Grid set to “Default.” Locate the handle on either side of the frame (indicated by the ball shape). Pull down or up on the ball on one or both sides of your frame until your horizon looks straight.
- Select the Checkmark at the top of the screen to confirm the edit.

You can address converging lines (e.g. leaning trees) via Warp as well. I’d recommend a smaller grid (like a 5×5, 7×7, or 10×10 so the adjustment affects less of your image). Warp will be more effective at preserving your original composition, but it requires more tugging and tricky maneuvering than simply using the Lens Correction and/or Perspective (both of which will crop your image…).
Beyond managing distortion, wide-angle lens can pose some technical hurdles when it comes to using filters. If your lens has a bulbous front (that curved, dome-like glass), you’ll need a special filter holder dedicated to that lens to attach filters like graduated neutral density, neutral density, and polarizing filters.
If your lens has a flat front element, you can screw filters directly onto your lens just like any other lens. However, this can cause vignetting in the corners of your frame since the the wide angle of view of the lens clips the filter’s edges. A simple way to fix this is to buy a slightly larger filter and use a step-up ring to attach it. (For more on this topic, visit my column on “Mind Those Corners” at https://dearbubbles.com/2020/09/mind-those-corners/.)
No matter the shape of the front of your lens’ glass, I tend to avoid polarizers when photographing skies with a wide-angle lens. The angle of view is wider than the effective range of polarization. This causes uneven polarization—some parts of the sky will look unnaturally darker than others. However, I will cautiously use a polarizer when photographing intimate landscapes (i.e., sans sky) where it can reduce the glare and enhance (or eliminate) reflections. Any uneven polarization is easier to mask.
These little quirks aside, a wide-angle lens can widen your horizons. It invites you to think expansively but compose with greater intention. Simplify your composition but embrace the extra space. Pay attention to and exaggerate the relationships between the elements. Leverage the perspective distortion but also be mindful of the side effects. Use filters cautiously but as needed.
It’s a big, big world out there, as they say. So get out there, and put that wide-angle lens to good use!
Be well, be brave, be wild,
~Bubbles
Have a question about photography, art, and/or the creative life? Need some advice? Looking for inspiration? Send your question to Dear Bubbles at colleen@colleenminiuk.com to be possibly featured in a future column post. (If you’d prefer a different display name than your real first name, please include your preferred nickname in your note.