Bracketing: When One isn’t Enough
Dear Bubbles:
Do you bracket your exposures? Should I be bracketing?
~Confused
Dear Confused:
The answer to both questions—as with most questions related to photography—is, it depends.
The Merriam-Webster Dictionary defines “bracket” as “to take photographs of at more than one exposure in order to ensure that the desired exposure is obtained.”
A photographer can bracket her exposure manually by adjusting her exposure settings while photographing a single composition. This capability is available in all camera modes, except Auto, including Program, Aperture-priority, Shutter speed-priority (or Time-value), and Manual. Generally speaking, a photographer establishes a baseline exposure for the first frame (e.g. adjust your exposure until your tick mark lines up with the 0 or middle line on your exposure meter). Then you’d add light in the next frame and subtract in the next one—or vice versa. The order in which you add and subtract light, or even record your baseline exposure, is immaterial.
Full-stop adjustments of 1-stop, 2-stops, and 3-stops of light over and under the baseline exposure are common (and often represented as +1/-1EV, +2/-2, and +3/-3EV respectively, with “EV” standing for exposure value and equating to a stop of light). Some cameras allow up to a +5/-5EV. That said, there’s no reason why one couldn’t make 1/3- or 1/2-stop adjustments instead of full-stop changes during a bracketing sequence.
Many digital cameras have an auto-exposure bracketing (AEB) function that permits a photographer to choose a set number of frames and a specific exposure adjustment range between each frame. AEB is usually either a button, a menu item, or both.
For example, my Olympus OMD EM1 Mark II camera has AEB button with presets that automatically create brackets of 3 frames at 2-stops over and under the baseline exposure (displayed as “3F 2.0EV”), 5 frames at 2.0EV, 7 frames at 2.0EV, 3 frames at 3.0EV and 5 frames at 3.0EV. If I go into the menu under Bracketing, I have a broader selection from which to choose. (From that same menu, I can also set up brackets for white balance, flash, ISO, artistic modes, and focus.)
Some cameras will follow these set instructions with a single push of the shutter button; others require a photographer to press the shutter button in between each frame. Some cameras display a flashing asterisk or other indicator on the screen to indicate a bracket sequence is in progress—helpful indeed in the case you get distracted and forget what you’re in the middle of (that never happens…ummm, yeah…).
Some cameras will record individual images that the photographer will then need to blend together in processing later; some cameras blend the multiple frames together in camera for you. Some cameras will allow you to select which method you prefer. It’s best to consult your camera’s instructional manual to determine how your camera handles AEB.
Bracketing is useful in situations when the dynamic range of the natural light exceeds the recording capabilities of your camera’s sensor (or your film). Dynamic range refers to the scale of light intensity from highlight to shadow. Bright lighting conditions have a greater dynamic range than overcast or low lighting conditions. I often refer to the former as “contrasty” and the latter as even illumination.
A camera communicates how it’s handled that natural range with its photographer through the histogram. Highlights on the right. Shadows on the left. Midtones in between.
Each digital sensor (or film) is designed to record a set scale of light intensities from highlights to shadows. For example, my Olympus OMD EM1 Mark II camera has a dynamic range of 12.8 stops of light. That’s quite broad compared to the film I used to use. Fujifilm Velvia 50 could eek out 3 or 4, maybe 5, stops of light. Barely.
If the shape of your histogram fits within the graph—which means the dynamic range of the scene falls within your camera’s capabilities—a single shot will suffice. If you notice spikes on the right or left sides of the histogram (or on both sides), though, your camera is not able to record the dynamic range of the scene in one shot. This is called “clipping,” where the light intensity for a scene is greater than the minimum and maximum intensities your camera can record.
For example, if my composition contains 13 or more stops of light, my Olympus camera cannot capture that full range in a single frame. My histogram will appear clipped on either the right or left sides (depending how I’ve adjusted my exposure)—or both. When I notice this, the two marbles in my brain start suggesting that bracketing will help record me record the broader range of light.
Keep two things in mind:
- The histogram displayed on the back of your camera renders data from a JPEG form of your photograph, even if you’re photographing in RAW format only. A JPEG is a compressed file format, so it contains much less data than a RAW file does. This means that the histogram you see may not necessarily share the true, full story of the light range you’ve recorded in your RAW file…if you’re curious to see the difference in this display, try photographing a variety of lighting conditions using in RAW+JPEG formats. When you load the images into processing software, convert the RAW with no adjustments. Then pull up the JPEG image and compare the histograms side by side. Note any variations between the two formats. The difference should be small, but still noticeable.)
- When you bracket, your histogram is going to go bonkers. If you’re getting a broad range of tones, it’s probably going to show spikes on the right when you overexposure and spikes on the left when you underexposure. You’re highlight alert is going to blink at you when you overexposure. Ignore all of this. You’re smarter than your camera, and you know what you’re doing better than your camera. (Right? On good days?!)
Bracketing is often associated with high dynamic range (HDR) imaging. This technique calls for a photographer to record multiple images at differing exposure points (i.e. bracket) which he will blend together—either in camera or in processing software—to convey a broader dynamic range than he can achieve in a single image. In additional to the AEB feature, many cameras these days also have a preset HDR settings which acts similarly to AEB.
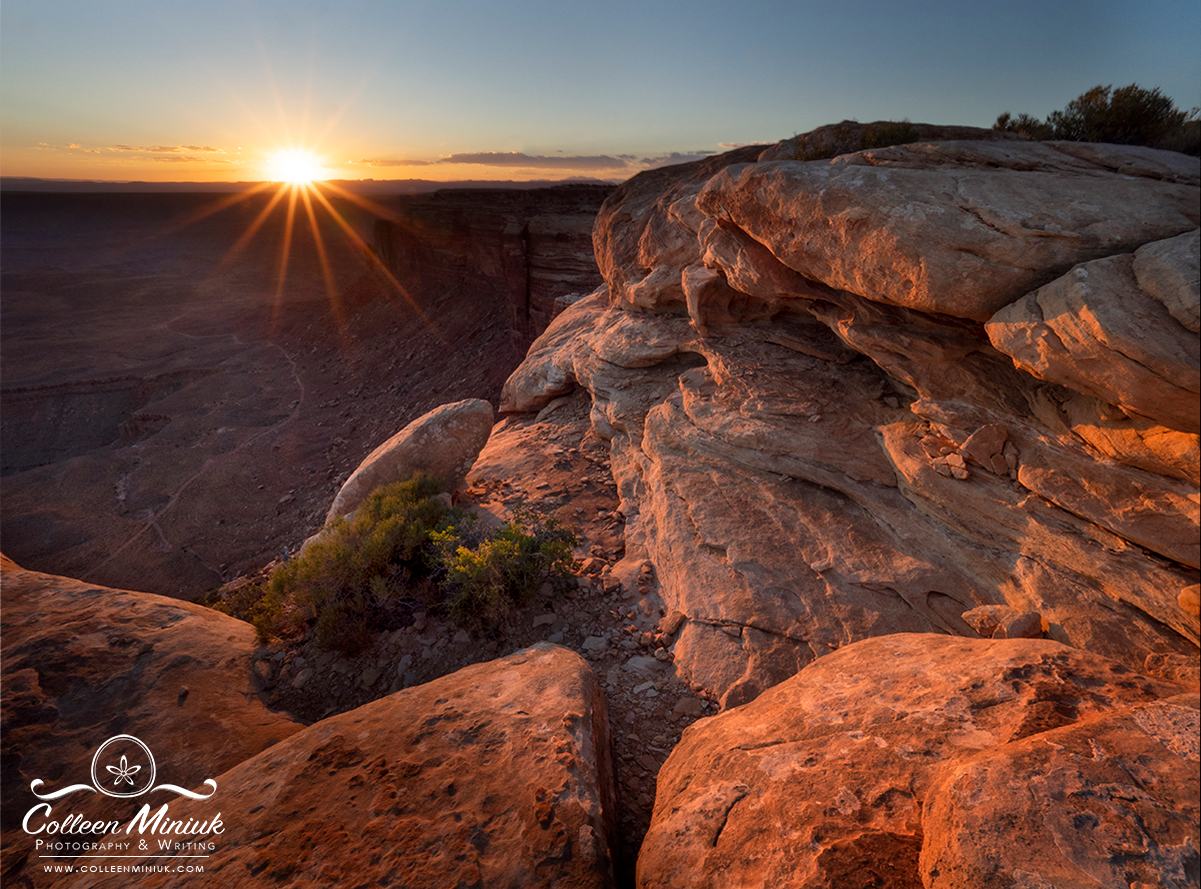
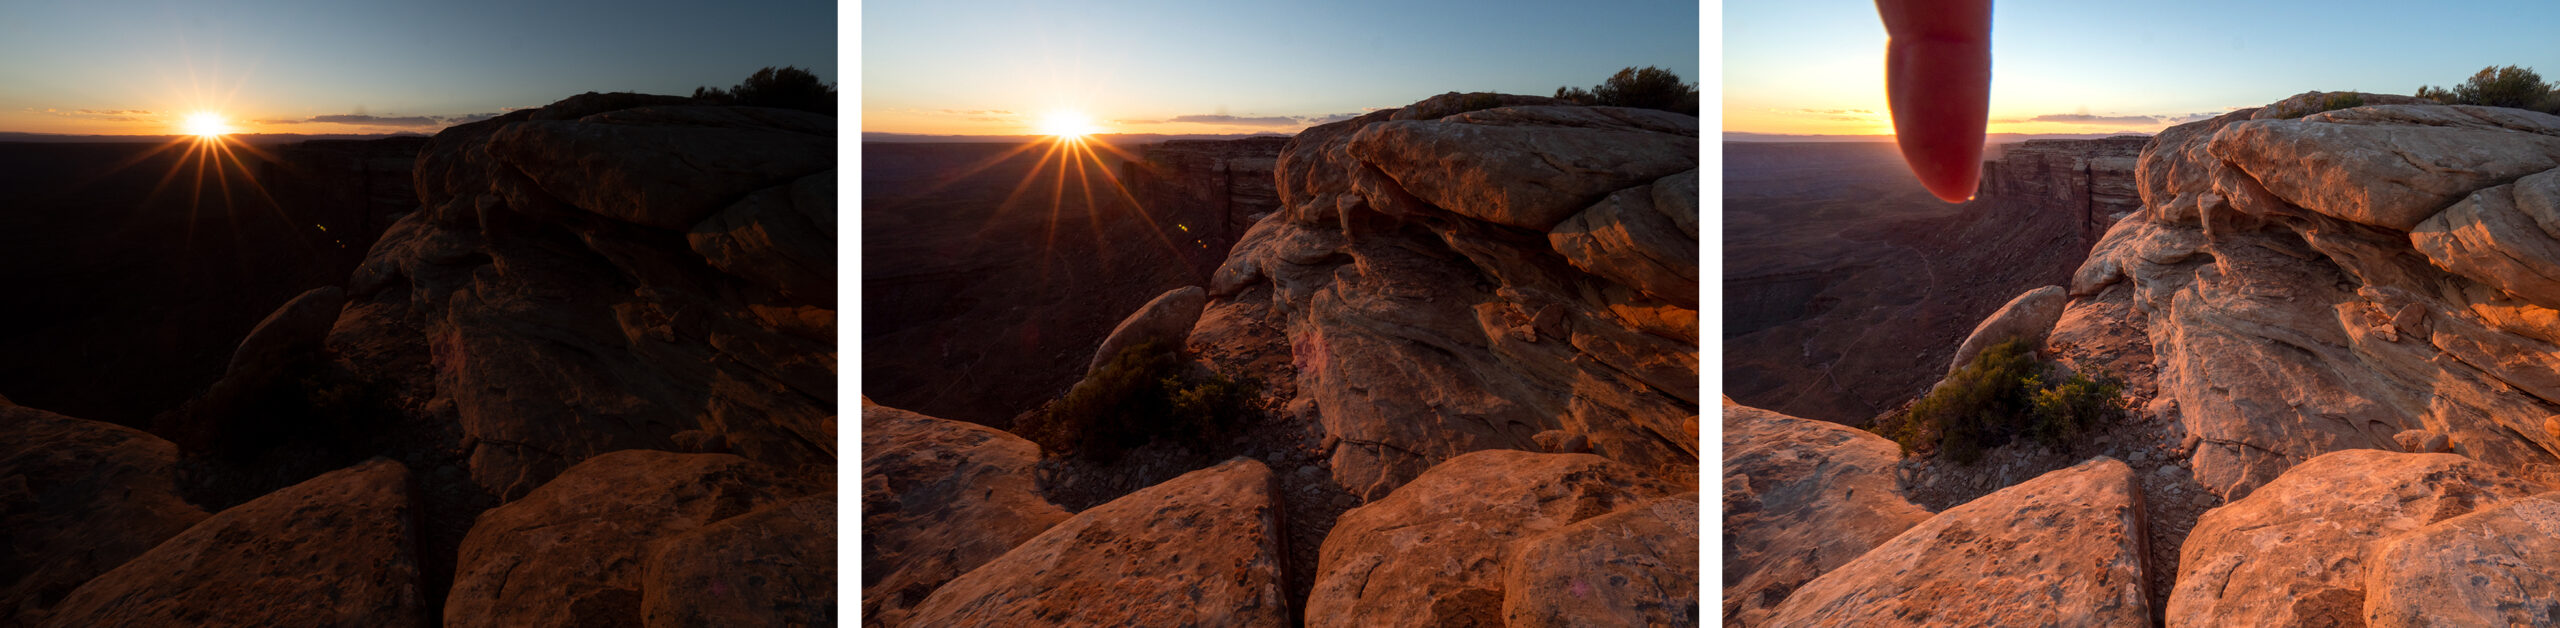
Photographers can—and do—use HDR in any type of lighting. I find the approach most useful when I’m photographing backlighting. With backlighting, the sun illuminates the scene from behind while pointing the camera into the sun. In this case, the landscape falls into deep shadows while the sky area appears overly bright, thanks to the thermonuclear explosion happening. Although sensor technology continues to improve with each new camera release, our cameras sometimes aren’t capable of recording that large of a dynamic range. If I want to see detail in the land and the sky, I bracket. If I wish to record a sunburst, I definitely bracket. If I wish to convey a silhouette, where the land is blacked out and the focus is on a cloud formation or colorful sky—I don’t bracket.
In all other lighting conditions, as purely a matter of personal taste and habits carried over from the film days, I prefer to use filters instead of bracketing to help me manage and rein in difficult exposure contrasts. For example, when photographing sidelight at sunrise and sunset, I use varying strengths of graduated neutral density filters to help me retain detail (data) in the overly bright sky backgrounds while maintaining “proper” exposure in the darker landscape, typically my foreground and midground areas. If I’m using my 7-14mm lens (a 14-28mm equivalent in 35mm speak), which has a bulbous front element, I often chose to bracket +2/-2 (or more) instead of trying to finagle hand-holding my filter at precisely the right angle to not get reflected light on my lens. (Haida makes the M15 filter holder for a variety of bulbous wide-angle lenses; I just haven’t taken the plunge for one yet.)
It may go without saying, but I’ll say it anyway: when making multiple images of the same scene, remember to use a tripod to keep your camera still and compositions aligned across the different frames you record. Also using bracketing with moving subjects can be a little tricky when using slower shutter speeds. The moving object can sometimes become a ghostly blur after you blend the three images together. If you’re need to make multiple exposures for action scenes, be sure your ISO and shutter speed are fast as they can be. Or be prepared to manually blend the images in processing to eliminate the unwanted blur.
Now, there’s only one scenario where I do not advise using bracketing. I do not advise using bracketing as a way to “spray and pray” to “ensure that the desired exposure is obtained”—that is, make a bunch of images at different exposure levels and pray one comes out. I do not advise using bracketing as a shortcut for understanding exposure, exposure compensation, and the histogram. It’s not a crutch. It’s a technique, one that should be deliberately used to help you convey your visual message—not to CYA (“cover your butt”). If you are uncertain about how to get the correct exposure for a scene, I’d encourage you practice that before diving into bracketing. By becoming more disciplined in your approach, you can save yourself from recording an enormous amount of unnecessary frames and having to spend loads of time sorting them all out during editing and processing.
So long as you’re simply paying attention to your histogram and understanding when, why, and how to make exposure adjustments based on your interpretation of the tones you see, you shouldn’t have to bracket—unless the light in the landscape suggests otherwise. Then, by all means, do whatever you need to do to ensure you’re recording the best image you can in camera and expressing your intent through your photographs, including bracketing.
Be well, be wild,
Bubbles
Have a question about photography and/or the creative life? Need some advice? Looking for inspiration? Send your question to Dear Bubbles at colleen@colleenminiuk.com to be possibly featured in a future column post. (If you’d prefer a different display name than your real first name, please include your preferred nickname in your note.

Picture Your Picture

You May Also Like
The Power of Possibilities
Framing Our Emotions