All About ME (Multiple Exposures)
Dear Bubbles,
How do you do multiple exposures?
~Barbara
Dear Barbara,
I remember learning about multiple exposures almost 20 years ago. I stood at my kitchen table anxiously unwrapping the package containing my latest roll of film. I had expected 36 frames of absolutely brilliant photographic masterpieces of the desert landscape despite my novice, but developing, skill level. What I actually got back was 35 barely mediocre, mostly over- or underexposed negatives and 1 totally jumbled disaster of an image.
I brought the film into my Saturday class at the local community college. “What did I do wrong here?” I asked, pointing to the totally jumbled disaster frame.
My teachers and a couple of classmates took turns studying it more closely on the lightbox.
“Well, it looks like you forgot to advance the film…” Sterling, one of my instructors, said with a chuckle. “You did a double exposure. It’s overexposed, but you should try it again.”
I looked down at the negative then back at him. “Is that a thing? Do people do double exposures intentionally?”
“Sure. Just make sure to underexpose both frames next time.”
What I loved about my introduction to photography is how encouraging my teachers and classmates were even during times when I seemingly messed up. Back then, I wasn’t technically capable nor confident enough to create a single frame, let alone two. So instead of seeing my accidental discovery as an opportunity to learn more about the approach, as my teachers encouraged, I saw it as mistake. Which is all just really long for I used to be a single-frame purist with strong perfectionist tendencies. We all have our faults.
I had my reasons for believing this! Hear me out!
The idea of photo montage as an art form originated in the 1850s then quickly fell out of favor as photography became seen as a way to communicate truth in ways other art forms did not (which, of course, is untrue—for more on this discussion, read “Realistic Expectations” at https://dearbubbles.com/2021/07/realistic-expectations). In the early 1900s, during the Realism movement, photographers I came to admire decades later like Ansel Adams supported the idea that a straight single-frame photograph was more “pure” than one that expressed the imagination (which fell under Pictorialism). Never mind that Ansel and other photographic realists manipulated their images in the darkroom through composites. “Pay no attention to the man behind the curtain!” said the Wizard of Oz.
Although famous artists like Man Ray, Salvador Dali, and Max Ernest embraced collage during the Surrealism movement after World War I, the act of combining photographic frames was still viewed by many as an unfortunate blunder. In fact, film camera manufacturers eventually built in a locking feature to later models to prevent unintentional mishaps. When digital cameras arrived on the scene, it wasn’t even an option in-camera. (Of course, with processing software like Adobe Photoshop you could recreate the effect.)
I’ll admit, when I first notice the Multiple Exposures function in my Olympus’ camera menu in 2017, I thought it was a silly gimmick. I didn’t even find the Image Overlay option in Playback mode until 2019—almost two years after buying the camera! While experimenting with both features, I found the digital technology inviting. A totally jumbled disaster cost nothing to create, was delete-able, and was not tangible unless I decided to process it with software. In other words, risk-free. And surprisingly, often enough, the double-exposed frames actually turned out to my liking.
Today, in addition to my normal single-frame work, I’m working on a new photographic portfolio called “Still in Motion” where I combine one still image and one image created using intentional camera movement. The project’s title has a variety of meaning but includes this: I’m a firm believer of never forgetting where we come from but I’m equally a believer in following curiosity and continually learning. I got into photography to discover new things about this world, not to stay in one single frame of mind. In other words, I’m still in motion. It’s all about growing as a human being. It’s all about ME. And by that, I mean expressing what I experience in the world through Multiple Exposures (ME, get it. Hahahaha!).
Multiple exposure is the act of combining two or more images into a single frame. Although it sounds similar, creating a multiple exposure image is different than bracketing. Indeed, bracketing is recording multiple exposures, but in separate, usually consecutive frames. High dynamic range (HDR) images, where you make multiple frames at different exposure levels then blend them, and focus-stacked images, where you make multiple frames using different focus points then blend them, also fall into the multiple exposure category. What we’re talking about here, though, is making multiple frames and blending together the compositions (and subsequently, the exposure and focus) with the intent of conveying a creative, expressive photograph.
Thanks to digital technology, this can be accomplished in multiple ways, including, but not limited to:
- The Multiple Exposure function in the camera: I find this most useful when I get an idea in a place I’m standing in the field with the intent of experimenting with the blending a bunch of different subjects within a given scene. It gives you options like the ability to choose the number of frames to blend (which isn’t limited to 2 in some cameras). The Overlay Mode option will allow you to choose whether you’ll start fresh with new consecutively-shot images or use an overlay (a previously photographed image on your memory card) to combine with all future new images you photograph so long as you do not turn off the camera or disable the ME feature. Some cameras will go even further and let you define whether you’ll apply the ME to the next two consecutive images (Single) or to a series of images (Series). Finally, the camera will give you a choice on how the camera will handle the exposure across the frames. This is called “gain”. You can let the camera do it (Auto Gain) or chose other options like Additive or Average exposure blending. In all cases, the camera aims to avoid overexposure in the final blended image. For most cameras with the ME feature, the final composite image is recorded in RAW format (while shooting in RAW).
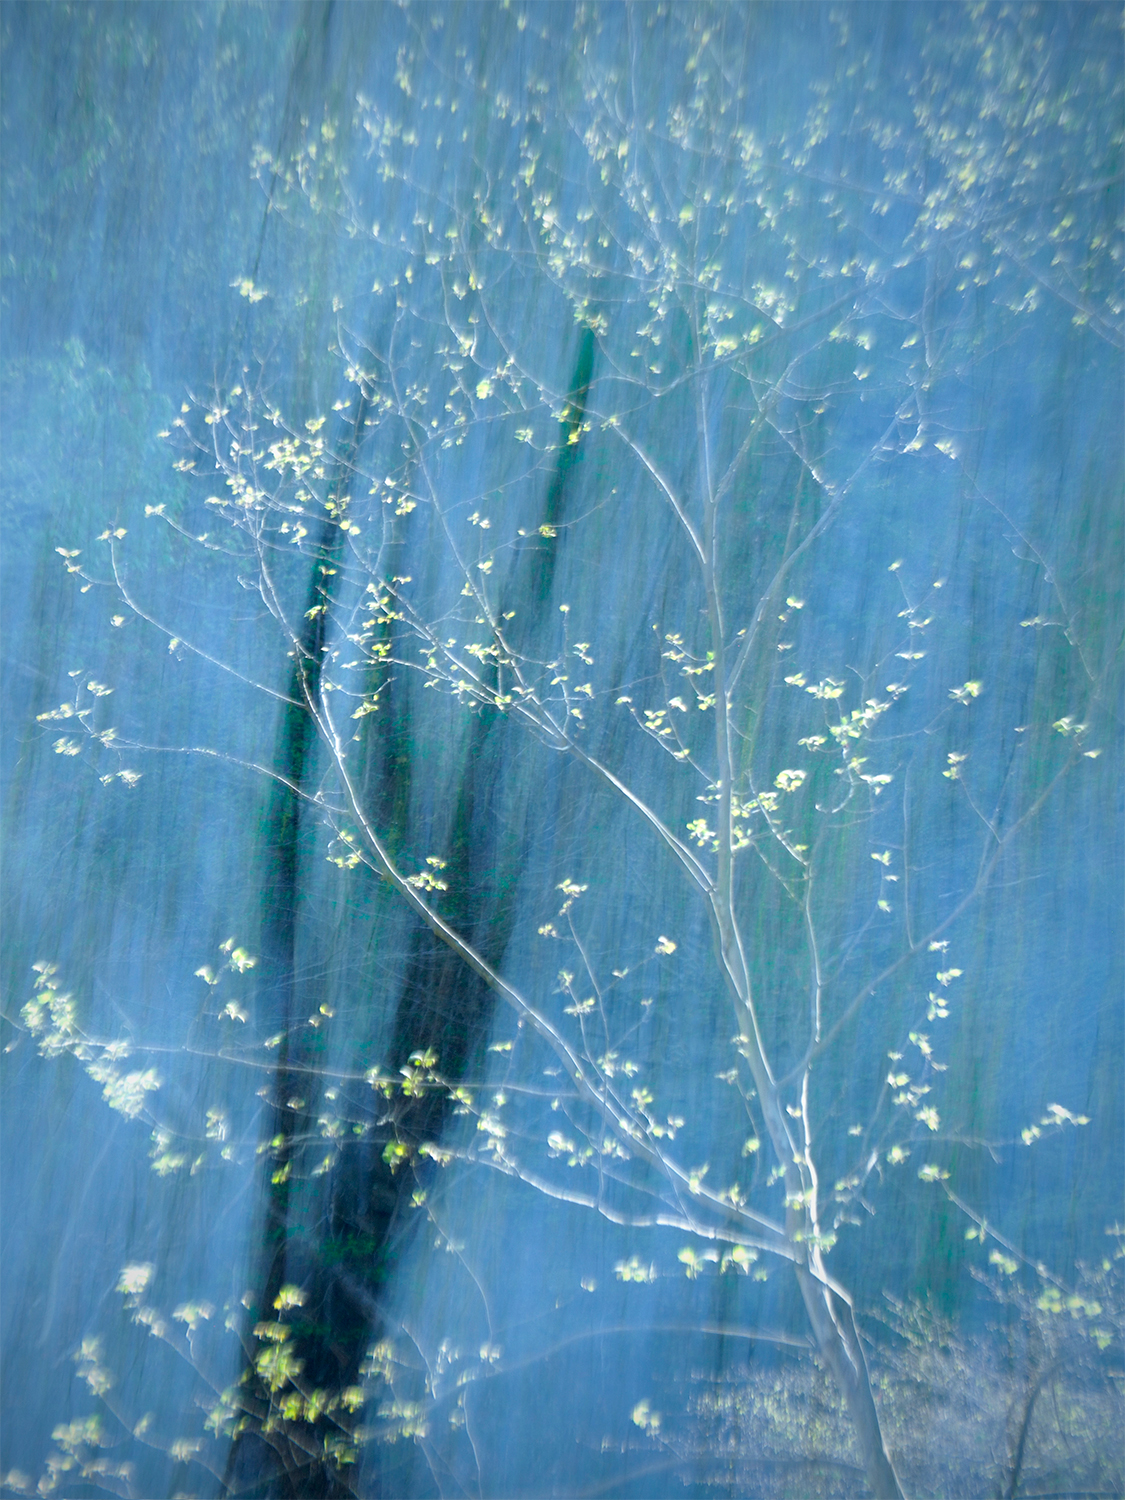
- The Image Overlay function in the camera: I chose this function when I get an idea for two images I’ve photographed on a single trip at separate times in separate places (i.e. they are not consecutive frames). It’s often found in the Playback options for a single image or in the Retouch menu. This setting allows for the combination of any two different RAW or JPEG frames on your memory card (so they don’t have to be photographed sequentially or at the same time). Once selected, you can adjust the gain (exposure) for each frame in real time. The camera will then save the merged image into a separate image/frame. Some cameras can save to RAW format while others produce a JPG of the composite (Olympus goes to a JPG—a small price to pay for such a fun effect). The two images you used for the blend remain separate and untouched from this blended image. As an example of this, I made the image at the top of this post using this function–I first created an image of a backlit tree along the road in Great Smoky Mountains National Park one morning and thought it was decent enough. It wasn’t until I did intentional camera movement with tree branches while on a hike a few days later did I think, “Huh, you know, I bet this would look amazing with that backlit tree I shot the other day. I should try blending these two and see what happens…” I selected Image Overlay and picked these two frames from my memory card, adjusted the gain/exposures, and boom, “Finding the Joy” was born.
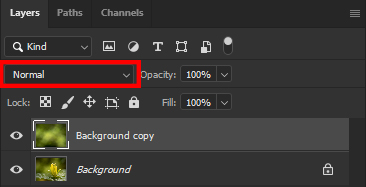
SCREENSHOT: In Adobe Photoshop, the Blend Mode field in the Layers window is not labeled, but defaults to “Normal.” Use the pull-down arrow to the right of the field to toggle through different blending options. - Processing software: I’ll tap into this mode when I get an idea for two images from two different places I’ve photographed on totally separate occasions–sometimes days, months, even years after making the single frames. After selecting the appropriate single frames in Bridge or Lightroom, use the “Load Files into Photoshop Layers” function in Adobe Bridge or the “Open As Layers In Photoshop” option from Lightroom. (You can also open the images individually in Adobe Photoshop and use “Duplicate Layers” to get to the same place). This will “stack” multiple single-frame images on top of each other like a cake (mmmmm, cake…) in Photoshop. From there, select the Blend Mode from the Layer palette. The Blend Mode isn’t labeled but the default setting is “Normal”. (See screenshot to the right for the location.) To get a definition for each available blend mode, visit Adobe’s website: https://helpx.adobe.com/photoshop/using/blending-modes.html.
- A combination of in-camera functions and processing software described above
- On your mobile device using smartphone apps like Blend Editor, BlendMe, Double Exposure, and Image Blender.
Although you can dig around your menu system, the fastest way to check whether your camera model has Multiple Exposure, Image Overlay, or both is to consult your instruction manual or do an online search. At the time of this writing, I believe newer models of the Olympus, Panasonic, Canon, Nikon, and Fuji mirrorless cameras all have some form of multiple exposure functions. Sorry Sony users, Sony does not. (Wonhhh wonhhhh waaaah…)
The functions, if available, are typically accessed while photographing in Program, Aperture-Priority, Shutter-Speed Priority, and Manual modes. It’s often not accessible when photographing in Live View. So if the menu option for Multiple Exposure is greyed out, check your camera mode and your Live View settings.
Rather than provide step-by-step instructions on how to do multiple exposures and image overlays, which differ from camera to camera, here are a few things to keep in mind as you create with multiple exposures:
- Get ready to play! Each exposure, and each combination of exposures, will differ. Analyze what you like about what happened in each frame. Try to recreate that. Define what you don’t like about what happened. Get rid of it next time. Experimentation and not fearing “failure” is how you’ll develop your preferences and create more expressive photographs through this technique.
- Start simple: Although you can select more than 2 images to blend, start with 2. Trust me. There’s going to be a lot of totally jumbled disasters going on at first. Learn how to sort the chaos out, how the technique works, what options your camera has, what you prefer, and what subject matter work best together. Once you have a solid understanding of how 2 images work together, add additional frames into the mix to increase the challenge and fun (and sometimes, let’s be honest, totally jumbled disasters!).
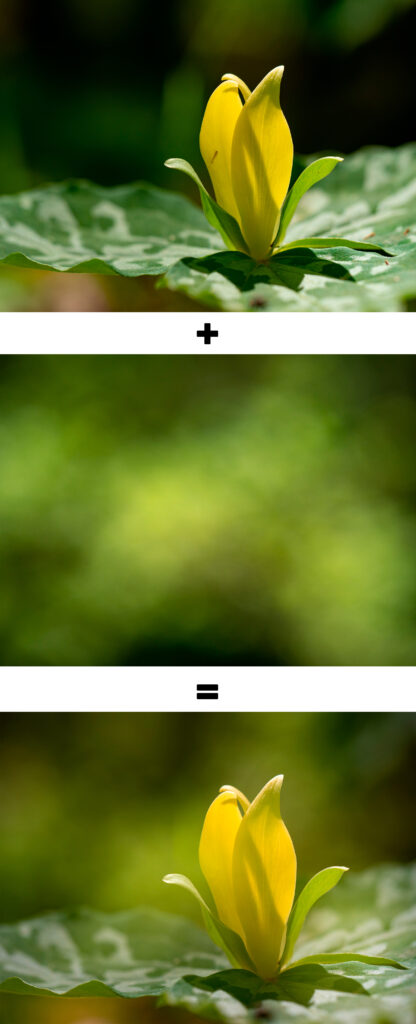
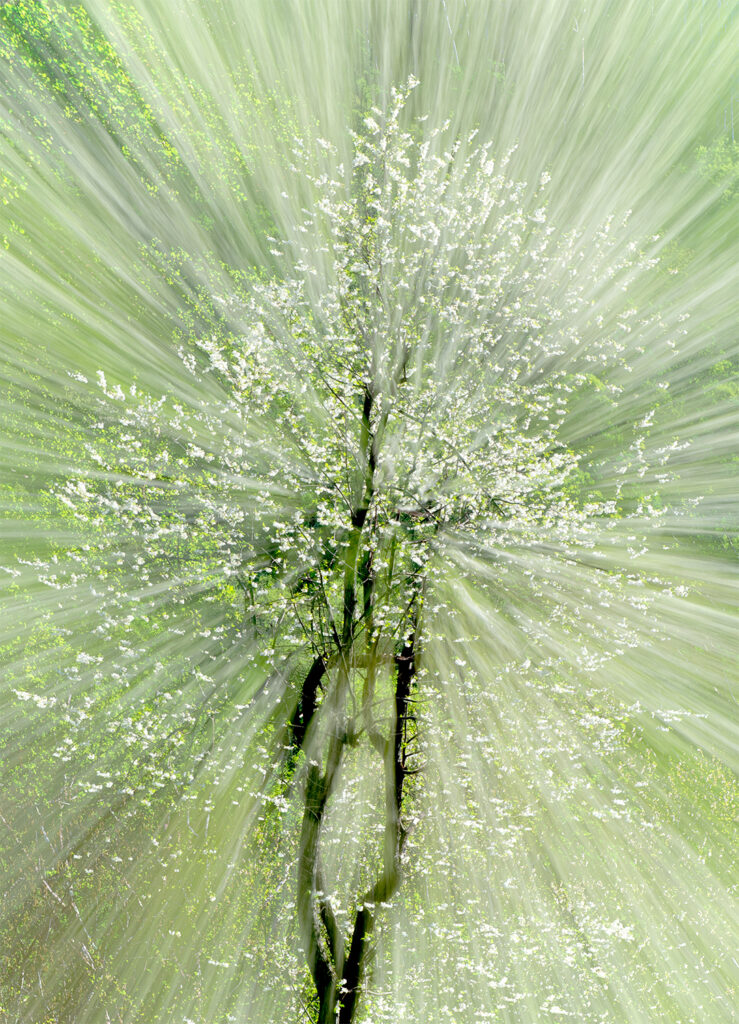
PHOTOS: I first made the top image as a single-frame shot using a shallow depth of field. I tried to position myself relative to the yellow trillium such that I captured a clean dark background. I couldn’t get what I wanted no matter what I tried. So I turned my manual focus such that the forest looked blurry and searched for an arrangement I could use as a background to overlay with my first image. After I made the image–the middle image above–I went into my Playback mode on the background image, selected Image Overlay/Merge 2 frames. picked the original image, and then adjusted the exposures to my liking. I selected OK and the camera blended the two into the bottom image. Background problem solved! - Pay attention to structure in lines, layers, and light (as you would any other single-frame photograph): In photography, the way to create depth in a two-dimensional media is to separate a figure from the ground. Photographers sometimes refer to this “identifying a primary subject and using a background.” I prefer to approach this differently in that figure-ground separation occurs through relationships between visual elements—contrasts between highlight and shadows which create lines; relationships between lines which create shapes; relationships between shapes which create layers; and relationships between highlight and shadow which separate layers. Multiple exposures only take this challenge to the next level. Not only do you need to evaluate the structure within a single-frame, but now you also need to explore the relationship between structures among multiple frames. How exciting! (For more on creating depth, read “Entering the Third Dimension:” https://dearbubbles.com/2021/12/entering-the-third-dimension). One of the things I love about creating multiple exposures is that you’re essentially creating a figure-ground illusion in a photograph (think: the Rubin’s vase illusion: https://www.illusionsindex.org/i/rubin-s-vase). The brain can’t focus on a figure and ground simultaneously so when you provide figures and grounds that can and do flip based on your perspective, the brain stays engaged with the image to try to sort it out. It’s almost hypnotizing. It’s magic, literally. (Cue the 1980s song “You Can Do Magic” by America…”You can do magic; you can have anything your heart desires…” What a great song. I digress…)
- Manage your exposure: Areas that are overexposed (i.e. pure white) will not pick up any additional data during the blending process. You could, in theory, use this to creatively isolate detail in different shapes, but watch your histogram carefully for overexposure if you do. (See, I heard you Sterling!) Otherwise lean towards making a normal exposure, perhaps even slightly underexposed, so that you have some leeway in adjusting the exposure in-camera or in processing software. Besides, darker areas tend to pick up greater detail during the merge.
- Become a gatherer of raw materials: I make background images that are out of focus, blurred, etc. on purpose as I’m wandering around even though I have absolutely no idea what purpose I’ll use them for now or later—or if I’ll even ever use them. I store them on my memory card and on my hard drive for when inspiration strikes or when I need to problem solve. For example, the photographs on the right show how I used multiple exposures to fix a messy background I didn’t like.
Here’s hoping inspiration to create images using multiple exposures has struck a chord with you. To echo the spirit of the Chandler-Gilbert Community College community, you should try it! It’s all about ME, and by that, I mean, it’s all about YOU and trying new things.
Be well, be wild,
Bubbles
Have a question about photography, art, and/or the creative life? Need some advice? Looking for inspiration? Send your question to Dear Bubbles at [email protected] to be possibly featured in a future column post. (If you’d prefer a different display name than your real first name, please include your preferred nickname in your note.

Going on a Sandimental Journey