Shoot for the Stars
Dear Bubbles:
How do you photograph stars? Any time I try to, I just get a black frame…help!
~In the Dark
Dear In the Dark:
During junior high school, any time my family went on vacation, I’d pick out a postcard to send home to my best friend. Once, while in Florida, I found a unique postcard, one that didn’t feature a drool-worthy scene of blue sky and endless views of sand and palm trees. The front was completely black. At the bottom, the text read: “Fort Lauderdale at Night.” I couldn’t stop laughing. Of course, that’s the one I sent. Every trip thereafter, I’d look for “South Padre Island at Night” or “Cayman Islands at Night” to mail to her. It became our running joke for years.
The morale of the story? If you’re photographing the night sky and you get a black frame, just title it as “Lake at Night” or “Cactus at Night.” It’s obviously postcard-worthy!
What’s that you say? That’s not exactly what you were going for? You were hoping for stars sparkling over a silhouetted or lit landscape? Ah well, then, we’ll need to change things up a bit…
Some people wake up in the middle of the night and photograph the stars before sunrise. I am not one of those people. I am a zombie until at least after 10 am and two cups of caffeine, so I prefer to play with astrophotography in the evening. Besides having my two marbles functional later in the day, I find it easier to shoot into the darkness of night versus into the looming lightness of the new morning. This means I start shooting the stars about 45-60 minutes after the sun sets, toward the end of nautical twilight and into astronomical twilight. I stop shooting the stars when I get cold, tired, or bored or a combination of the three…which could mean I pull an all-nighter.
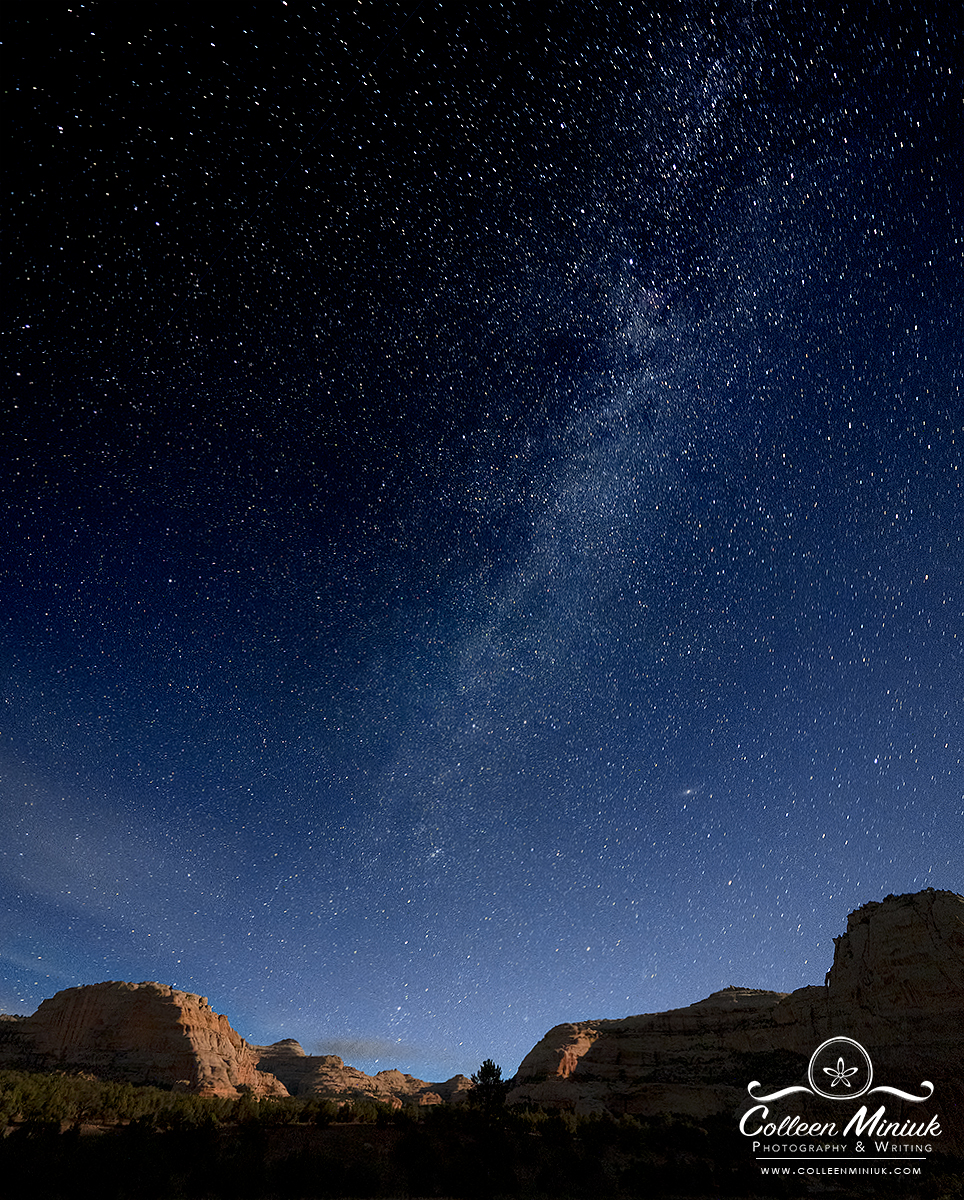
A full moon can drown out the night sky and make it more difficult to see stars in your images. (So can light pollution so select position yourself well away from civilization.) Instead, look for a time to photograph when a new moon or a crescent moon low on the horizon exists. To determine the phases and azimuth of the moon, consult The Photographer’s Ephemeris or PhotoPills. As an example, the photograph at the top of this post was made during a rising crescent moon…at 3 am during a rafting trip on the Yampa River in Colorado/Utah. (I just happened to get up to go to the bathroom and caught the moon rise happening…)
To add even more sparkle to your sky, catch the Milky Way or a meteor shower. While any time of year can render excellent results, the Galactic Center (i.e. the brightest part) of the Milky Way is most visible from March to October in the Northern Hemisphere. Meteor showers also occur throughout the year—and consistently from year to year. Check out the American Meteor Society to see the timing of not only the celestial events but also how it lines up with the brightness of the moon, and thus our likelihood of seeing the meteor activity.
If you’d like to photograph star trails that appear to rotate around a center point, you’ll want to locate the North Star (i.e. the center point) in your sky. A star chart or a star app on your mobile device can tell you where to expect Polaris relative to your location. (Hint: it’s to the north…unless you’re at the North Pole or south of the equator.)
As you know, it’s a real trick to see what you’re doing in the dark. So address a few things before the sun goes down:
- Ensure you have plenty of fully charged camera batteries. Long exposures will drain batteries quickly, especially in colder weather. I keep seven batteries in my bag at any time—one can never be too prepared! I typically go through one, maybe two, batteries a night while doing astrophotography, though.
- Set your camera on a tripod and plug your cable release (also formally called a “clicker-doo”) into my camera. Digital technology is improving, but it’s not good enough for us to hand-hold our cameras steady for 30 seconds or longer. Yet…
- Remove all camera filters from your lens. You won’t want anything slowing down your shutter speed unnecessarily. You also don’t want to risk any lens flare which can occur if a moon appears in the night sky.
- Turn off in-camera noise reduction. The in-camera noise reduction function makes a “dark frame” after each photograph you create. This doubles the amount of time required to make each image. If you’re photographing stars for long shutter speeds (e.g. hours), it’ll take twice as long to process your image in camera. Instead of making a dark frame after every snap, you can manually make a single dark frame at the end of your shooting session. To do this, at the end of your shoot, put the lens cap over your lens. Snap a frame for the same amount of time as your exposure. Later, in processing, you can utilize this single “dark frame” to subtract the noise out of all the images you recorded that evening (see instructions below)
- Compose your frame. Make sure you’re horizon is straight! I like to drop my horizon toward the bottom third of the frame, whether in vertical or horizontal orientation, to emphasize the night sky. Unless you the landscape via moonlight or artificial light (e.g. via a headlamp or flashlight which is called “light painting”), it’ll appear as a silhouette in your photograph. You’ll want enough darkened landscape to set a foundation and context for your stars but too much of it can overwhelm the frame with a black blob of nothingness.
- Set your focus point using Manual focus. Consult a Depth of Field app to determine the distance you need to focus at such that your foreground to infinity appears sharp for a given aperture. (Pro tip: pay attention to the hyperfocal distance!) Some people like to use electrical tape to hold their lens in position for the night once they have their focus point established.
- Make an exposure for the landscape during nautical twilight (30-60 minutes after the sun goes down or comes up) to blend with a later nighttime exposure. This is an optional step, but it’s one I’ll take if I wish to retain detail in the foreground with stars overhead and not get a black silhouette.

As you lose light, use a headlamp equipped with a red filter to help you do things like see camera buttons and dials, recompose your image, and illuminate the foreground to reset your focus point without losing your night vision.
Now, a black frame results when your camera hasn’t recorded enough light. It happens. It just needs more time. How much time, though, depends on how much ambient light exists and what you wish to accomplish with your photograph.
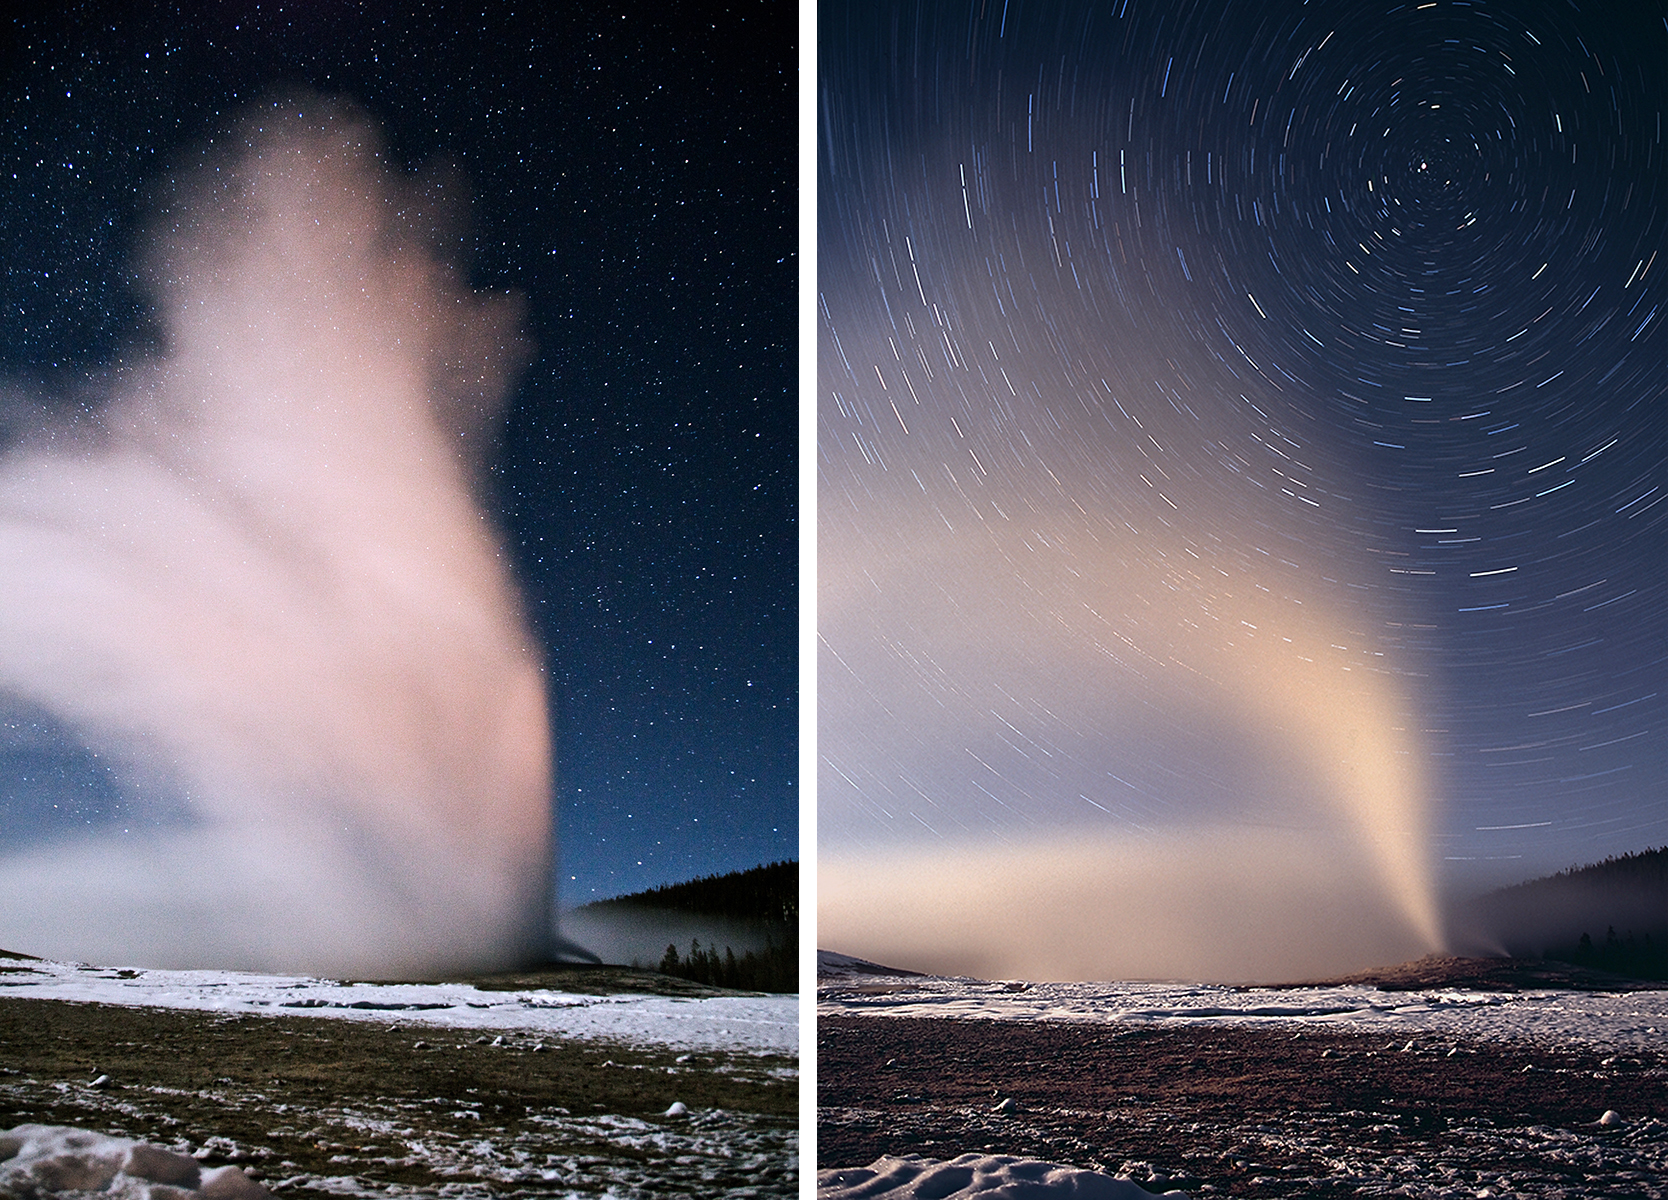
Because your exposure settings impacts how your photograph turns out, you’ll want to decide before you photograph what kind of motion you’d like to depict in the stars: frozen or blurred. In other words, do you wish for the stars to appear as dots in your sky (frozen) or as pencil-thin trails (blurred) in your photograph?
To make an image of frozen stars is more straightforward than blurred stars—and if you’re just starting out with night sky photography, this is where I’d start.
To freeze stars:
Set a fast ISO (e.g. 1600 or 3200) and a wide aperture (e.g., f/2.8 or f/4). Keep in mind with apertures that wide, your depth of field will be short. (Remember: “Small number, small depth of field.”) Make sure your foreground isn’t too close to you and falls within the near-far range calculated by the Depth of Field app.
To determine the longest exposure before the stars appear to move in your image, use the 500 Rule. Yes, it involves math. The formula is 500 divided by the focal length of your lens (the 35mm full-frame equivalent if you shoot with crop sensors as I do). For example, if you’re photographing with a 16mm lens, the longest exposure you can set before the stars start to create lines is about 31 seconds (500 /16mm = ~31 seconds). If you’re photographing with a 400mm lens, that limit is 1.25 seconds.
The Great and Almighty Gods of Photography—the internet—debate that this rule should really be the 200 Rule, the 400 Rule, or even the 600 Rule. While they fight over numerators and the pinpoint sharpness of objects that are millions and billions of miles away from us, I simply use 30 seconds as my baseline for my 16mm lens set at f/2.8 and ISO 1600 and go for it. I’m just not a fan of doing math. Or arguing.
So as with all “rules,” it’s more of a guideline. After you make a frame, zoom in on the stars to see if you see sharp dots or little streaks. If the latter occurs, reduce the amount of time your shutter speed stays open (which will require an adjustment to your aperture and/or ISO settings to let more light in during the exposure).
Before you close up shop, remember to make one last image: your dark frame. Put your lens cap over your lens and make an image with the exact exposure settings you used to make real photographs. I make my dark frame at the end, not the beginning, of my shooting session. The sensor heats up as you create images, and the dark frame at the end captures more artifacts than it would if you make the dark frame before you start photographing. (See, your black frame could, in fact, be useful to you in this process after all!)
When you get home, in processing software, load a chosen star photograph and the dark frame into the layers into Adobe Photoshop. (From Adobe Bridge, this function is under Tools/Photoshop/Load into Photoshop Layers. From Adobe Lightroom, in Develop mode, select Photo/Edit In/Open as Layers in Photoshop.) If it’s not there already, rearrange the layers so that the dark frame sits on top of the two layers. Select the dark frame layer. Then chose the Blend mode “Subtract” in the Layers palette.
If I plan to blend two images—one for the landscape and one for the stars—I’ll also load the two frames as layers in Photoshop. Instead of using the Subtract blend mode, though, I simply using masks to hide what I don’t want to appear in the final photograph. Then I’ll make adjustments to white balance, levels, and curves as needed. Photographer Royce Bair has a helpful write-up about using an S-curve in the Curves adjustment to make your night sky images pop: http://intothenightphoto.blogspot.com/2013/02/view-milky-way-with-your-naked-eye.html (It’s a little dated, but the concepts are still valid.)
To blur stars:
Now, you may wish to see lines in your nighttime photograph. Much longer shutter speeds are required if you would like to blur stars into star trails. Exposures can take hours.
Who wants to wait hours to find out you had the wrong exposure, though? You don’t! Save yourself time by firing several test shots at high ISO with a wide aperture to determine the appropriate shutter speed to render a proper exposure. Once you’ve identified that combination, then calculate the shutter speed required for aperture and ISO the image you wish to create.
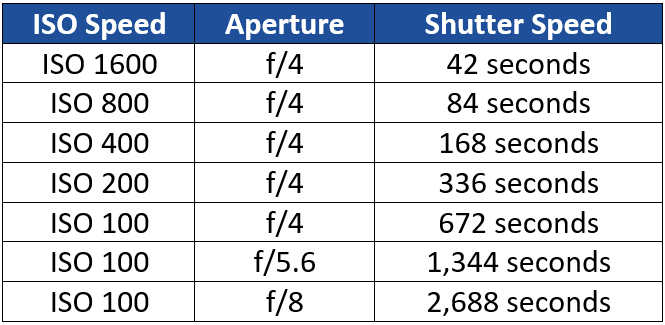
For example, suppose you wish to photograph moving stars at ISO 100 and f/8 (I made this combo up). Instead of guessing on whether an hour-long shutter speed lets in an appropriate amount of light, test your settings at high ISO speeds and your widest aperture first (e.g., ISO 1600 at f/4). Let’s assume you see a good histogram at 42 seconds while set to ISO 1600 and f/4. This renders frozen stars—not what you’re aiming for with star trails. That’s OK! It involves math, but you can calculate the same exposure levels using ISO 100 and f/8 to achieve your final vision. As you reduce the light in half moving from ISO 1600 to ISO 800, the shutter speed time doubles to maintain the same amount of exposure. From the chart below, you can see you would need a shutter speed of 2,688 seconds (or 45 minutes) to achieve the correct exposure—and your vision of moving stars.
To enable your camera to expose at times beyond 30 seconds, switch your camera mode to Bulb camera mode. Reset your ISO and aperture to whatever you desire. Set a timer for your desired time. Some cameras have a timer built in. Otherwise you might need to use an external device like your mobile phone or watch to keep track of time. Keep in mind when you’re exposing for extended periods of time like 60 minutes, a minute or two less or more isn’t going to affect the exposure level of the final image significantly. When you’re ready to rock, release the shutter with a locking cable release. Grab an adult beverage. Sit back and marvel over the universe overhead while your camera works for you.
With the sensor I have on my Olympus OMD EM1 Mark II, I get too much noise at those long exposure levels. The sensor heats up and produces unsightly artifacts and noise to the point the image is unusable. (One downside of mirrorless technology…some mirrorless cameras are better than others at astrophotography, but there’s still a ways to go to catch up to the good ole film camera days.)
To get around this technical limitation, you can make multiple images throughout the evening and blend them together in processing software. To do this, an intervolumeter will help. An intervolumeter enables you to fire off multiple frames back-to-back with an interval of time between them. Some intervolumeters are external, like fancy clicker-doo (i.e. cable release). Some cameras, like mine, have an intervolumeter built into the functions of the camera. Either way, you’ll set the number of frames you wish and how much time you want in between frames. When attempting to collect multiple frames of stars, I tinker with my settings but seem to get the best results with 20-30 frames with 5-minute exposure each.
You can stack these images in Photoshop (using the load into layers approach), but external star stacking software like Deep Sky Stacker (free), Starry Landscape Stacker ($39.95, Mac-based), or the Sequator (free, Windows-based) have beefier algorithms to align stars and process large image files.
So there you have it, In the Dark. Find yourself a dark night sky, grab your camera, and give these techniques a try. Whatever you decide, remember: shoot for the stars!
Be well, be wild,
~Bubbles
Have a question about photography, art, and/or the creative life? Need some advice? Looking for inspiration? Send your question to Dear Bubbles at [email protected] to be possibly featured in a future column post. (If you’d prefer a different display name than your real first name, please include your preferred nickname in your note.

Trying on for Size


One Comment
Sarah S
Thanks so much for this very detailed and practical explanation!