Clearing the Dust
Dear Bubbles:
How do you clean your camera sensor? Do you clean it yourself or take it somewhere? And how often do you do it?
~Dusty Dan
Dear Dusty Dan,
How do I clean my camera sensor? Verrrrrrry, very carefully…
When I bought my first digital camera in 2007, nothing terrified me more than cleaning my camera sensor. Experts talked about how delicate the sensor was and how easy it would be to damage it even if you made the smallest of mistake in doing so. Just thinking about destroying the sensor with a single touch made me shudder.
Because I didn’t trust my understanding of the process or the steadiness of my hands to perform such a task, I used to outsource the cleaning to Canon (when I photographed with Canon equipment) and to my local camera shop, Tempe Camera. Over time, though, I’ve become more comfortable with digital technology—which means I’ve watched a lot more YouTube videos on the cleaning process to help build my confidence. When I transitioned into my Panasonic and now Olympus mirrorless cameras, I’ve started taking on most of the responsibility myself. (Maybe also because they are cheaper to replace than my Canon’s were…)
For starters, many digital cameras now possess an automatic cleaning mode. When you turn the camera on or off, the IR filter in front of the sensor vibrates at high frequency (35,000 to 50,000 hertz—one hertz equals one cycle per second—so ultrasonically fast) to shake off loose particles. Some manufacturers use sensor shifting instead, which shakes the actual sensor at lower frequency (100 hertz). Particles that fall off are collected by a strip of adhesive. This new-ish technology has certainly helped when compared to earlier non-self-cleaning models, but it doesn’t always do the trick.
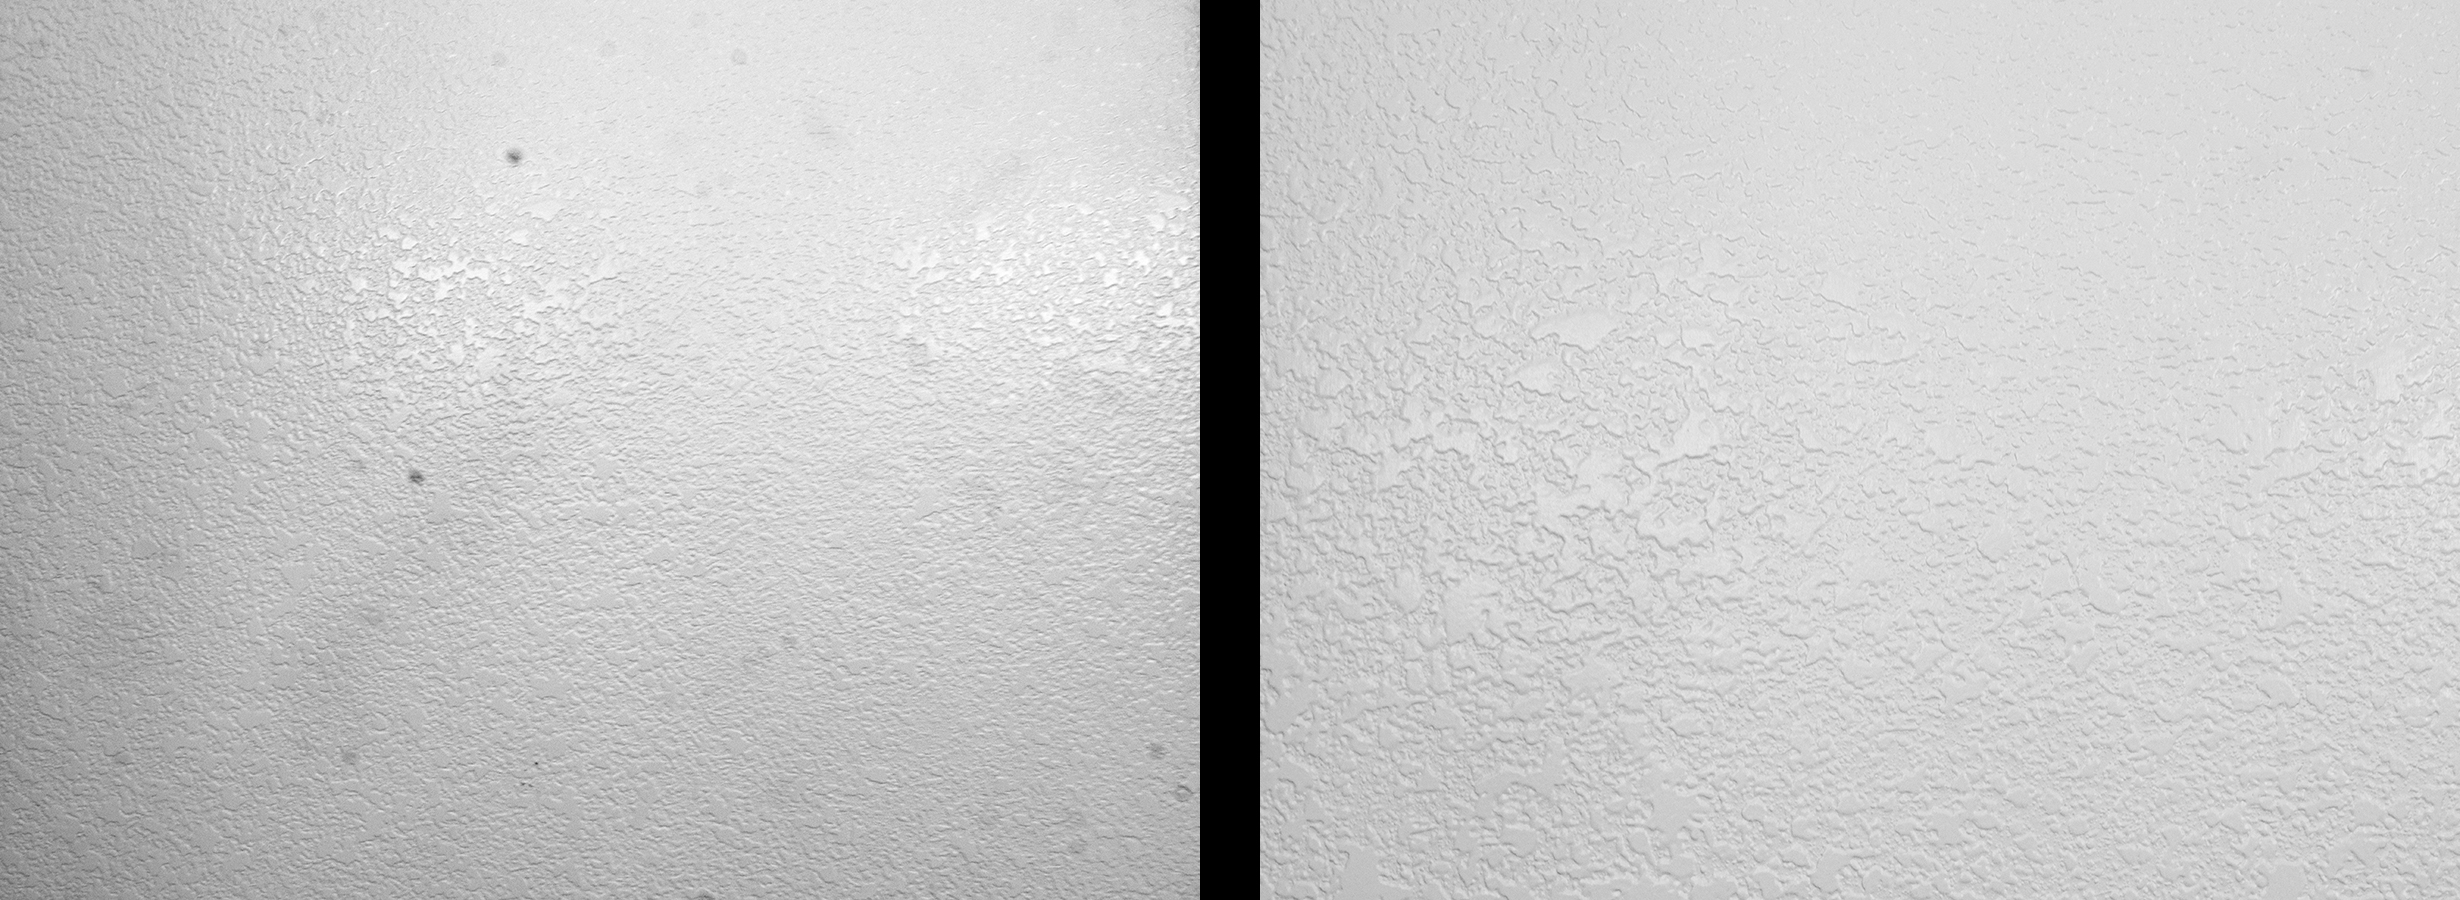
After each of my photographic outings, especially after ones in sandy or salty environments involving high winds, I’ll test the state of my sensor as soon as I get home. To do this, I set my camera to a small aperture like an f/16 or f/22 and a low ISO around ISO 100 or 200. Then, I photograph a white wall, a blank sheet of paper, or a clear blue sky—anything solid and lighter in color will help illuminate the darker dust circles. (A wide aperture has a short enough depth of field, the dust spots might not be as obvious…)
If the frame looks relatively clean, I won’t take any action. If I see more than a few spots, though, I know it’s time for a clean. I’ll start with a “dry clean” to see if I can get rid of the dust spots quickly. Sometimes all it takes is a couple of strong puffs of air from a blower and a quick swipe with the static brush or a dry swab to take care of business. If I can’t get rid of the issues, I’ll move to a “wet clean,” which involves gently swabbing the sensor with a tiny amount of alcohol-free liquid. I use a cleaning kit from Altura, but Delkin and other manufacturers also offer viable alternatives (in kits and as individual pieces).
Afterwards, I’ll take another test shot to confirm my success (or lack thereof). I’ll also upload this frame to view on my computer screen (which I also keep clean) to review in processing software to double check. With my worsening eyesight in my advancing age, I don’t always see smaller spots on my camera’s LCD screen while in the field. (As an aside, I do get some of my best macro visualizations while cleaning dust spots on my photos zoomed in at 100% on my computer screen…)
If I can’t get a tidy enough sensor on my own, I’ll send it out to the big dogs for a thorough cleaning. I do this once every year or two depending on how hard I’ve been on my equipment. Most of the digital camera manufacturers these days offer cleaning services for a reasonable fee. Some even offer a “pro” program. If you qualify (i.e. have purchased a certain amount of their fancy equipment), you can get special perks like free shipping, expedited service, free cleanings, and loaners. Google your camera brand plus “professional services” to find out what your manufacturer offers. If you don’t qualify or aren’t satisfied with the terms of their programs, talk with your local camera shop. If they don’t perform the cleaning service in-house, they’ll likely know who to recommend.
Now, the best way to minimize the need for sensor cleaning is to keep it clean in the first place by:
- Being careful when changing lenses in the field, especially if it’s windy or wet out. The Great and Almighty Gods of Photography—the internet—often suggest photographers should avoid changing lenses in the field. This is hogwash. I never let my equipment—or the risk of getting it a little dirty—get in the way of me executing my personal vision. I’m in charge! Change to whatever lens you need when you need it. Just protect it from the elements as best you can (e.g. shield the wind with your body; change your lens in your camera backpack). Or buy a broad zoom lens to minimize your need to swap lenses frequently. (This is why I bought a 14-150mm lens, which is a 28-300mm equivalent in 35mm terms—so I didn’t have to change lenses while shooting from my stand-up paddleboard.)
- Using rain coverings in wind, sand, rain, and spray. Brands like Optech and ThinkTank offer formal rain covers, but a garbage bag and/or shower cap work in a pinch too.
- Keeping your lenses clean. It doesn’t matter a lick how clean your camera sensor is if your lens glass is a mess. Keep a lens cap on when you aren’t photographing. Keep multiple dry lens cloths on hand as well as blowers, brushes, swabs, etc. when photographing in harsh conditions.
- Keep a filter on your lens. Filters don’t come cheap, but they’re cheaper than replacing a lens if you get a scratch. Using a UV filter can protect your glass from dust and scratches. I was taking my UV filter on and off enough that I’ve bypassed the UV filter and just keep my polarizer on all the time. Yes, a polarizer is more expensive than a UV filter to replace but that cost is worth the reduction of time and hassle in the field for me.
If all else fails, processing software does offer tools, like the Spot Removal, Clone Stamp, and Spot Healing Brush functions in Adobe products. But who wants to sit in front of a computer mindlessly clicking a mouse on top of dust spot for hours? I know you can do it while listening to music and drinking bubbly, but there are literally a million and one things I’d much rather do with my time than that—like photographing in some beautiful place in windy, sandy, and wet conditions!
Be well, be wild,
~Bubbles
Have a question about photography, art, and/or the creative life? Need some advice? Looking for inspiration? Send your question to Dear Bubbles at [email protected] to be possibly featured in a future column post. (If you’d prefer a different display name than your real first name, please include your preferred nickname in your note.)

A Slice of Color