Bursting with Light
Dear Bubbles:
You recently posted a picture of a sun with rays coming out of it but you could see detail in the foreground too. How did you do that? I’ve tried to shoot into the sun before, but my whole frame turns black and the sun looks like a bright smudge of light. What am I doing wrong?
~On the Dark Side
Dear On the Dark Side:
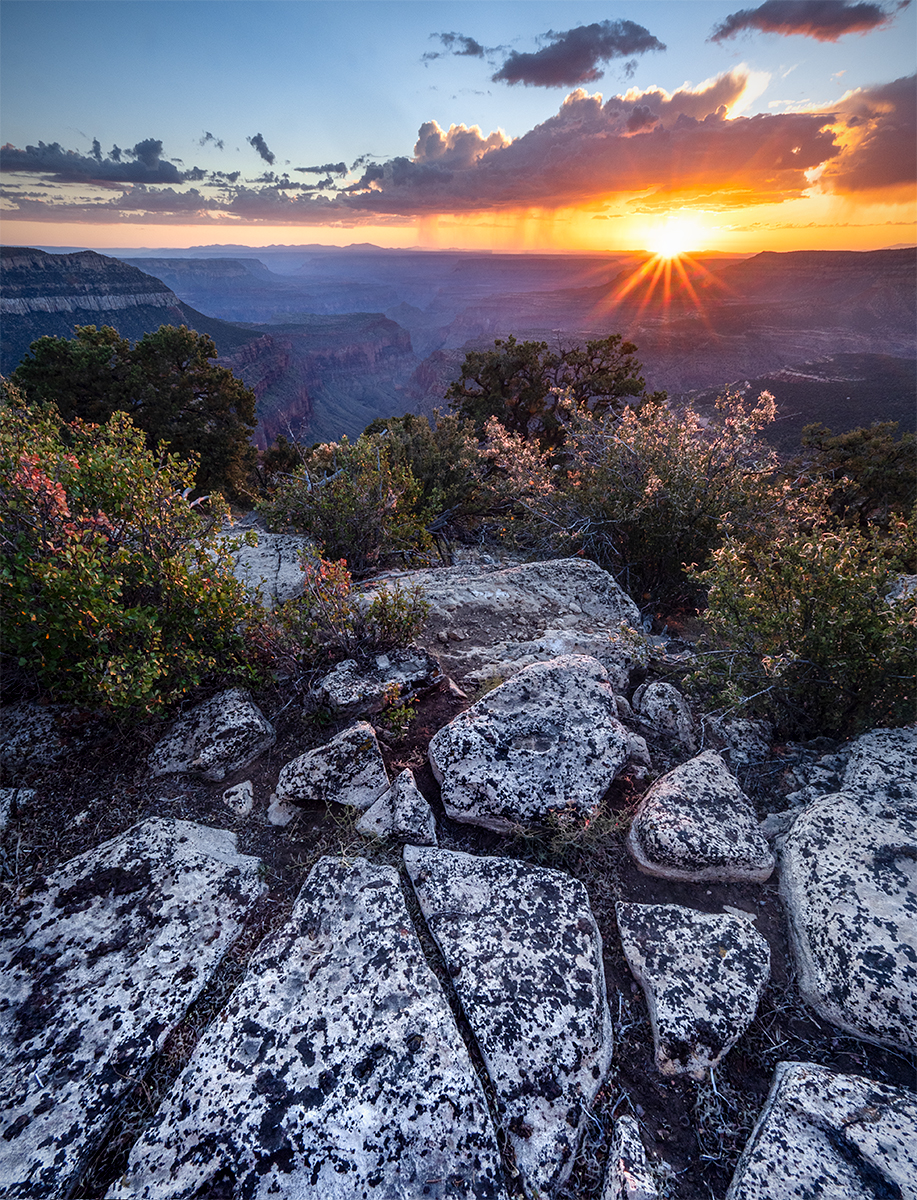
I posted a photograph on Facebook and Instagram a few weeks ago that featured a setting sun along the North Rim of the Grand Canyon. Sunbursts (which are also called sun stars, starbursts, and sun flares) are a wonderful way to add a sense of hope and happiness to a nature scene. Symbolically, humans tend to associate the sun with life, strength, energy, rejuvenation, freshness, and other positive vibes. At the time I made the photograph, I was celebrating all of those things which drove my decision to include it in my scene.
Recording a sunburst in a photograph is fairly straight-forward:
- Chose a lens. Wider-angle lenses and higher-quality lenses tend to produce more pronounced sunbursts. The number of rays or points you see radiating from the sun depends on the shape of your aperture and the number of blades your lens possesses. If you have a polygonal-shaped aperture, with an even amount of blades, you’ll see one ray per blade (i.e. 6 blades = 6 points). If you have an odd amount of blades, you’ll see double as many rays as the number of blades (i.e. 7 blades = 14 rays). If you have a circular aperture, you’ll see small, blurry looking circles—not a star effect. The best way to check this? . You’ll be able to impress all your friends at happy hour with this information, I’m sure.
- Remove all filters including your UV filter. Anything positioned in front of the lens could cause unintentional lens flare. When a bright light reflects into your lens, it can produce weird circular artifacts emitting from the sun across your frame. These flares look like faint purple, orange, yellow, even rainbow-colored circles of all sizes. They look like bubbles (!!!), so you’d think they’d be desirable. They usually aren’t. They’re usually distracting. With backlighting, these artifacts are often unavoidable. Filters can make it even worse. You can reduce the effect, though, by removing all filters before you shoot and by protecting the front of your lens with a lens hood/shade, your hand, your hat, etc. (Here’s your dose of random useless knowledge for the day: In theatrical terms, these protectors are called “gobo’s,” or “go between’s,” meaning “go between the light and lens.”)
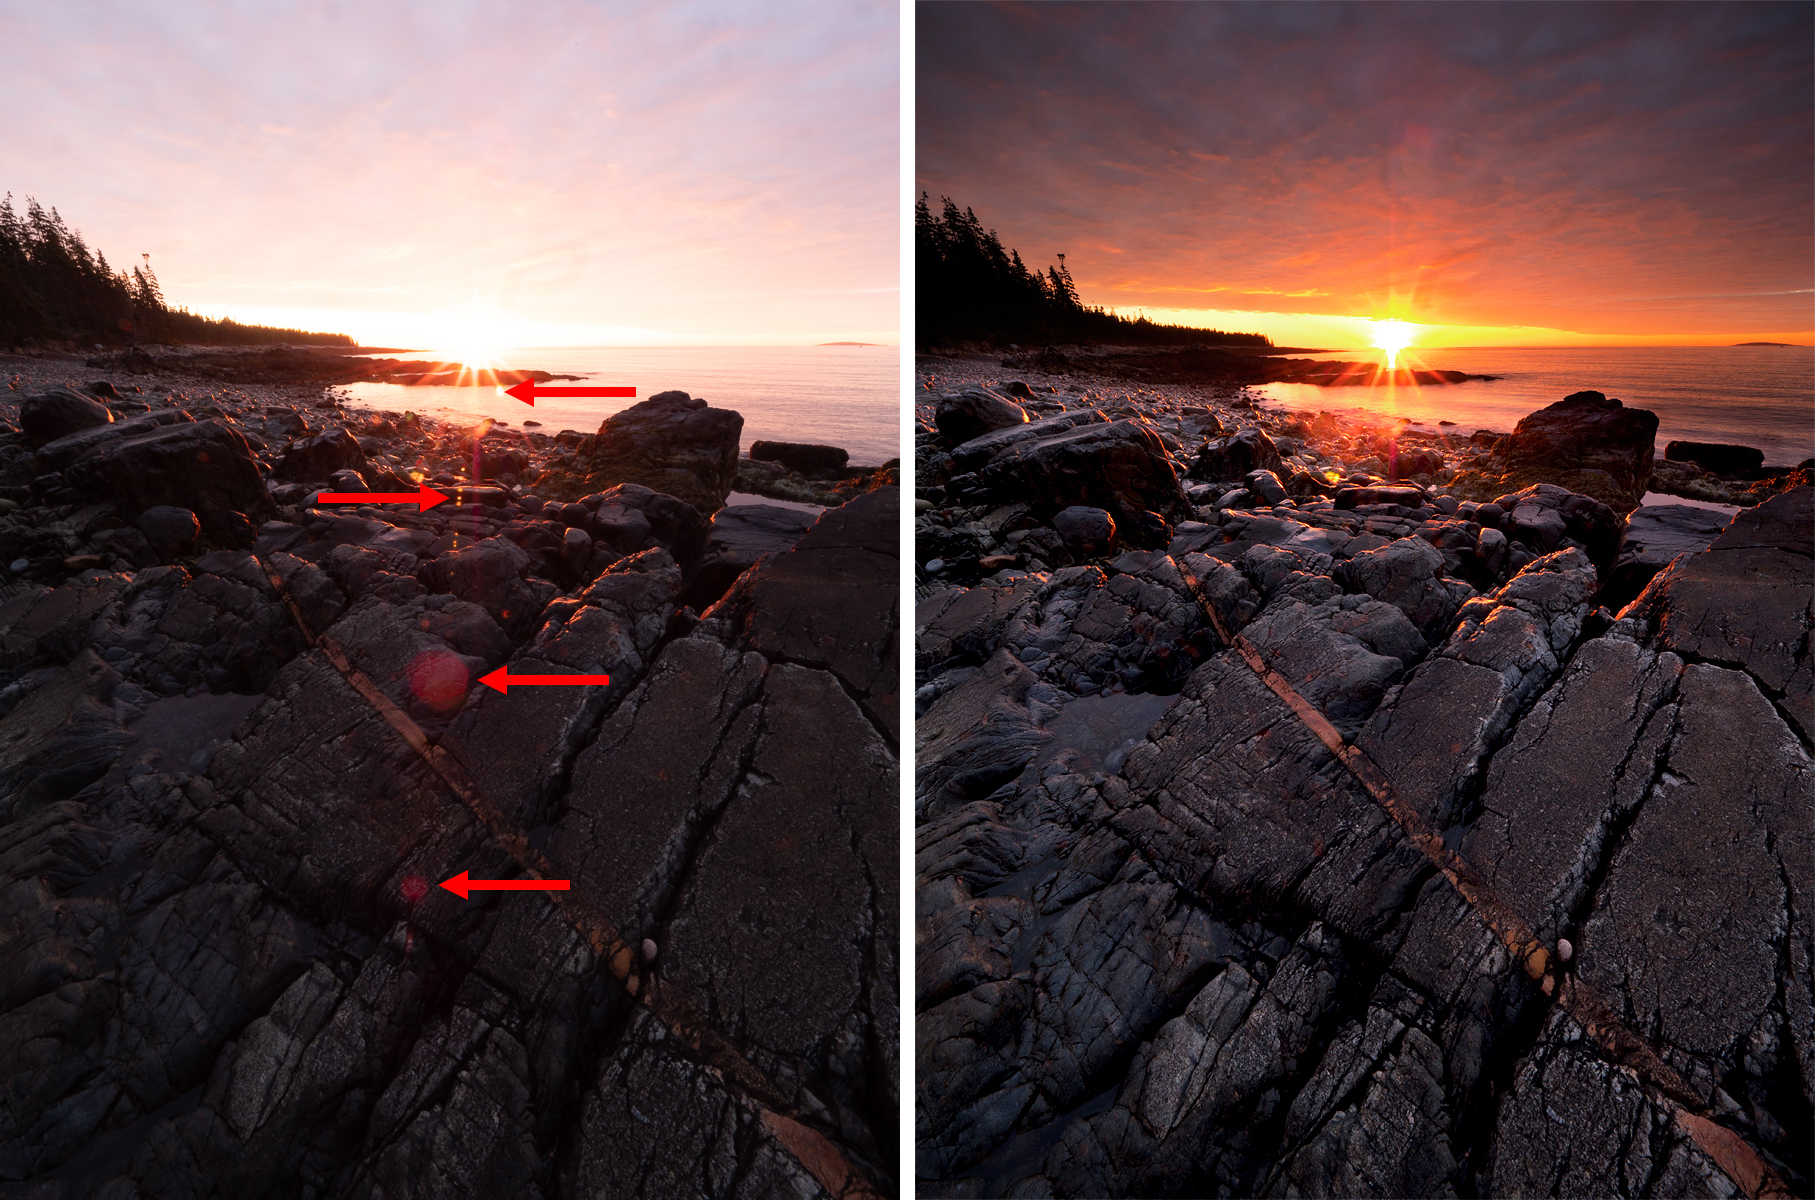
PHOTO COMPARISON: The arrows in the photograph on the left point to lens flares. When incorporated deliberately into the composition, they can be acceptable. For this image, though, the circular shapes contrasted with the lines in the rocks–a juxtaposition I wasn’t interested in conveying. I wanted to eliminate them in the final image. To resolve this, I used two images–one exposed for the sky (dark) and one exposed for the foreground (light, with my finger placed over the sun), then blended together later in processing software. This technique is described below. - Point your lens toward the sun. A partially obstructed sun (i.e. behind a tree, peaking out from a cloud, “touching” a distant horizon) tends to create sharper rays. As you set your composition up, do NOT look directly into the sun. It’ll burn your retinas. That would be no bueno.
- Set a small aperture like f/16 or f/22. Each lens will produce different shapes and each aperture will change the sharpness of rays. I recommend testing each of your lenses to determine the aperture setting that renders the best results–the “best” being subjective and dependent on your tastes. For example, I get nice sunbursts with my 7-14mm lens (which is a 14-28mm equivalent in 35mm full frame terms) around f/8. With my 14-150mm (28-300mm equivalent), it takes at least an f/16. Knowing this ahead of time helps me decide what lens I wish to use in the field. It also helps me chose an appropriate aperture to achieve my desired depth of field and to avoid diffraction and chromatic aberration (see my earlier post Choose Wisely for more on this).
- Underexpose by about a stop of light via your shutter speed—my preference—or ISO.
- Click the shutter!
While the approach may be formulaic, it’s not without challenges. When you review your resulting photograph on your camera’s LCD or on your computer at home, you might notice two things related to the exposure:
- No matter how dark you set your exposure, you can never get the sun to stop blinking in your highlight alert—and you have a spike off the right side of your histogram. As you keep underexposing the frame, you lose all detail in the rest of the frame.
- You can’t see detail in the foreground because it’s too dark. Lightening the image, though, only makes the sun brighter and the rays less pronounced. Your highlight alert screams at you that the sky is overexposed. A spike appears off the left side of your histogram.
When we turn our cameras toward the sun, we are photographing backlighting. The light source (i.e. the sun) illuminates our subjects from behind. This means we’re shooting into a shadow—a dark one too. This type of light is one of the most difficult lighting situations we face as photographers, because the contrast between the sky and land can be extreme–so extreme that our camera cannot record the broad dynamic range of a scene in a single-frame.
Dynamic range in photography refers to the difference between the whitest and darkest tones in a photograph. It is measured, like exposure, in stops of light. The official definition of “dynamic range” according to the Merriam Webster Dictionary is “the ratio of the strongest to the weakest sound intensity that can be transmitted or reproduced by an audio or broadcasting system.” Methinks this needs to be updated…
In any case, The Great and Almighty Gods of Photography—the internet—suggest our eyes have a dynamic range anywhere from 15-25 stops of light. That’s a bit misleading, because our eyes constantly adjust to vast ranges of tonalities automatically so it’s hard to quantify and thus, compare. What we see as blue sky can appear as white and what we see as detail in the foreground can disappear into a black abyss in a photograph. Even though our eyeballs may see detail in the shadows and highlights for a given scene, our camera cannot.
Although it varies, most digital SLR cameras these days hold about 11-15 stops of light in a single image. (This is major progress from the Fujifilm Velvia 50 slide film I used to shoot where the dynamic range was 3-4, maybe 5, stops!) According to Imaging Resource, my Olympus OMD EM1 Mark II mirrorless camera has a peak dynamic range of 12.84 stops at its base ISO (i.e., ISO 200). Higher ISOs decrease the dynamic range, so this falls to 7.6 stops at the highest ISOs for my camera. It seems with each new technology turn, the dynamic range of sensors improve and expand. Maybe one day our cameras will process light the way we see it…
Until then, though, we shouldn’t let technological limitations get in the way of delivering our vision, right? Right! There are a few ways to handle this challenge:
- Use a graduated neutral-density filter in the field. By positioning a graduated neutral density filter over the sky (the gradation on the filter lined up with the horizon line), you can darken the tones found in the bright light in the sky. How much light it holds back depends on the strength of filter you use. I suggest at least a 4-stop graduated neutral-density filter when photographing sunbursts. That said, using a filter on bulbous lenses (like my wide-angle 7-14mm, which creates the best sunstar in my kit) is difficult, if not impossible, unless you have a specialty (and expensive) filter holder system. Which I don’t have. So I use solution #2 or #3 instead.
- Employ High Dynamic Range (HDR) techniques. The HDR approach aims to expand the dynamic range for an image—but it requires at least three or more images to do so. (Some photographers like to bracket five, seven, nine, or more images as their raw materials. That’s cool. The greater the contrast in the scene, the more images I’d involve.) The goal here is to record at least one image that captures a range of midtones (called “0”), a second image for the bright tones (+1, +2, +3 and so on), and a third for the dark tones (-1, -2, -3, and so on). If you include more than three images, you can expand the tonal range even more so or work in smaller increments than full stops of light (like half- or third-stops of light). Some cameras process the sequence of images in-camera. This typically results in a JPG image (so those who prefer to shoot in RAW format may not chose this path even if your camera is capable of it because it will limit your processing). If your camera doesn’t combine the images or you’d prefer to do it yourself manually, you can merge them in processing software. In Adobe Bridge, select the series of photographs. Then select Tools/Photoshop/Merge into HDR Pro. In Adobe Lightroom, select the photos, then choose Photo/Photo Merge/HDR. Dedicated software like Photomatix, Aurora HDR, and HDR Efex Pro (by Nik), among others, can also assist with the combination of images.
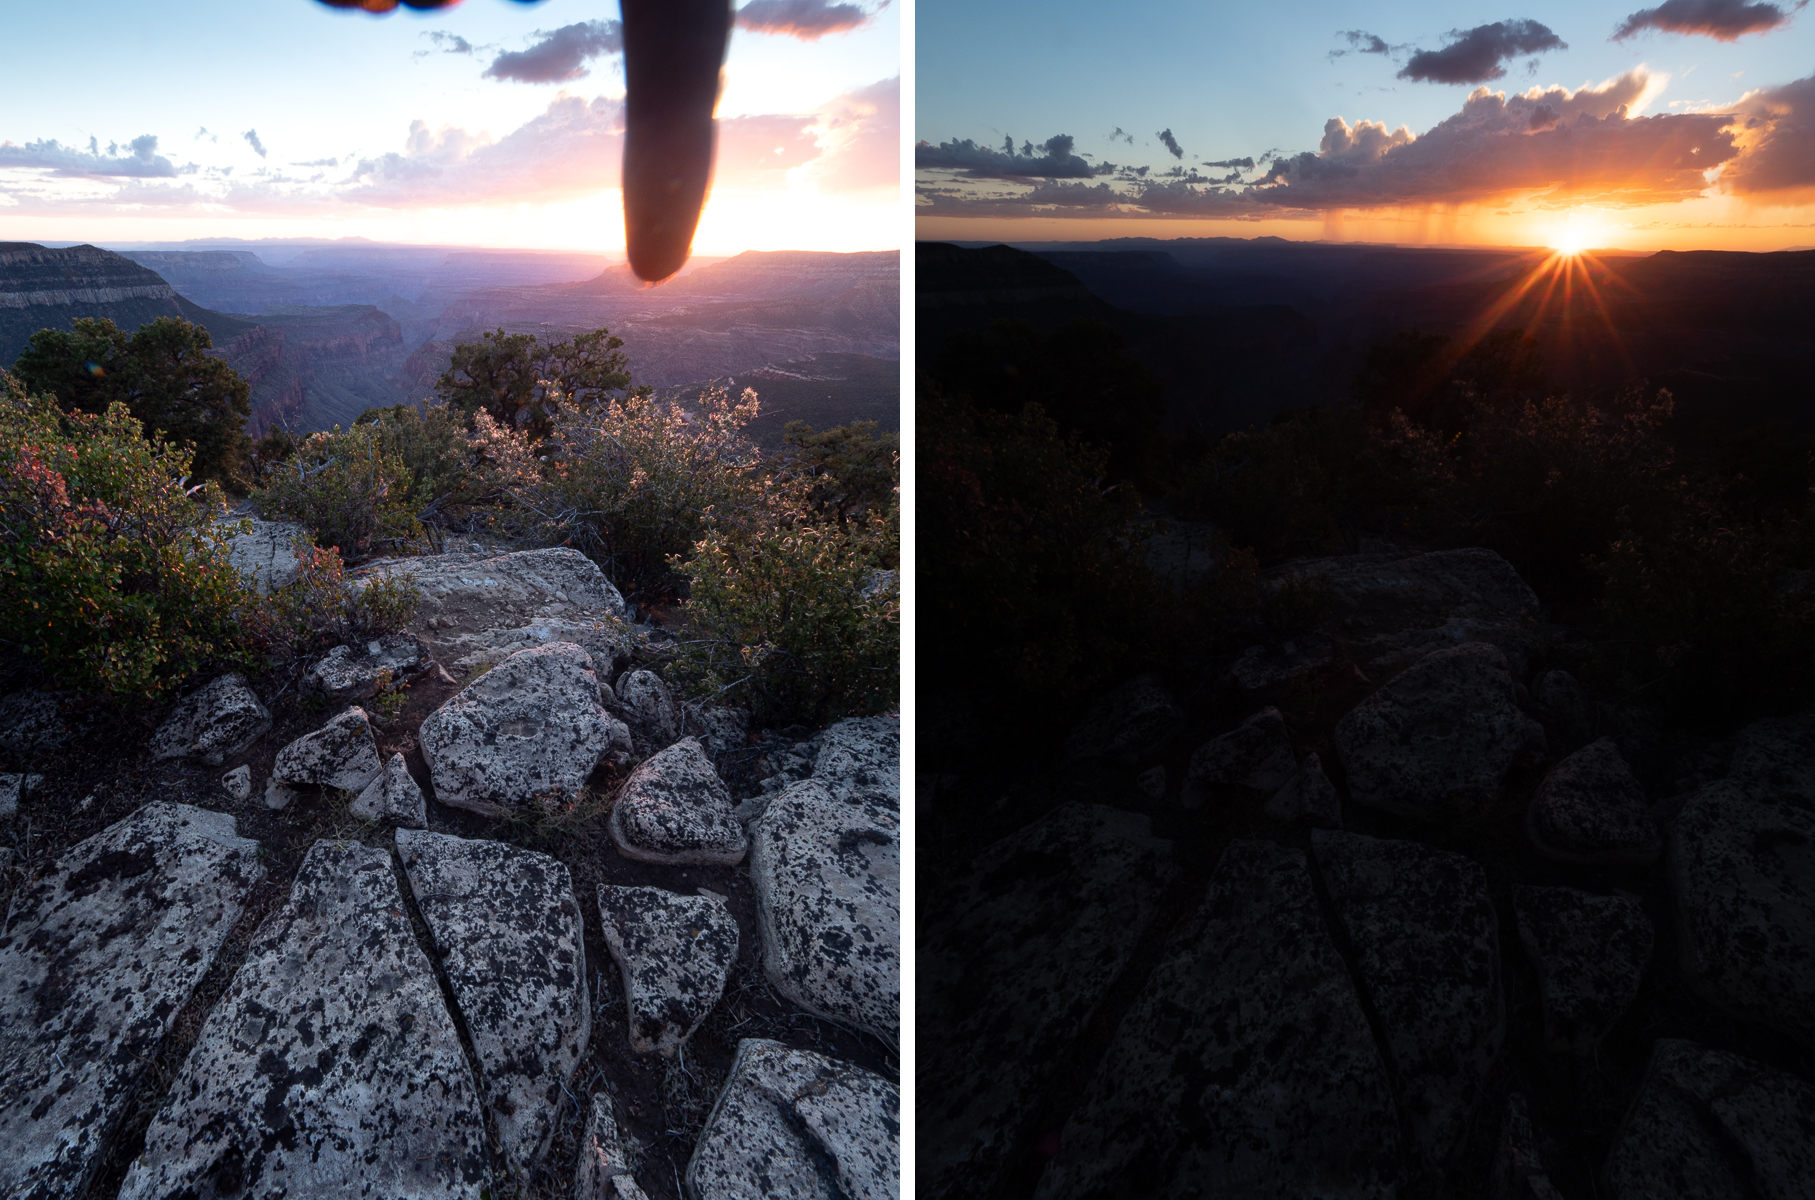
- Blend two images using the finger technique. This is my preferred method since it not only addresses the exposure challenges, but also reduces the lens flare artifacts. In the field, make a single frame exposed correctly for the foreground while placing your finger over the sun. Yes, that’s right. Make a photograph with your finger in it. The highlight alert will blink over your sky (since it’s overexposed). Ignore this for now. Immediately, make a second frame without changing your composition but remove your finger and expose correctly for the sky. Your foreground will look too dark. Ignore this for now. In processing, open these two photographs into layers in Photoshop (from Bridge, the command is Tools/Photoshop/Load Files into Layers in Photoshop). Arrange the layers so the dark one is on top (or vice versa). Create a mask, then Edit/Fill with black to hide the entire frame. Using a brush set to white (to reveal), paint in the darker sky into the lighter frame (or vice versa). Make sure you’ve painted out your finger such that is it not visible in the final image.
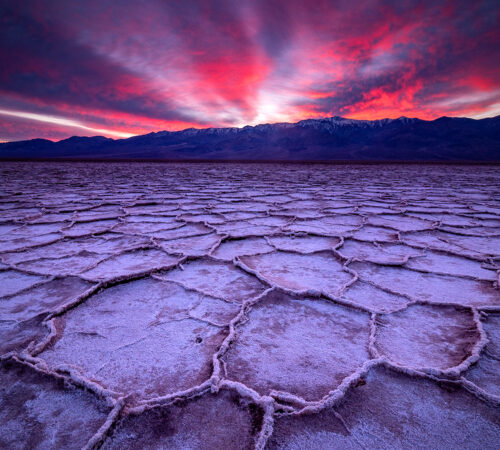
Now, you might go through all or any of these three steps and still see blinkies in the sun on your camera’s LCD. Here’s the thing: the sun a thermonuclear explosion in the sky. It’s kinda bright. If the area around and on top of the sun blinks a little, that’s OK. What’s acceptable? Everyone will have a different opinion on this (and that’s OK too!). If you evaluate the sun in my image at the top of this post, you’ll note there’s no detail in the sun itself or in the clouds surrounding it. That’s what acceptable looks like to me. It’s all about balance–balancing the highlights and shadows in a backlit situation.
As with much of photography, experimenting with different lenses, exposure settings, and scenarios will help you master this skill. Keep practicing! Once you get a handle on photographing sunbursts, burst with more joy and more light by photographing other light sources, like street and house lights at dawn or dusk and even stars through a telescope! Happy shooting!
Be well, be wild,
~Bubbles
Have a question about photography, art, and/or the creative life? Need some advice? Looking for inspiration? Send your question to Dear Bubbles at [email protected] to be possibly featured in a future column post. (If you’d prefer a different display name than your real first name, please include your preferred nickname in your note.)

Choose Wisely

One Comment
Pingback: