Another Dose of Depth of Field
Dear Bubbles:
Could you please explain this depth of field and hyperfocal business to me ONE more time? Thank you!
~Still Don’t Get It
Dear Still Don’t Get It:
An abundance of unscientific evidence has proven that in order for one to understand depth of field and hyperfocal, one must bang his or her head into a wall at least 11,723 times. Chanting the string of apertures in order over and over while spinning yourself around and snapping your fingers also appeases the depth of field gods. Making a daily offering of tater tots probably wouldn’t hurt either.
Truth be told, depth of field and hyperfocal are arguably among the most confusing concepts in photography. It took me at least two years to sort out. Even then, when I started teaching it in 2009 (which was 8 years after I first heard of the notion), I still occasionally mixed things up. It wasn’t until 2013 when I could say with confidence I had it figured out.
So, Still Don’t Get It, it’s OK if you don’t have a firm grasp on it yet. Keep trying! One day, it’ll click in your brain. You’ll sing. You’ll dance. And you’ll get to keep all those tater tots for yourself forever and ever. It’s worth the wait, trust me.
Let’s start at the beginning…
The Oxford Dictionary defines depth of field (DOF) as “the distance between the nearest and the furthest objects that give an image judged to be in focus in a camera.” That’s a direct quote. I copied and pasted it. I have absolutely no idea what that sentence means. I’m not even sure it is a sentence. And I understand depth of field. Maybe I should get some more tea before we continue…
(Dear Oxford, That was not helpful! Thanks, Bubbles)
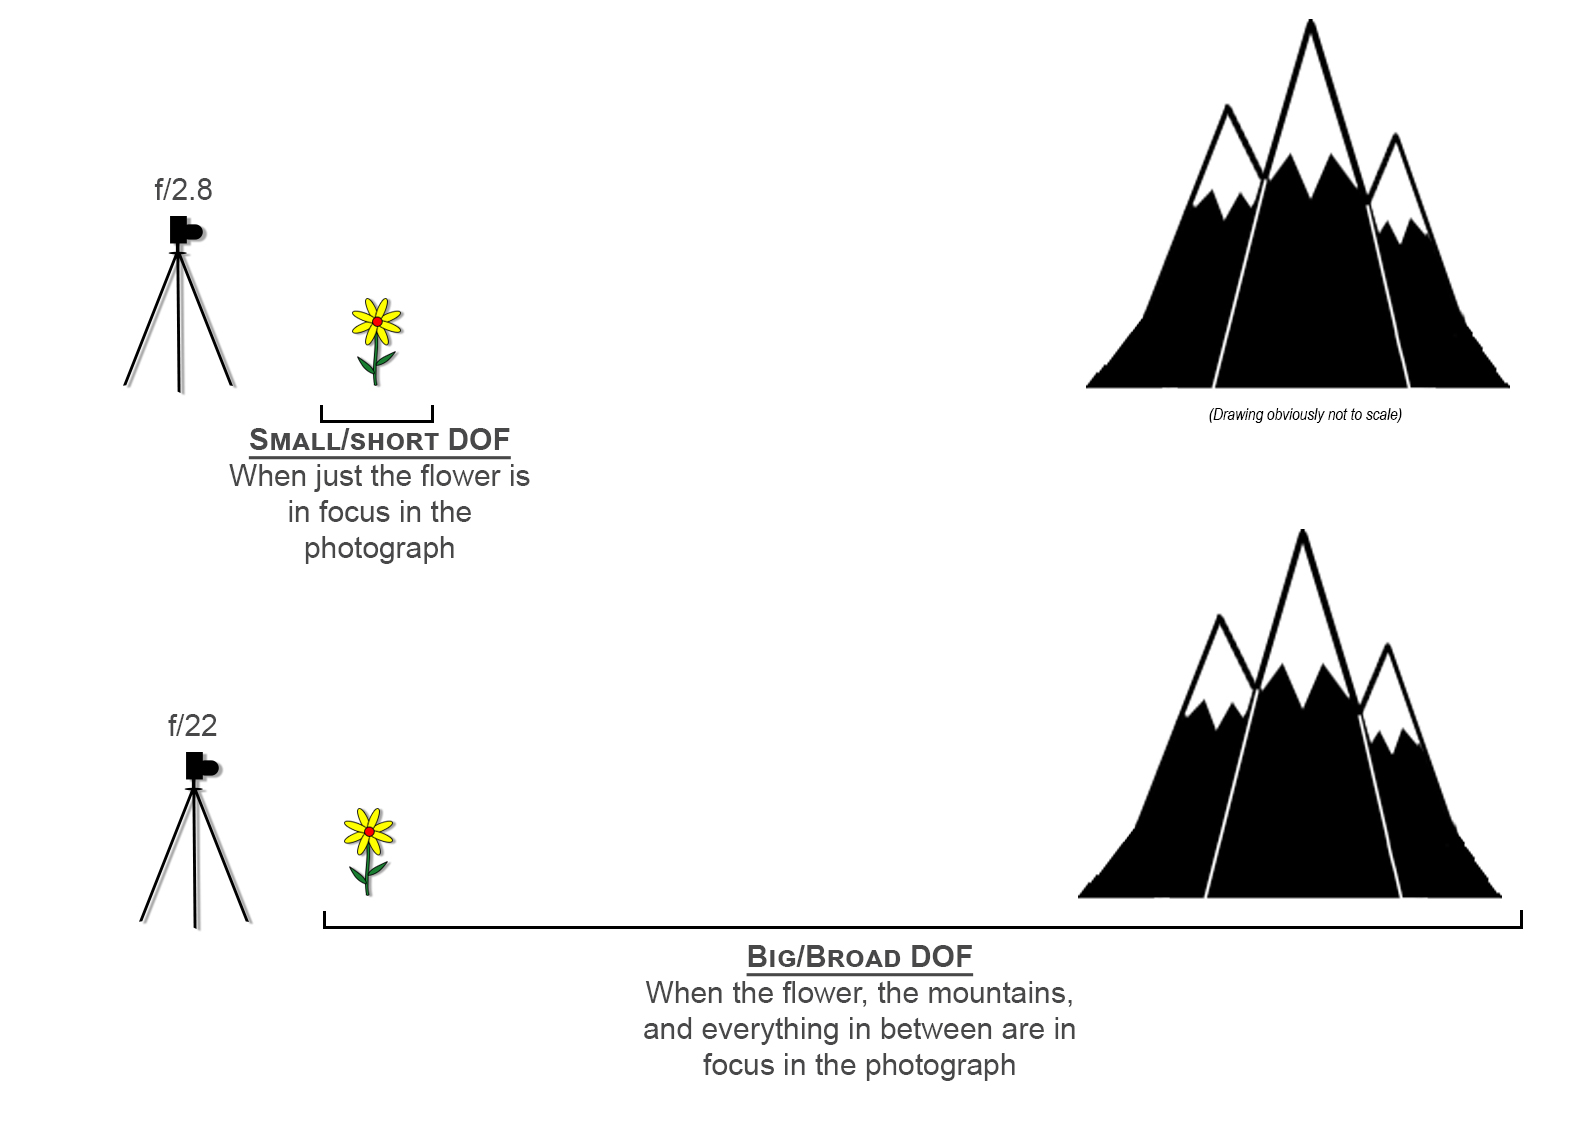
Here’s my definition: depth of field is how much of an image appears to be in sharp focus. Sharpness appears at a close point and disappears at a far point in a photograph. The space in between is called “depth of field.” This area is measured in the same way we measure distance, in inches, feet, meters, etc. An image that shows a small part of an image in focus is said to have a small, or short, depth of field. An image that displays everything in focus has a big, or broad, depth of field.
 A photographer can modify the DOF, or how much of an image is in focus, in three ways:
- Change the aperture. Smaller number (i.e., f/2.8, f/4), smaller depth of field. Bigger number (i.e., f/16, f/22), bigger depth of field.
- Change the camera-to-subject/focus distance. The closer you position your camera to an object, the shorter the DOF for a given aperture. The farther away you place your camera from an object, the broader the DOF for a given aperture. For example, assuming an f/8 aperture, if you focus on a flower 2 feet away, your depth of field will be much shorter than if you focus on mountains 200 feet away.
- Change the focal length of the lens. Wide-angle lenses possess much broader DOF at a given aperture than telephoto and macro lenses (thanks to physics and how lenses are manufactured). An f/8 on a 16mm lens renders much broader DOF than a 400mm.
These are listed in the order I perform them when I’m standing in front of a scene. By the time I decide on technical settings, my composition is already set. This means I’ve already positioned myself and selected my lens’ focal length to create the arrangement I want. Any changes in these two affects my composition. I don’t want to do that unless I can’t find an aperture to render the DOF I wish. If I can’t manage to get a broad enough DOF, for example, I might back up two steps and try again. If I still can’t get what I want, I change to a wider-angle lens (if I have one). And if I still can’t get what I want, I write a letter to Santa Claus in hopes he’ll bring it to me. (He prefers offerings of snickerdoodle cookies, in case you ever need to go this route…)
Landscape photographers often wish to render extensive DOF in their images, where everything from the foreground to the background appears to be sharp. To achieve this, we must consider the “hyperfocal distance” (or “hyperfocal” for short). The hyperfocal distance is the point at which you MUST focus at such that everything from approximately half the hyperfocal distance to infinity is acceptably sharp. Focusing at the hyperfocal distance produces the maximum depth of field for a given aperture, lens, and subject-distance.
Hyperfocal is a set and calculated number. The formula, for those who like to geek out like I do, is:
Hyperfocal Distance[mm]
=
(Your Lens’s Focal Length[mm] * Your Lens’s Focal Length[mm]) / (Aperture * Circle of Confusion[mm])
(As an aside, circle of confusion is aptly named. I’ve never been able to clearly articulate its definition, but I’ll give it a go here. It’s the size of the circle cast by light converging on a camera’s sensor. It’s a dot, really. It’s so small, it’s measured in millimeters. For those who wish to look up the size of their camera’s circle of confusion, check your camera’s specifications or visit https://www.dofmaster.com/digital_coc.html. Each camera differs. Most digital cameras fall in the 0.01-0.03mm range. My Olympus OMD EM1 Mark II has about a 0.015mm circle of confusion. The only reason you would ever need to know this is if you wish to scare off all your non-photographer friends at a cocktail party with this completely random useless knowledge. Maybe even your photographer friends too. Don’t be surprised, though, if they come up with their own definition for it–and you–while they sit in a circle and stare at you in confusion.)
Back to math! So the hyperfocal distance for my 16mm lens when it’s set to f/8 equals (16×16)/(8*.015) = 2,133mm or 7 feet.
Now, good news! You do not need to do this calculation every time you want to make a photograph. I mean, if you want to, knock yourself out. As is commonly said, though, “There’s an app for that!”
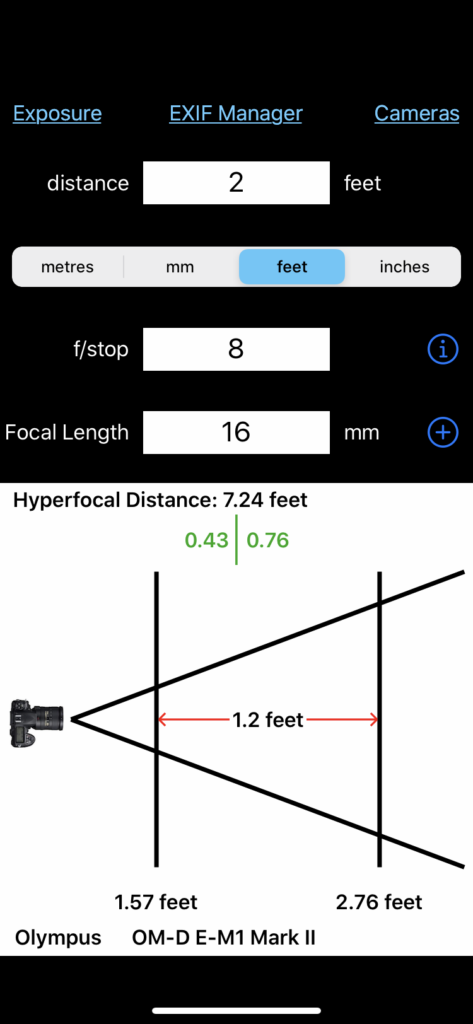
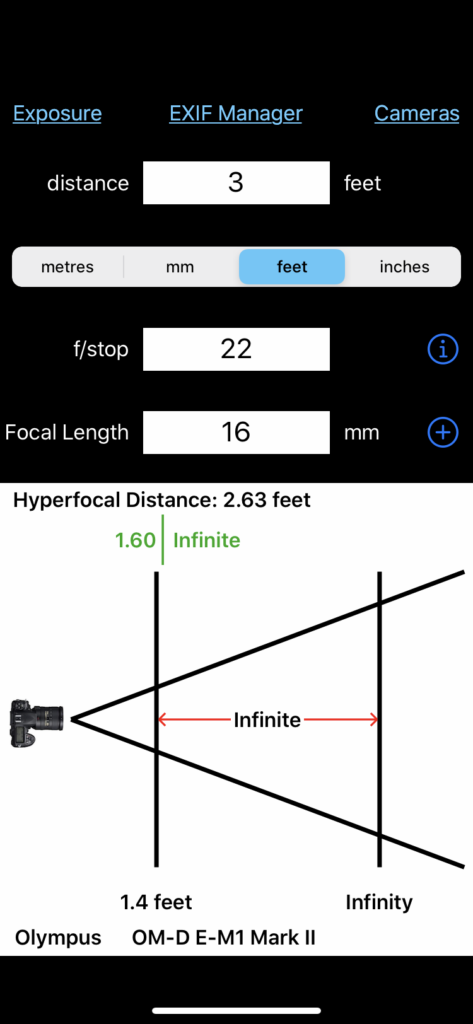
There are many DOF apps on the market, and they all do the same thing with slightly different interfaces. I use DOF Calc: https://apps.apple.com/us/app/depth-of-field-calculator/id356339910. (see photo on the right for its display). Pick one and go with it. Math is math.
In my app, I first select my camera, which sets the circle of confusion. I ignore the Distance field for now (type whatever number you want into it). I enter my f/stop and focal length of my lens (whatever I’m set at for my composition), and boom! It spits out the hyperfocal distance.
For my 16mm lens set to f/8, my app says the hyperfocal distance is 7.24 feet. (The 0.24 variation from my manual calculation above is likely due to rounding with the circle of confusion.) To make this easier on all of us, I’m going to stick with my 7 feet for the next example.
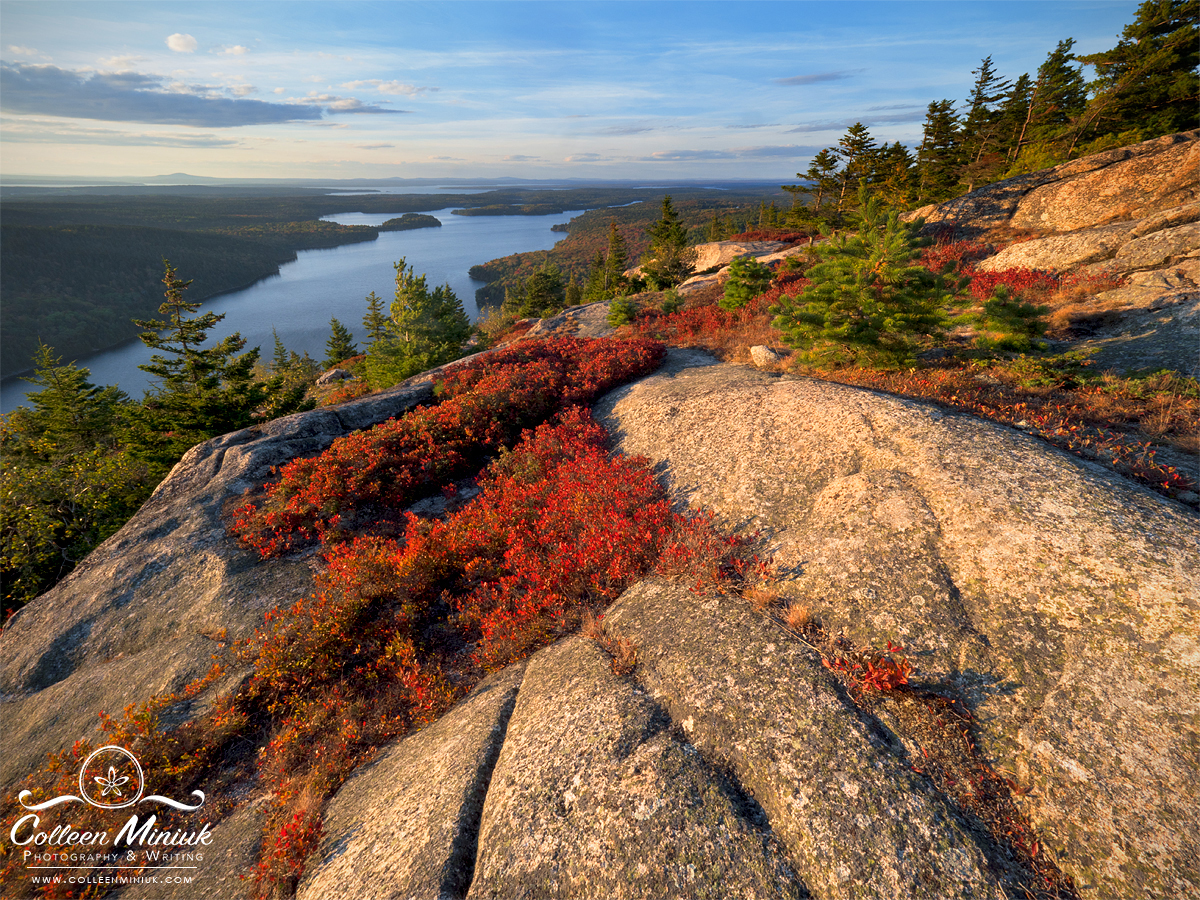
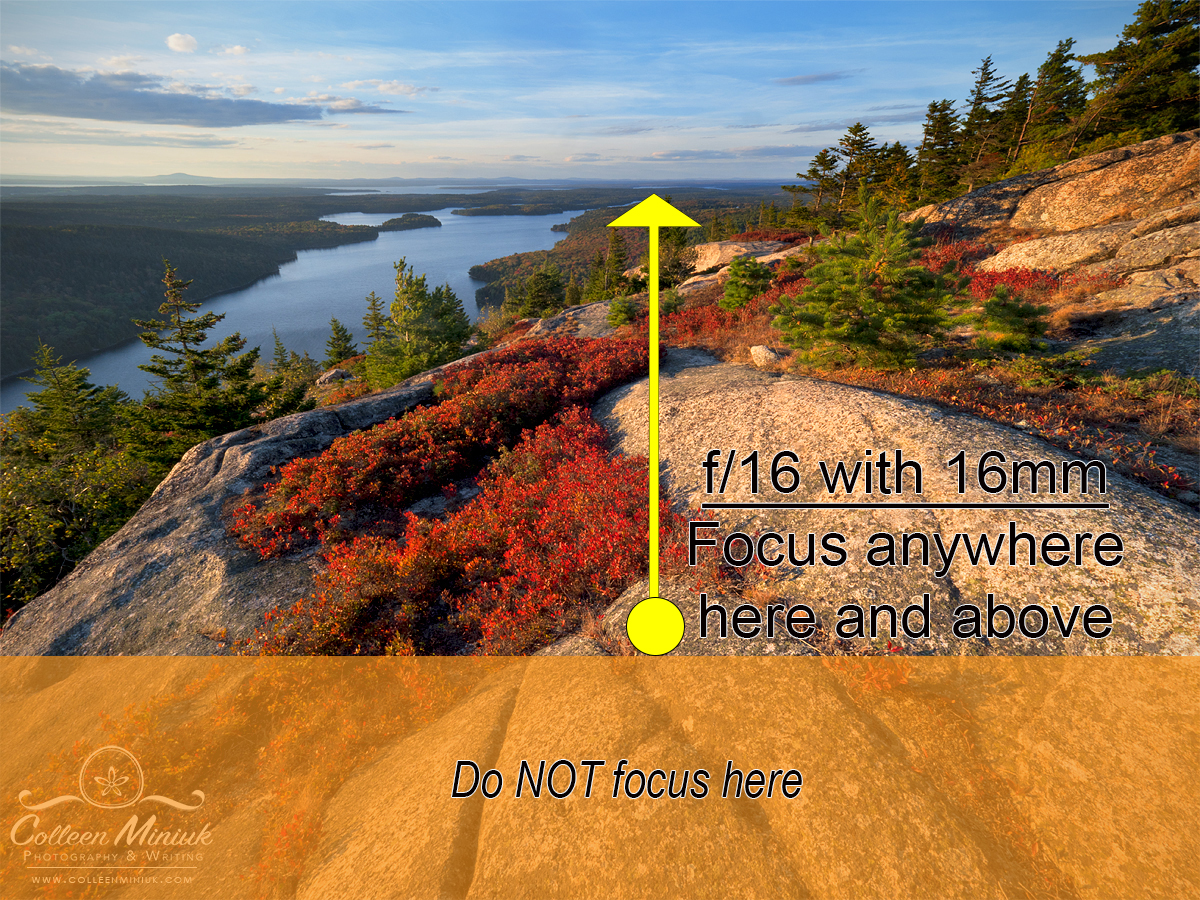
Let’s say I’m standing on Beech Mountain in Acadia National Park in Maine. I have a lovely composition set-up as seen at the top of this post. Knowing the hyperfocal distance helps photographers answer two questions:
- What aperture do I need to set?
- Where do I position my focus point?
The answers depend on how much DOF you want to depict. For my Beech Mountain image, I want everything in my picture in focus. To get that, if I’ve set my aperture at f/8, I MUST focus at 7 feet in order for half that distance—3.5 feet—to infinity to be in focus in my photograph.
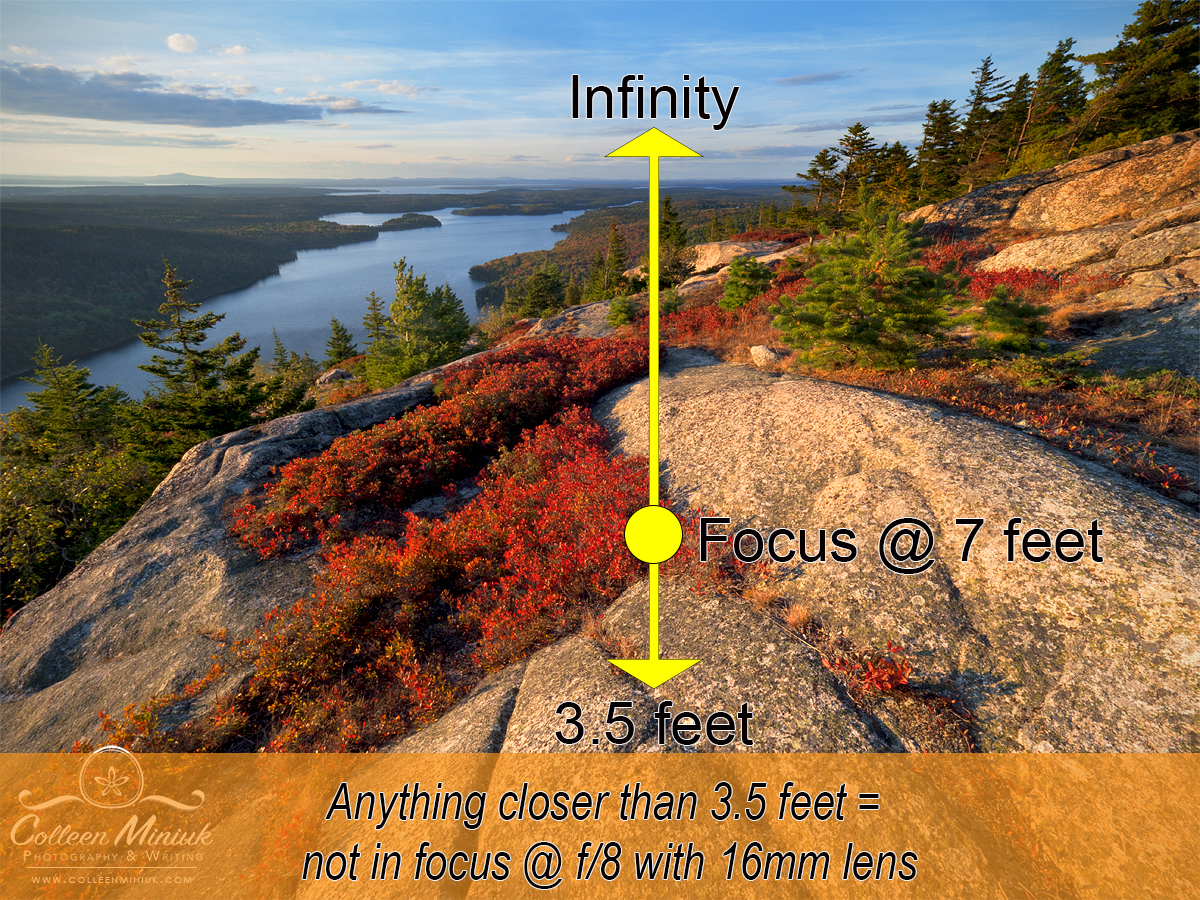
That’s fine and dandy, but I want the rock in my foreground that’s 2 feet away in focus. With a 16mm lens set to f/8, it ain’t gonna happen. Time to make some choices! And there are several viable options…which perhaps makes this more complicated.
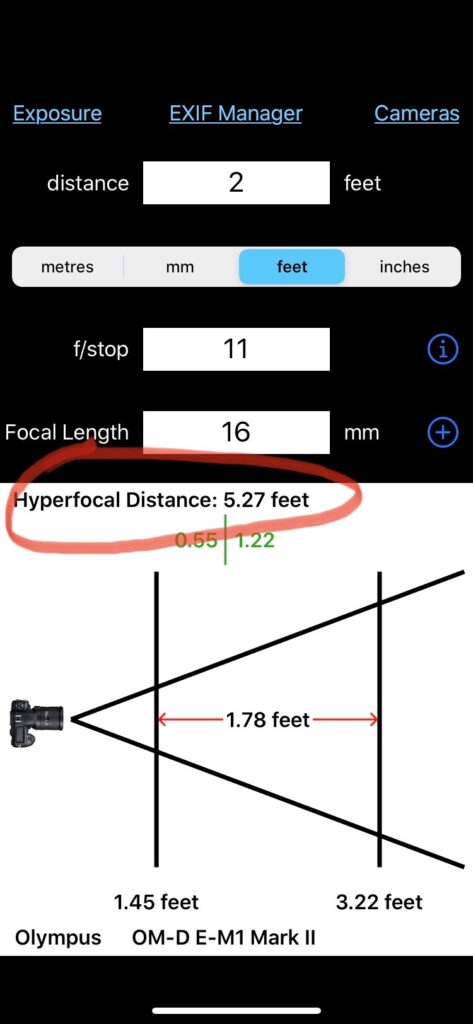
As indicated earlier, the first thing I’ll do is change my aperture. If I need a broader depth of field, I switch to a bigger number. Let’s plug in f/11. The hyperfocal changed to 5.27 feet. If I focus there, everything from 2.6 feet to infinity will be in focus. My rock hasn’t moved. It’s still at 2 feet. An f/11 aperture does not produce a broad enough range to get the depth of field I need for my scene.
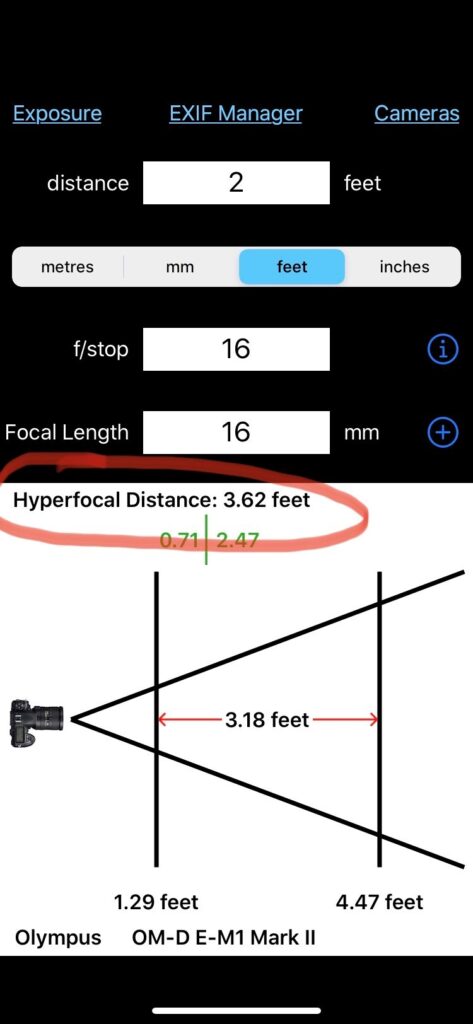
So I try f/16. The hyperfocal moves to 3.62 feet. Half that distance is 1.81 feet. My rock is now in focus IF I focus at 3.62 feet. Not at 1.81 feet and not on the rock directly. I must position my focus point beyond the rock (either through autofocus or manual focus). So f/16 focused at 3.62 feet (say, 4 feet) while standing 2 feet away from my rock is a right answer.
What if, for whatever reason, I was absolutely set on using f/8 with my 16mm lens for this photograph? Maybe I needed that setting to depict a certain type of motion, and thus had a specific shutter speed in mind that required an f/8 setting to get a correct exposure. I still want my rock in focus, though. I could take two steps backwards until the rock was at least 3.5 feet away from my camera lens. I’d focus at the hyperfocal we originally calculated: 7 feet. Moving back changes my composition slightly, but now I’d get it all in focus. I’d have it all! Mwhahahahahahaaaaaaa! Oh, sorry…all this DOF talk gets me excited…
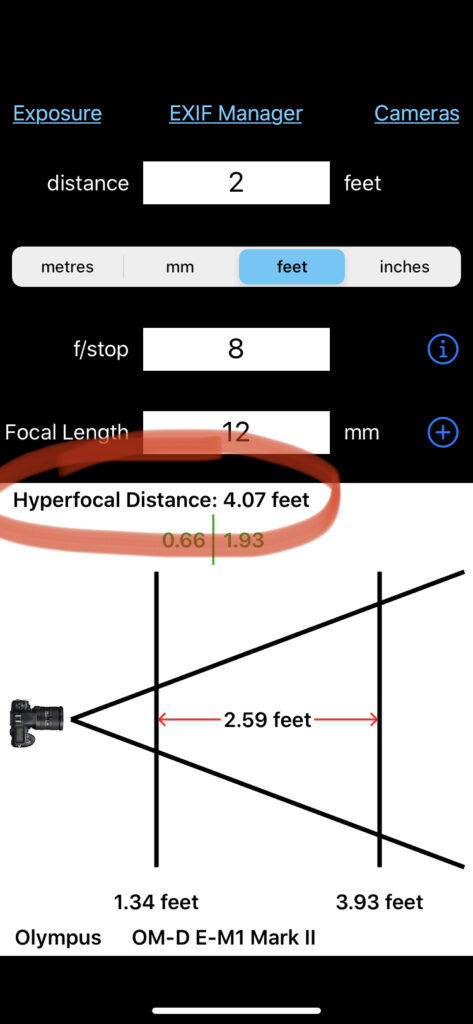
I could also choose to not move, still use an f/8, but switch to a 12mm lens. The hyperfocal distance for that combination equals 4.07 feet. If I focus at 4.07 feet, then everything from 2.04 feet to infinity would be in focus. Close enough. I mean, what’s 2 feet versus 2.04 feet? (Um, well, 0.04 feet, Bubbles!) We’re talking less than a half an inch. I can live with that. And if I couldn’t, I move my tripod back a half an inch or more to be sure. So f/8 with a 12mm lens focused at 4.07 feet would work too.
Now there’s another way to approach this, and it involves that Distance field I told you to ignore earlier.
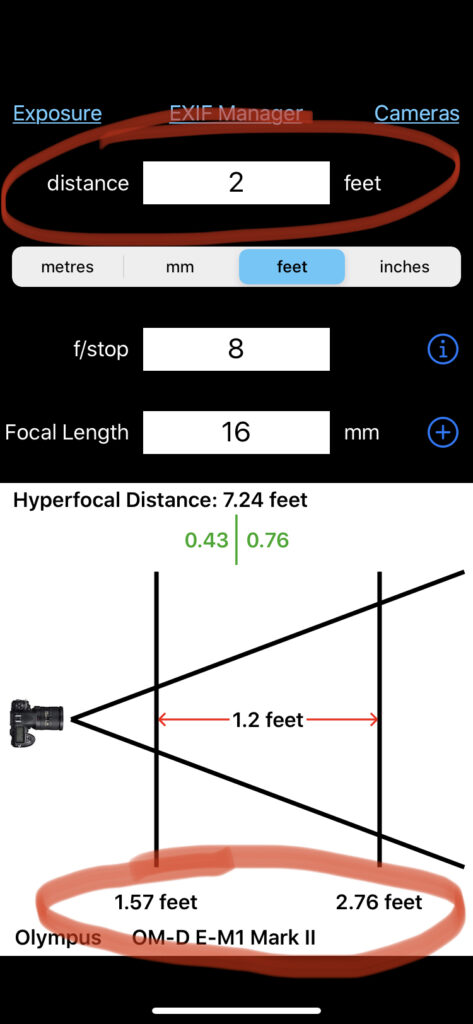
I reset my settings in the app to f/8 and 16mm. I type in “2” into the Distance field, which represents the closest object I want in focus in my composition—my rock sitting 2 feet away. Then I pay attention to additional numbers appearing on my iPhone’s screen, specifically the near point and the far point of the depth of field shown at the bottom (the location of yours will vary depending on the app you have).
If I focus at 2 feet (which is what you’ve just told the app you were going to do by entering a distance), my near point lists 1.57 feet, my far point at 2.76 feet. If I focus on the rock, at 2 feet, my depth of field will be a whopping 1.2 feet. My rock will be in focus, but not much else.
Remember, no matter where I decide to focus, the hyperfocal for a 16mm lens set to f/8 is still 7.24 feet. I MUST focus at 7.24 feet if I want everything from half that distance to infinity in focus. So if I want something that’s 2 feet away in focus, I MUST change my aperture, my subject distance, or my lens.
If I change the aperture to f/22, the hyperfocal changes to 2.63 feet. If I focus at 2.63 feet, everything from half that distance to infinity is in focus. If I focus at 2 feet, on my rock, I’ll get 1.14 feet to 8.32 feet in focus. That’s all. All I have to do here is not focus at 2 feet, but rather 3 feet. Change the Distance field to 3 feet to see what happens. Now my near point is 1.4 feet, and my far is infinity. So f/22 focused at 3 feet is another right answer. Problem solved.
For the Beech Mountain photograph, I settled on f/16 with my 16mm lens (with a hyperfocal distance and thus a focus point of 3.62 feet).
Because the hyperfocal distance varies based on your aperture, focal length of your lens, and camera model, it is possible that you might need to focus behind or in front of your subject—and not on your subject—to get your desired depth of field. If you are to err in positioning your focus point, err long. Move your focus point away from you. Do not position it close to you. Remember, focusing closer shortens your DOF.
You might be thinking, how in the hell am I supposed to know what 3.62 feet is? You aren’t. No one does. Give it your best guess. Or you can pick up a laser measuring tool at a hardware store to help you in the field.
You may get into situations moving so fast that checking your DOF app and doing all this math isn’t practical. Some photography instructors suggest if you place your focus point approximately one-third of the way from the bottom (think: the bottom horizontal line of a tic-tac-toe grid), then you should be fine. With a wide-angle lens positioned low to the ground with very close foreground (called “forced perspective”), this rule-of-thumb does not work. You will not be fine. Your foreground distances are too close to the camera. Focusing that close results in short of DOF and blurry backgrounds. It’s safer to focus right smack in the middle of the frame (if you aren’t able to use the DOF apps to assist you more precisely.)
After you’ve put all this effort into getting your focus and depth of field dialed in, don’t walk away from your composition until you know for sure it’s right. Use your Depth of Field preview button if you have it on your camera. Turn on the focus peaking functionality if you have it. (My Olympus sparkles yellow at me when things are in focus. It’s delightful!) Take multiple frames at different focus points to cover yourself or to enable focus stacking in processing later.
As you’re learning depth of field, you may find it helpful to make multiple frames of the same composition at different apertures to see the effect on your image. Work through different scenarios with a DOF app. Be intentional with your focus placement. And expect to mess it up along the way. A lot. Just keep trying. And learning. You can do it! For love of the tater tots!
Be well, be wild,
~Bubbles
Have a question about photography, art, and/or the creative life? Need some advice? Send your question to Dear Bubbles at [email protected] to be possibly featured in a future column post. (If you’d prefer a different display name than your real first name, please include your preferred nickname in your note.)

Get Your Ikigai On


One Comment
Pingback: