Becoming One with the Right Tripod
Dear Bubbles:
One of your timely statements was that we should try to become one with our tripods. What type of tripod is worth becoming one with?
~ Lari
Dear Lari:
Ah yes, tripods get no love. Of all the pieces of photography-related gear, tripods are the one piece of equipment that gets cursed at the most. Threatened even. I mean, who hasn’t been tempted to throw theirs in a lake at some point?
Don’t lose hope! There is a tripod out there that’s a perfect match for you. Yes, you really can be one with a tripod. It just takes patience, research, and testing to find the right one for you.
When I first started taking photography classes, I walked into a camera shop and asked for a tripod that could hold my brand new, shiny Minolta Maxxum 5. I don’t remember having much discussion about it. (It’s not like I had any clue what to ask for.) The clerk handed me a box. I handed him money. I went home, tried it, and the cursing began immediately.
You know the tripod I’m talking about: the cheap, flimsy, plastic tripod with a geared center-column, braced legs, and long single handle on the head (which I call the throat choker because every time I bent down to look at my camera’s viewfinder, the handle would jab me in the Adam’s apple. Every. Single. Time.). Based on the number of times I see new photographers with this same tripod, it’s almost a rite of passage to get this type as our first tripod. It’s a bond many of us share…
This initially annoyed me. Why would anyone sell us these P.O.S.’s? Then I realized they were doing us a favor. It’s important to know what you want out of a tripod before you drop a bunch of cash on it. (They aren’t cheap…) That’s difficult to define immediately after purchasing your first camera. What better way to learn that than to know exactly what you don’t want?
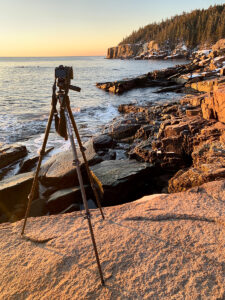
It took me wading through hundreds of options my students brought with them on my workshops and purchasing three tripods systems of my own over the course of many years to get a set-up I felt comfortable with. I use (and having been using for many years now) a Manfrotto carbon fiber three-section tripod with horizontal center column (MT055CXPRO3) with a Manfrotto grip ball action head (322RC2). I love it mainly because it doesn’t get in my way when I’m out creating photographs.
Before we get too far, though, some of you might be thinking, “But Bubbles, why do I even need a tripod?”
The technology for image stabilization (some camera manufacturers call this “vibration reduction”) has evolved tremendously over the years, allowing photographers to handhold their cameras down to slower and slower shutter speeds. Back in the film-only days, to prevent camera shake and thus blurry images, the general rule of thumb was that we shouldn’t handhold our cameras if our shutter speed was slower than 1/focal length of your lens. So if you were shooting a 400mm lens, you shouldn’t handhold 1/400th of a second or slower. If a 24mm, then 1/25th of a second or slower. Image stabilization functionality now provides up to five-stops of extra leeway with this.
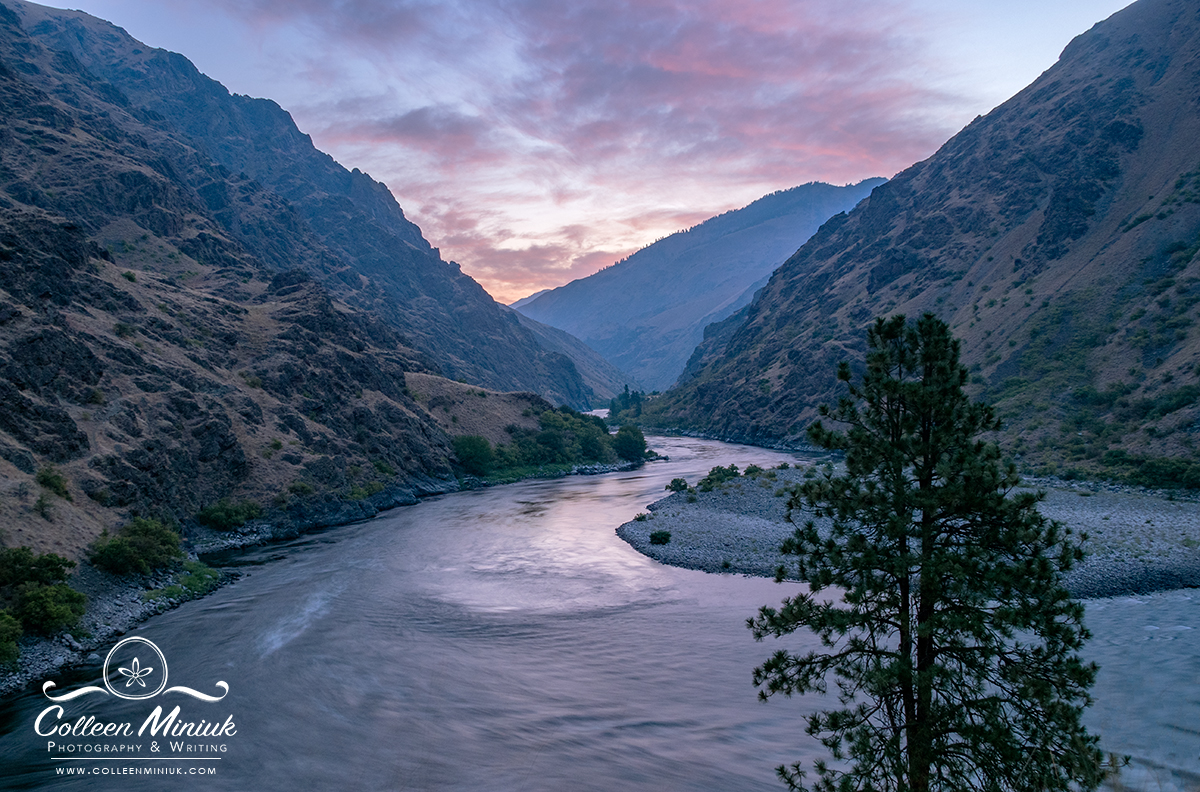
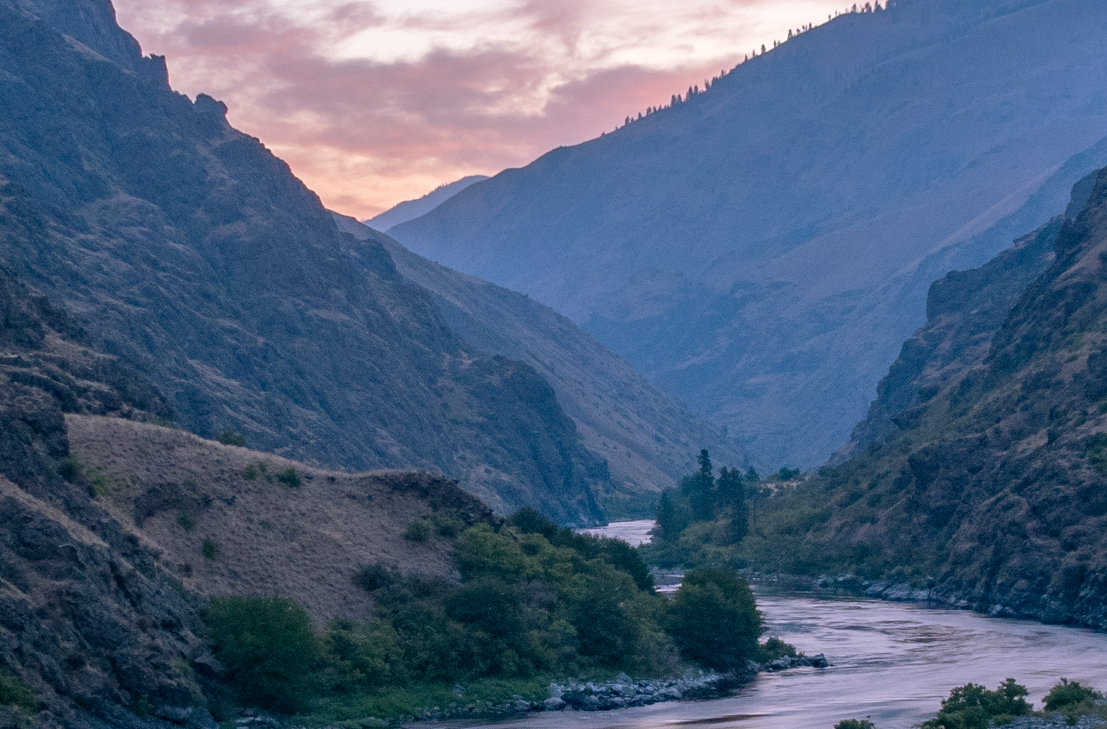
Case in point: In August 2019, I attended a writing workshop on the Snake River on the Idaho/Oregon border. On it, I wanted to focus my creative energies on writing. I knew if I brought all my camera gear that I’d feel more inclined to fall back on my normal habits of communicating a story visually. So I left my tripod at home. On the first morning of our trip, we walked to the top of the nearby plateau to watch the sun rise. Yeah, you know what happened…a gorgeous sunrise over this beautiful and tranquil scene of the Snake River twisting through Hells Canyon. I had to make an image of it. In the absence of my tripod, I set my camera to continuous drive/shot mode, which would snap multiple images so long as I kept the shutter depressed. From previous experience using this technique in street photography scenarios, I knew the middle frames usually ends up sharper than the first and last ones. I rested my mirrorless camera on my knees, held my breath, and stayed as still as possible for the four-second exposure (at ISO 400 and f/6.3). To my surprise, the third frame within the sequence of four was tack sharp. After handholding for four seconds!
Wait, I’m supposed to be convincing to use a tripod…Right! OK! If image sharpness is important to you, I can’t recommend relying upon this hold-your-breath-and-pray-the-image-comes-out technique as a standard practice. It’s risky at best. And bad for the nerves.
This is where a tripod comes in. A tripod stabilizes your camera gear, which is especially useful during longer exposures resulting from shooting in low lighting conditions (like sunrise, sunset, twilight, and night) and using neutral density filters. It’s also helpful in keeping compositions consistent from frame to frame as required by multi-image high-dynamic range imaging, focus stacking, and creating panoramas. In addition, carefully-positioned tripods have enabled me to make images blind at awkward angles, high and low.
You may have heard people say one of the benefits of tripods is that they get photographers to slow down. That’s true. I’ve seen a lot of photographers inadvertently slowed by fumbling to extend their tripod legs and struggling to position their ball head to their liking. And cursing. Lots and lots of cursing. Kicking too sometimes. How is this helpful to anyone’s photographic process?!?
Gear shouldn’t slow you down (or make you insane). Gear like tripods should support your efforts to make images, not put a barrier in between your enthusiasm over what you see and clicking the shutter. If you’re banking on a tripod to help you “slow down” (which really means becoming more aware of your surroundings, connecting on a personal level, and composing your scene accordingly), well, you might consider rethinking your approach. Similarly, if you’ve ever found yourself saying “I’m too impatient to use a tripod,” it’s because you have the wrong one.
I mostly photograph things that aren’t moving real fast—rocks, trees, flowers—so I usually have time to setup. I won’t use a tripod if I’m photographing wildlife; panning the camera or using other intentional camera movement techniques; or acting sly on the street for people photography—basically any time I aim to record a fleeting moment that won’t last long enough for me to setup.
Now, not all tripods are created equal and there are so many options out there, many of which look the same. A tripod worth becoming one with should:
- Support the weight of your gear.
- Last longer than a month.
- Not break the bank.
- Not break your back or your knees.
- Not make you crazy. (Well, any crazier than you already are…)
I haven’t tested all the tripods ever created so I won’t pretend to be an expert. Plus everyone likes and needs something different. Rather than recommend specific brands (which would be similar to me telling you my exposure settings for a photograph but not telling you why I chose them), here are factors to consider when looking to become one with the right tripod:
- Tripod weight: What do you plan to do with your tripod? Hike long distances? Travel on planes with weight restrictions? How big of a load do you want to carry? Tripods made from aluminum construction tend to be heavier than those made from carbon fiber. Warning: you’ll get sticker shock when you see the price difference between the two. Is the extra money for a carbon fiber worth the reduced weight? If you plan to do mainly roadkill photography (pull your car over, get out, and shoot), then no. If you do any sort of walking, hiking, paddling, or other activity, though, absolutely yes. That pound or pound-and-a-half may not seem like much but just ask your knees and backs. They care. They aren’t getting any younger. Also, carbon fiber tripods tends to be stronger and weather-resistant. As such, they tend to have a longer useful life than aluminum. I’ve beat mine to hell for the last five years now. (It may look like it, too…)
- Load capacity/support weight: Can the tripod hold your camera plus your heaviest lens? Camera manufacturers provide weight information in their specs. My Olympus OMD EM1 Mark II is 1.27 pounds and my 300mm fixed lens is 3.27 pounds. So 4.54 pounds total. My tripod holds 19.8 pounds max. Overkill, yes, but I needed the extra flexibility in working height the tripod I eventually picked out afforded. You’ll also need a tripod head to support this same weight so your camera doesn’t slip during exposures…more on heads in a minute.
- Tripod height: Look for an adequate maximum working height without the center column extended. What’s adequate? It depends on your height. I’m six-feet tall. Bending down gets really old, really fast. That said, I try to photograph my scenes outside the “human zone” (which runs from about chest-high to head-high) to show my viewers a new perspective than they’d normally see standing up. So I usually shoot really low to the ground or high above my head. The tripod I use must support these extremes. The other height-related consideration relates to travel: how small does the tripod fold up when not in use? Will it fit in your suitcase? In the overhead bins on an airplane? Use measurements of these things to compare with a tripod’s folded, or collapsed, length to ensure its fit.
- Center column: A center-column can limit how low to the ground you can get unless it’s removable or adjustable. How low do you go? Shooting low provides an unusual perspective in landscape photography. It’s also sometimes essential in macro photography, especially when you’re photographing smaller things on the ground like small desert wildflowers, moss, or water droplets on leaves. BUBBLES! Confirm the tripod’s minimum working height matches what you’re likely to photograph. For me, the lower the better. In addition, some tripods come with a center column counter weight hook or a tripod stabilizing hook, where you can attach additional weight (e.g. tie down to your backpack) to the center column to make the tripod more stable. Not something that makes or breaks my tripod decision, but certainly a nice-to-have feature.
- Number of leg sections: Most tripods feature three or four leg sections. Those with fewer sections tend to yield greater stability. They also have fewer leg locks to manage. Those with more leg sections, though, collapse down to a shorter folded length, making them easier to travel with—which may or may not make any difference to you.
- Leg locks: Locks secure the leg sections into place. They come in two styles: flip and twist. I strongly prefer flip locks. They pinch me every now and then when I lock them in place, but few things on Earth make me as crazy as twist locks. I never know which direction to turn them. I know, I know, “righty tighty, lefty loosely.” That would require me to remember my right hand from my left, though, and well… Plus, if you twist the lock too much in the wrong direction, the leg literally falls apart. I never know how to put it back together. I’ll take an occasional pinch over that madness any day (which serves to remind me how grateful I am to not be using twist locks).
- Leg function: In landscape photography, we often set up on uneven terrain—hills, rocks, cliffs, and the like. When we do, our tripod should help us keep our camera level. To do so requires each leg moving independently of each other—not braced to the center column. The legs should also be capable of locking into multiple angles. This is sometimes referred to as “multi-angle leg locks” which are different than flip/twist leg locks. (Confusing, I know.) Multi-angle leg locks are located at the joint between a leg and the center structure. They’re like hip joints and move independently at different angles. My tripod allows me to splay the legs out (and adjust the center column) so it sits almost completely flat to the ground.
- Feet: Tripod’s shoes! Rubber feet can prevent the tripod from slipping on slick and wet surfaces. Metal spikes work best when you need more teeth to the grip on surfaces like sand, ice, mud, and rock. Some tripods come with one or the other. Some come with both. Some allow interchangeable feet. Not a deciding factor for me.
But wait! There’s more! That’s just the tripod legs. You have to put a head on it to make your setup functional. A tripod head attaches your camera to your tripod and enables you to adjust your camera in different positions atop the tripod.
Some tripods come with a built-in head (as with those cheap, flimsy, plastic tripods we all first bought). If you buy tripod legs and a head separately—recommended to maximize your flexibility in the field—make sure the screw type for the tripod mount and head are the same. The standard size is 3/8–16 (which means the screw is 3/8” inches in diameter with 16 threads per inch). When connecting the two, the tripod will act as the male; the head as the female. (You may see this reference in the specs). Screw adapters are available if needed to make this fit.
As with tripods, there are a multitude of head options:
- Pan-tilt: One or two long handles control the horizontal (pan) and vertical (tilt) movement of your camera. The throat chokers! Some suggest that by separating these movements, photographers gain greater precision in their placement. That may be true, but it doesn’t overcome their obvious shortcomings: slow to use, big to travel with, and have I mentioned they jab you in the neck?
- Ball: The head sits on top of a ball-and-socket joint where one or more knobs control the positioning of the camera in all directions. One knob usually locks down the movement (“main locking knob”), but fancier heads will have additional knobs for friction, plate movement, and pan movement. Simply put, I’m too stupid for knobs (in the same way I’m too dumb for twisting leg locks). I can never remember which way to turn them or which one does what function. They make me insane. But if the number I see on my workshops is any indication (by people who are obviously smarter than me), these are the most popular types of tripod heads.
- Gimbal: Used mainly by wildlife and sport photographers (on tripods and monopods), a gimbal head gives a photographer the freedom to smoothly pivot around an axis point to track moving objects with long, heavy telephoto lenses. Landscape photographers also use them, but they don’t provide the same precision control as other heads. Gimbals come in two types of mounts: side and cradle. Some people suggest cradle mounts are safer to use (you know, the whole gravity thing), but they tend to be heavier and more cumbersome to use than side mounted gimbal heads.
- Joystick/grip ball action: Also called a pistol grip, these heads typically use the ball-and-socket design but are modeled after the old video game joysticks (and aircraft joystick controllers). You squeeze the grip and pop the camera into whatever position you want. I have the grip ball action head by Manfrotto, which has the joystick capability on the side of the head, not the top of it. I chose this model over the standard joystick models because I didn’t want my camera to sit so high above my tripod legs when shooting horizontally or sticking out so far when shooting vertically—both of which would affect stability.
No matter the type of head you choose, it must support the weight of your camera plus your heaviest lens, as I mentioned in the Load capacity/support weight category above. Tightening the friction controls on the head can help prevent this to a degree, but buy a ball head that can cover your expected load by a few extra pounds just in case. (Mine holds 11 pounds. I never have trouble with my camera slipping.)
Tripod heads typically come with a quick-release plate, a flat metal platform that screws into the bottom of your camera and locks down in the base of your tripod head. Each manufacturer has their own style of plates for their tripod lines. I bought extra plates and attached them to my different camera bodies and lens collars (on my telephoto lenses) so I don’t have to keep screwing and unscrewing a single quick-release plate every time I wish to change gear. Make sure you can synch the connection tightly to your camera. Otherwise the camera will droop on the tripod, especially when shooting in vertical orientation.
An alternative to a quick-release plate is an L-bracket. An L-bracket looks just as it sounds. It’s an L-shaped platform that attaches to your camera. Unlike the standard camera plates, which only have one way to connect to the tripod head, an L-bracket has two connections available for the tripod head, one on each side of the L. So when a photographer wishes to change his/her composition from horizontal to vertical (or vice versa), you release the bracket, change orientations, and reattach to the tripod head without changing the position of the tripod head. When buying an L-bracket, be careful the plate doesn’t interfere with your cable release connection to the camera—or get a wireless remote or use the in-camera self-timer to trigger your shutter instead.
In case you aren’t already overwhelmed by the plethora of options out there for tripod legs and head combinations, alternatives to them exist, like monopods, car mounts, and pocket tripods. Evaluate these the same way you would tripod legs and heads: for weight, height, carrying capacities, functionality, and ease of use.
Once you find a tripod solution, take the time before you go out to photograph to set it up, take it down, set it up, take it down, set it up, take it down. Get comfortable with it before you have to rely upon it. (On some of my photography workshops, we even started having tripod races…). Becoming one with a tripod is not only feasible, it’s essential to keeping your images sharp, and more importantly, photography fun.
Be well, be wild,
~Bubbles
——————————————————-
Have a question about photography, art, and/or the creative life? Need some advice? Send your question to Dear Bubbles at [email protected] to be possibly featured in a future column post. (If you’d prefer a different display name than your real first name, please include your preferred nickname in your note.)

Keeping it Fresh